Our short answer: Check ink delivery, nozzle output, and printhead capping every workday. Clean the printhead interface weekly, service the cap, wiper, and belt area every 15 days, and inspect the encoder strip and guide rail roughly monthly. When a symptom appears, identify the affected system and use the replacement criteria below.
Printable Eco-Solvent Printer Maintenance Checklist
Printer / serial number: ____ Week beginning: ____ Operator: ____
Print this table and keep it by the machine. Enter a date and initials for each completed task; use the last column to record a failed check or service ticket. We use the intervals from our eco-solvent maintenance manual as the starting schedule.
| Frequency | Task | Pass / action required | Date, initials, or notes |
|---|---|---|---|
| Start of shift | Check waste-ink level and visible ink tubes. Print and save a nozzle test. | Waste ink below red line; continuous ink column; test pattern recorded. | ____ |
| End of shift | Print a nozzle test and park the head over the cap. | Test compared with startup; head centered on and sealed by cap. | ____ |
| Every 7 days | Clean the printhead interface with a dust-free cloth and approved eco-solvent solution. | Surface residue removed; fresh nozzle test recorded. | ____ |
| Every 15 days | Clean the cap and wiper with pure water; inspect both contact edges. | Cap seals; wiper edge is straight and flexible. | ____ |
| Every 15 days | Inspect and lubricate the specified belt/gear contact points. | Belt runs smoothly; lubricant stays off sensors and media. | ____ |
| Every 3 weeks to 1 month | Clean the encoder strip with a little alcohol on a dust-free cloth. | Strip clean and undamaged; horizontal test aligned. | ____ |
| About monthly | Clean and oil the guide rail with the specified sewing-machine oil. | Carriage moves smoothly without excess oil. | ____ |
| Yearly | Inspect power cord and socket. | No heat damage, cracking, or loose connection. | ____ |
| Planned idle period | Confirm cap seal; schedule cleaning every two weeks around a month idle. For three months or more, arrange ink-path and head preservation. | Preservation dates and restart test recorded. | ____ |
If the nozzle test remains incomplete after three Weak Clean cycles, stop repeating the command and contact our technical team. Keep the first and last test strips; they show whether the pattern changed. The steps below explain how we inspect each system and when a worn part needs replacement.
A missing nozzle line can follow poor ink flow or a cap that failed to seal. A horizontal registration error directs us toward the encoder strip or belt. We use each observation to choose the next check.
This routine applies to the eco-solvent printers covered by our general Maintenance and Instruction of Eco-solvent Printer (Only for Eco-solvent) manual. Use the installed machine’s access and safety instructions for disassembly and powered service. For DTF, UV, and water-based machines, use their own fluid and maintenance procedures.
What Do We Check Before the First Print?
We begin with three observations that cost little time: waste ink, the visible ink column, and a nozzle test. They tell us whether the machine is ready to produce or whether we should stop and inspect an upstream problem.
1. Waste ink: act at the marked line
The manual says to check the waste-ink container daily and clear it when the ink reaches its red line. Do not wait for an overflow or use the fill level as a guess about nozzle health. Empty or service the container using the machine’s waste-ink procedure and the local rules for handling used ink.

The red line is the inspection trigger shown in Xinflying’s eco-solvent maintenance manual.
2. Ink tube: inspect flow before blaming the head
The manual asks operators to check for air in the ink tube. Its photo shows an interrupted-looking ink column and warns that ink in the tube or tank may have coagulated, restricting flow. Our advice is to treat that appearance as a reason to investigate, not as visual proof of one cause. Air, a poor connection, or changed ink condition need different remedies.
If the ink is visibly thickened or flow is poor, the manual calls for cleaning the ink tube and ink tank. We stop production and have someone familiar with that ink path confirm the condition and perform the cleaning. Running more nozzle cleaning while the supply path remains restricted can hide the real problem.

The manual uses this appearance as a warning to inspect the ink tube and tank; it is not a stand-alone diagnosis.
3. Nozzle test: use a clear stopping rule
Xinflying’s manual calls for a nozzle test when the printer starts and again before it is turned off. We compare the test strip with the previous result and note which channels or positions have missing lines. If the strip is incomplete, the manual’s first software step is Weak Clean. If three weak-clean cycles do not resolve it, the manual says to contact Xinflying.
We use that limit. Three unchanged tests tell us to inspect the ink path, cap seal, and head condition instead of repeating a routine with no evidence that it is working. Replace a printhead when a qualified inspection confirms physical nozzle-face or internal damage, or when the same channels remain failed after the specified ink-path, capping, and cleaning checks. After replacement, prime the ink path, print a baseline nozzle test, and compare a production sample at the normal settings.

Keep a dated photo or print of the test strip so the next shift can compare the same channels and positions.
Why Do We Check the Capping Station at Shutdown?
Our priority at shutdown is simple: make sure the printhead is correctly aligned with the ink-stack cap. The manual states that this position helps keep the printhead moist and warns that a head left uncapped can clog. We make the parking position a visible end-of-shift check, especially before weekends or holidays.
The photo below identifies the capping area. It does not replace the parking procedure for the installed printer. If the carriage does not reach or seal against the cap as expected, we record the fault and resolve it before a long idle period.
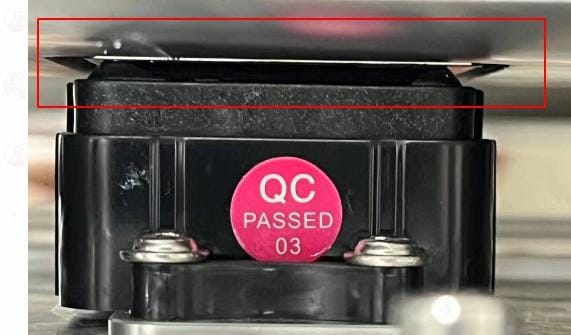
Correct parking is a condition to verify, not an assumption made because the power is off.
How Do We Clean the Head Interface, Cap, and Wiper?
These three surfaces have different jobs, so we do not use one liquid or one motion for all of them. The manual specifies eco-solvent solution for the printhead interface and pure water for the capping station and wiper. We keep those instructions distinct and use only materials approved for the installed equipment.
Every 7 days: clean the printhead interface
The manual directs a gentle wipe of the printhead surface with a dust-free cloth dipped in eco-solvent solution. We first confirm the correct access procedure, stop the printer as required, and avoid scraping or pressing on the nozzle face. The goal is to remove surface residue; it does not substitute for checking supply flow or nozzle output.
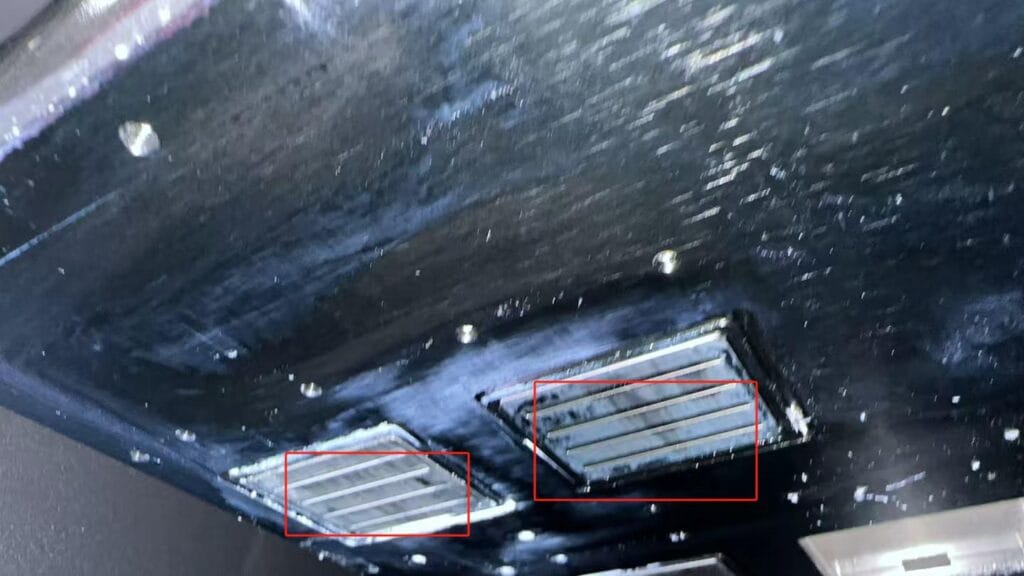
The highlighted areas show the surfaces addressed in the manual’s weekly cleaning task.
Every 15 days: clean the capping station
The manual describes moving the carriage to the middle, using the software’s Loading ink function, and slowly pouring pure water into the ink-stack capping area. Because this sequence combines carriage access with a software-controlled ink operation, we use the model’s service procedure or ask Xinflying for its demonstration video before attempting it for the first time. Keep liquid away from exposed electronics and do not improvise a flush into ink connections.
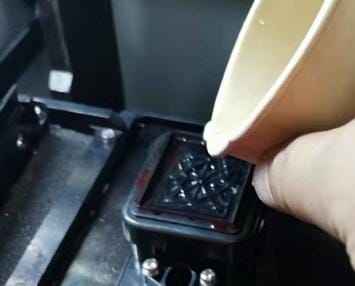
This illustrates the manual’s capping-station cleaning point; use the machine’s service sequence for carriage and pump control.
Every 15 days: clean the wiper
The manual specifies a dust-free cloth dipped in pure water for the wiper. We inspect whether the edge is dirty, distorted, or worn as we clean it. We find that a dirty wiping surface deserves attention before another printhead clean: the wiper touches the head repeatedly, so leaving residue there can undermine the next cleaning cycle.

Keep the wiper and cap as separate inspection points; the manual gives each its own cleaning step.
What Do Registration Errors Tell Us About the Motion System?
We do not group every crooked line under “printhead trouble.” The manual links the encoder (grating) strip and synchronous belt to horizontal accuracy, and the pinch roller to media pressure and stepping. That makes the pattern of the defect useful when choosing the first part to inspect.
| What we observe | First part we inspect | Why |
|---|---|---|
| A defect repeats at the same horizontal position | Encoder strip and its cleanliness | The manual links the strip to horizontal accuracy and repeated position-related problems |
| Irregular horizontal displacement | Synchronous belt and its drive area | The manual flags irregular horizontal misalignment as a reason to check the belt |
| Abnormal media steps or weak paper grip | Pinch roller and media path | The manual links poor pressing and abnormal stepping to the roller |
The strip should be wiped every three weeks to one month with a dust-free cloth carrying a little alcohol, according to the manual. We use the approved service method, apply very little liquid, and keep oil off the strip. The guide rail receives sewing-machine oil about once a month. These are different surfaces with different treatments.
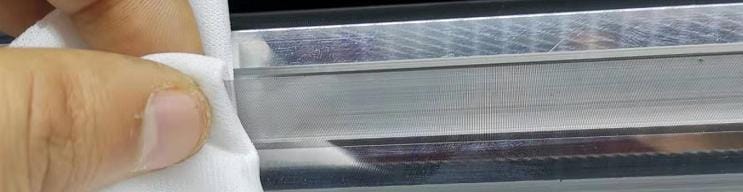
The encoder strip is a position reference; we clean it gently and avoid treating it like a lubricated rail.
The manual also recommends lubricant at both ends of the belt area every 15 days so it reaches the gear-and-belt meshing position. We verify the specified lubricant and access points for the installed machine before applying it. More lubricant is not automatically better; contamination in a position-sensing or media-contact area creates a second problem.
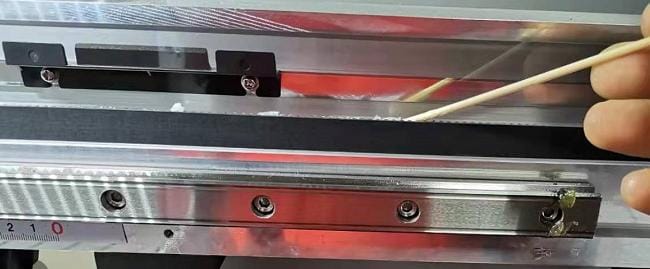
This is the maintenance location shown in the manual, not permission to oil every belt or nearby sensor.
Finally, inspect the power cord and socket for visible aging once a year, as the manual recommends. Damaged electrical parts should be handled through the machine’s electrical service procedure, not cleaned or adjusted during production.
What Changes When the Printer Sits Idle?
An idle eco-solvent printer still has ink in the system. We plan its maintenance before the shutdown begins rather than waiting for the first failed nozzle test on restart.
- Around one month without printing: The manual recommends cleaning once every two weeks. We put those dates in the maintenance log and confirm the printhead is parked over the cap after each visit.
- Three months or longer without printing: The manual recommends emptying the ink path and removing, cleaning, and storing the printhead separately. We arrange this as a planned service job, using the installed machine’s preservation procedure rather than attempting an improvised teardown.
Use the storage fluid, container, and restart sequence specified for the installed printhead and machine. Record the ink type, preservation date, and first restart nozzle test.
When Must We Replace Eco-Solvent Printer Wear Parts?
The manual gives planning periods for nine wear parts. We use those dates to stock and inspect parts; our service decision depends on the condition of the part and the symptom. Ink formulation and viscosity can shorten service life. The replacement triggers and checks below are our practical service rules for this printer category, not extra intervals stated in the manual.
| Part | Manual planning period | Replace when this condition is confirmed | Verify after replacement |
|---|---|---|---|
| Filter | 3–6 months | Flow remains restricted and the filter is fouled after the tank, tube, and connections are checked. | Prime the line; confirm steady flow and a complete nozzle test. |
| Damper | 6 months | It leaks, will not hold the required ink supply condition, or flow remains unstable after upstream causes are ruled out. | Check for leaks and bubbles; repeat the nozzle test and a short print. |
| Wiper | 6 months | The edge is hard, bent, torn, or cannot wipe evenly after cleaning. | Confirm even contact, clean the cap area, and compare nozzle tests before and after service. |
| Ink capping | 6 months | The lip is torn, distorted, or fails to seal after cleaning and parking alignment are corrected. | Confirm the parked head seals, then test nozzle output after an idle period. |
| Ink tube | 2 years | It is cracked, leaking, or remains blocked by coagulated ink after approved cleaning. | Check every connection for leaks or air; prime the line and print a nozzle test. |
| Ink pump | 2 years | It fails to move ink or drain the cap correctly after a blocked line and electrical supply are ruled out. | Run the specified loading or cleaning sequence; confirm waste flow and a fresh nozzle test. |
| Encoder (grating) strip | 2 years | It is damaged, or the same position error persists after correct cleaning and sensor checks. | Run a horizontal registration test across the print width. |
| Synchronous belt | 1 year | It is frayed, damaged, or cannot hold the specified tension and motion accuracy after adjustment. | Check smooth carriage travel and repeat the horizontal alignment test. |
| Pinch roller | 2 years | It is cracked, hardened, or grips media unevenly after pressure and media-path adjustment. | Feed the actual production media and check stepping over a representative length. |
Replacement workflow: Document the failing check, install a part specified for the printer configuration, clean or correct the related contact area, and record the post-repair test. For a printhead, electrical part, ink-path disassembly, or any procedure beyond the operator’s access level, have a trained technician follow the installed machine’s service instructions.
The Maintenance Log We Use
We prefer a short log that helps the next person make a decision. For each shift, record the nozzle-test result, waste-ink level, visible ink-tube condition, and whether the head parked over the cap. When service is done, add the date, component, fluid or lubricant used, and the result of a fresh test print. Photograph any persistent defect and mark its position on the page.
That record prevents an expensive guessing cycle. If the same nozzle channel remains broken after three weak cleans, the next technician can see that the cleaning limit was reached. If a horizontal error stays at one position after strip cleaning, that evidence is more useful than the vague note “print quality bad.”
Field Case: Nozzle Dropout After a Ten-Day Shutdown
This anonymized service record came from a CMYK wide-format eco-solvent printer. We have removed the workshop name, exact service date, and equipment identifiers. The measurements below are from the case record.
Fault symptoms
After about 10 days idle, the operator found fixed fine white lines in cyan and magenta areas of a 1.6 m-wide graphics job. The startup nozzle test showed three missing magenta nozzles, five missing cyan nozzles, and two deflected cyan jets. Yellow and black were normal. The operator had run five Weak Clean cycles before contacting us: the first recovered one magenta nozzle, but subsequent cycles produced no meaningful improvement. Our manual says to contact us after three unsuccessful cycles.
What we found
The head had not been parked squarely over the capping station during the shutdown. We found dried ink at the printhead edge and deposits on both the cap and wiper. The waste-ink container was about 60% full, below its red line, and the visible ink tubes showed continuous ink columns. The wiper had been in service for about eight months; its edge had hardened and distorted. These findings directed us to the head-maintenance station and contact surfaces. We kept the original nozzle test as the repair baseline.
What we replaced and serviced
We replaced the worn wiper. We also gently cleaned the printhead surface with a dust-free cloth and approved eco-solvent solution, and cleaned the cap area with pure water, following the different fluid instructions in our manual. We corrected and verified the head’s parking position over the cap. The record shows no printhead replacement. Scheduled belt, encoder-strip, rail, and electrical checks were completed separately; they were not the identified cause of this dropout.
Result
| Check | Before service | After service |
|---|---|---|
| Magenta | 3 missing nozzles | Complete nozzle test |
| Cyan | 5 missing nozzles; 2 deflected jets | Complete nozzle test; no deflected jets |
| Yellow and black | Normal | Normal |
| Production print | Fixed white lines in affected colors | A 3 m test length across the 1.6 m width showed no reported defect |
The service record reports complete nozzle tests at 24 hours and 7 days, with no recurrence during the following month. The job was delivered without rework. In this case, replacing the worn wiper, cleaning the contact surfaces, and restoring the cap position returned the printer to normal output.
Eco-Solvent Printer Maintenance FAQs
No. The Xinflying manual says to contact the company if three weak-clean cycles have not corrected the nozzle test. We stop repeating the command and inspect ink supply, capping, and printhead condition with the appropriate service procedure.
Use each liquid only on its specified component. The manual specifies eco-solvent solution for the printhead interface, pure water for the cap and wiper, and a little alcohol on a dust-free cloth for the encoder strip. Use the exact approved materials and access instructions supplied for the installed machine.
Replace it when it is physically damaged, or when the same horizontal-position error remains after the strip is cleaned and the sensor is checked. The manual lists two years as a planning period. After replacement, run a registration test across the full print width and record the result.
No. The source manual explicitly says it is only for eco-solvent. Other ink systems can have different fluids, cleaning procedures, printhead arrangements, and idle-period requirements.
Keep the Printer Ready for the Next Job
We begin and end each shift with a nozzle test because a dated pattern shows whether a fault is new, improving, or unchanged. We check ink delivery and capping before adding cleaning cycles; we replace a wear part when its condition and the machine’s test results identify it as the problem. In the field case above, that meant a new wiper, a cleaned cap and head interface, correct parking, and a clean production retest.
Need a matching part or a service procedure for your machine? Contact our technical team with your printer model and serial number, ink type, nozzle-test photos, and a photo of the worn part. We can confirm the compatible wiper, cap, filter, damper, ink tube, pump, belt, roller, or eco-solvent cleaning consumable before quoting or dispatching it. You can also browse Xinflying’s product catalog to explore currently listed equipment; ask us to confirm eco-solvent compatibility before choosing any product from the catalog. For a parts or consumables quote, use our contact form.