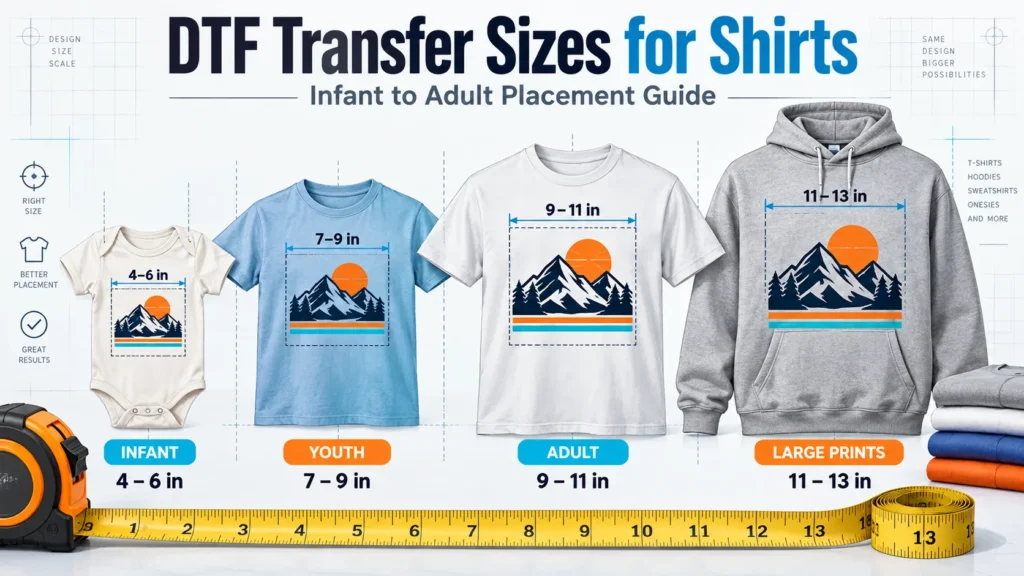
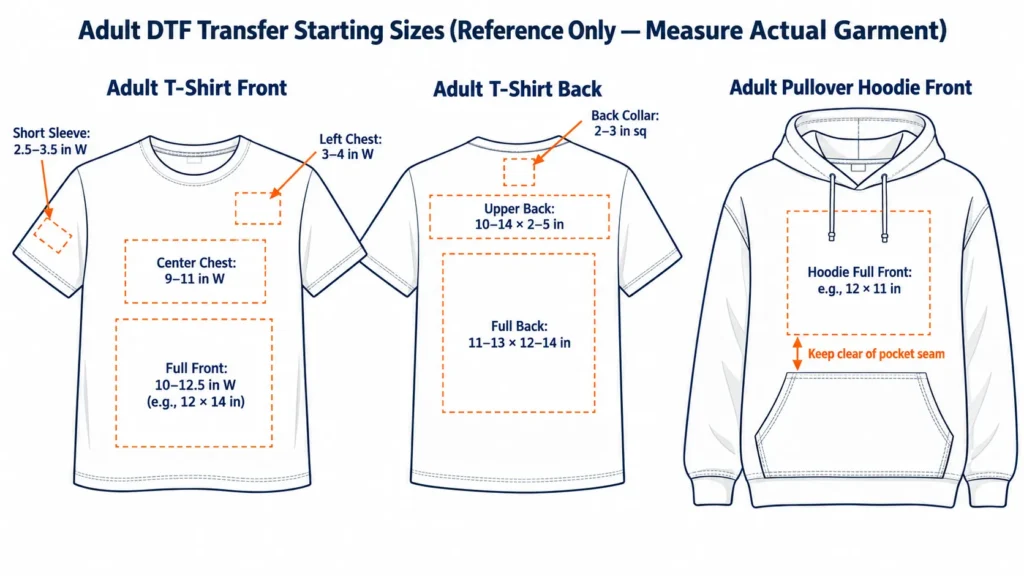
A dtf transfer size chart gives print shops and designers starting dimensions, not fixed industry rules. On adult shirts, left-chest logos typically start at 3 to 4 inches wide, center-chest graphics at 9 to 11 inches wide, and full-front or full-back prints at 10 to 13 inches wide. Final dimensions depend on the garment cut, the flat area between seams and pockets, and a physical layout check before pressing.
Use supplier charts as an artwork baseline rather than a substitute for measuring the blank garment. Suppliers publish different numbers because some list width alone while others give maximum width-by-height boxes. Checking how those starting figures fit around collars, pockets, heat press platens, and gang sheets prevents wasted film and reprints.
Adult DTF Transfer Size Chart by Print Location
The table below compiles published starting dimensions for adult placements from the DTF Dallas Application & Care FAQ, We Print U Press, and DTF Transfers Now. Inch values come from each supplier’s guide, and centimeter values are approximate conversions (1 inch = 2.54 cm). Treat these ranges as starting references and measure the blank garment before locking the print file.
| Print Location | Starting Width Reference | Width × Height Example | Approx. Metric (cm) | Garment & Layout Check |
|---|---|---|---|---|
| Left Chest | 3–4 in (DTF Dallas); 3.5–4 in (We Print U Press) | 4 × 4 in on tees/polos (DTF Transfers Now) | 7.6–10.2 cm wide; 10.2 × 10.2 cm | Clear polo plackets, pockets, and shoulder seams. |
| Center Chest | 9–11 in (We Print U Press) | 12 × 8 in front chest (DTF Transfers Now) | 22.9–27.9 cm wide; 30.5 × 20.3 cm | Check visual span between armholes on fitted tees. |
| Adult Full Front | 10–12 in (DTF Dallas); 11–12.5 in (We Print U Press) | 12 × 14 in tee; 12 × 11 in hoodie (DTF Transfers Now) | 25.4–31.8 cm wide; 30.5 × 35.6 cm (tee) | Reduce height when a hoodie pocket limits flat space. |
| Standard Full Back | 11–13 in (We Print U Press) | 11–13 × 12–14 in (DTF Dallas); 12 × 14 in (DTF Transfers Now) | 27.9–33.0 cm wide; 27.9–33.0 × 30.5–35.6 cm | Back panels allow more height, but side seams limit width. |
| Upper Back / Yoke | 10–12 in (We Print U Press) | 10–14 × 2–5 in (DTF Dallas); 12 × 8 in (DTF Transfers Now) | 25.4–30.5 cm wide; 25.4–35.6 × 5.1–12.7 cm | Keep wide text level across shoulders below the collar. |
| Short Sleeve | 2.5–3 in (We Print U Press) | 3.5 × 3.5 in (DTF Transfers Now) | 6.4–7.6 cm wide; 8.9 × 8.9 cm | Measure flat sleeve width above hem to avoid wrap. |
| Back Collar / Label | 2–3 in sq (DTF Dallas) | 3 × 3 in tee; 2.5 × 2.5 in polo (DTF Transfers Now) | 5.1–7.6 cm sq; 6.4 × 6.4 to 7.6 × 7.6 cm | Separate tee and polo sizes; stay off collar seams. |
Supplier guides define dimensions in two ways across these locations. A width-only suggestion lets the artwork’s aspect ratio set the height, while a 12 × 14 inch box marks a maximum boundary. A horizontal left-chest logo at 4 inches wide may only need 1.5 inches of height; stretching it to 4 inches tall would overpower the shirt.
How to Choose DTF Transfer Sizes for Shirts Across Garment Runs
Choosing dtf transfer sizes for shirts across a multi-size run means matching the graphic to each garment group rather than printing one width for every blank. A 10.5-inch chest graphic that fits an Adult Large crewneck can crowd the armholes on a Youth Small tee and look small on an Adult 3XL. Grouping mixed orders into size brackets keeps proportions balanced without building a separate file for every tag.
Youth, Toddler, and Infant Starting Sizes
Smaller shirts narrow both the chest width and the vertical drop above the hem. The comparison below lists youth, toddler, and infant starting dimensions from We Print U Press, DTF Dallas, and DTF Transfers Now. Verify these starting widths on the physical blank before gang-sheeting the job.
| Garment Group | General Width (DTF Dallas) | Left Chest (We Print U Press) | Center / Full Front (We Print U Press) | Size-by-Size Reference (DTF Transfers Now) |
|---|---|---|---|---|
| Infant / Onesies | 5 in (12.7 cm) | 2–3 in (5.1–7.6 cm) | Center: 4–6 in (10.2–15.2 cm); Full: 6–8 in (15.2–20.3 cm) | Measure flat space above leg snaps first. |
| Toddler Shirts | 6 in (15.2 cm) | Check flat chest space | Scale between infant and youth by chest width | Check neck stretch and short torso length. |
| Youth Shirts | 8 in (20.3 cm) | 3–3.5 in (7.6–8.9 cm) | Center: 7–9 in (17.8–22.9 cm); Full: 9–10 in (22.9–25.4 cm) | XS: 7.5 × 10 in; S: 7.5–8 × 10.5–11 in; M: 8 × 10.5–11 in; L: 8–8.5 × 10.5–11 in; XL: 8.5 × 10.5–11 in. |
| Adult Comparison | XS–XL: 11 in (27.9 cm); 2XL–3XL: 11.5 in (29.2 cm); 4XL: 12 in (30.5 cm) | 3.5–4 in (8.9–10.2 cm) | Center: 9–11 in (22.9–27.9 cm); Full: 11–12.5 in (27.9–31.8 cm) | S: 9–9.5 × 12 in; M: 9.5–10 × 12–13 in; L–XL: 10–11 × 12–13 in; 2XL: 11–12 × 13–14 in; 3XL: 12 × 13–14 in; 4XL: 12–13 × 13–14 in. |
Scaling Across Adult Small to 4XL and Locking Aspect Ratio
When an order runs from Youth sizes to Adult 4XL, most shops divide transfers into two or three size tiers. A practical split uses one width for Youth S–L, a 10 to 11 inch width for Adult S–XL, and an 11.5 to 12.5 inch width for Adult 2XL–4XL. Even at the same tagged size, a fitted women’s tee has a narrower flat front than a boxy unisex blank.
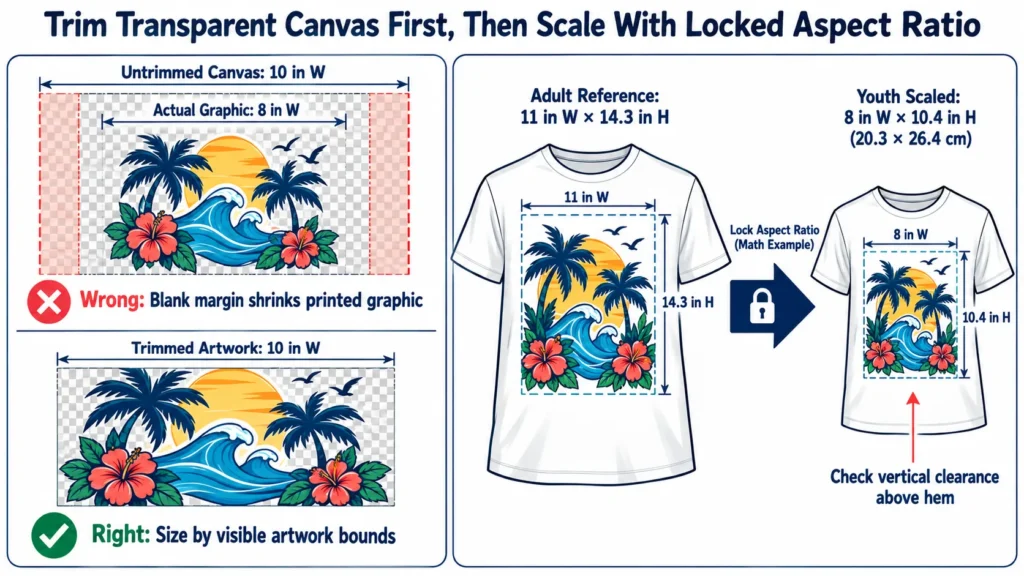
Before entering a target width in software, trim empty transparent pixels so the bounding box hugs the visible artwork. If a PNG file has 1 inch of blank margin on each side, setting the canvas to 10 inches yields an 8-inch printed graphic. Lock the aspect ratio when scaling and check both width and height against the shirt’s flat zone.
As a mathematical example, take a vertical graphic measuring 11 inches wide by 14.3 inches high after trimming margins. Scaling that file to 8 inches wide for a youth shirt with a locked aspect ratio gives a height of 10.4 inches (8 \times 14.3 \div 11 = 10.4\text{ in}, or about 20.3 \times 26.4\text{ cm}). Checking that 10.4-inch height against the youth shirt’s front panel confirms whether the bottom edge clears the hem before printing film.
Hoodie, Zip-Up, and Specialty Garment Adjustments
Pullover hoodies, zip-up sweatshirts, and polo shirts have seams and pockets that shrink the flat print zone compared with a crewneck tee. On a pullover hoodie, the kangaroo pocket seam and hood drop compress vertical chest space. Accordingly, DTF Transfers Now lists a hoodie full-front size of 12 × 11 inches (about 30.5 × 27.9 cm) instead of the 12 × 14 inches used on tees.
Meanwhile, We Print U Press notes that heavy fleece can make small chest designs look smaller than on jersey, so some decorators size center-chest hoodie prints 0.5 to 1 inch wider when space allows. Measure the flat fabric between the collar seam and top pocket stitching on the smallest hoodie in the run. Keep the transfer off the raised pocket seam so the heat press platen applies uniform pressure across the edge.
Zip-up hoodies split the center chest with zipper teeth and tape, making left-chest, sleeve, or full-back prints safer than a divided front design. On polo shirts, the button placket and collar wings limit left-chest width and push the visual center toward the armhole. Button the placket and measure the flat span between the placket seam and side seam before finalizing logo width.
A Practical DTF Placement Guide: From Paper Preview to Heat Press
Selecting a transfer size is only half the setup; a clear dtf placement guide keeps the graphic straight, proportional, and clear of seams. Even a well-sized 10-inch chest print looks off-balance if it sits too close to the collar rib or drifts toward one sleeve. Combining starting collar-drop numbers with a physical preview on the blank removes guesswork at the press.
Starting Collar-Drop and Alignment References
To set a baseline on the press table, We Print U Press publishes starting placement distances by garment zone:
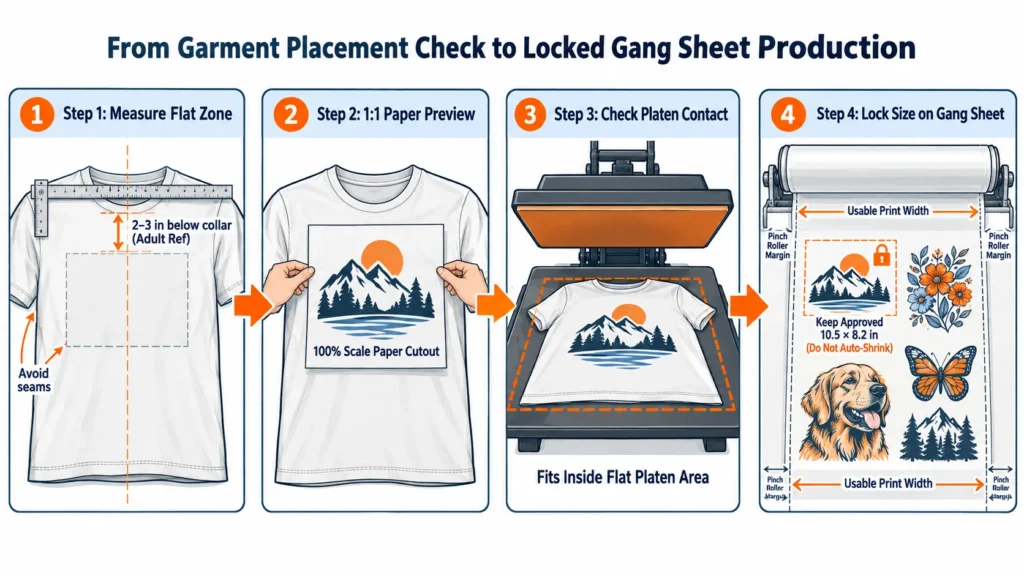
- Center chest and full front: Place the top edge 2 to 3 inches (5.1 to 7.6 cm) below the collar on adult shirts, and 1.5 to 2 inches (3.8 to 5.1 cm) below the collar on youth shirts, centered between side seams.
- Left chest: Measure 3 to 4 inches (7.6 to 10.2 cm) down from the left shoulder seam, centered horizontally between the centerline (or placket) and left side seam.
- Full back: Position the top edge 4 to 5 inches (10.2 to 12.7 cm) below the back collar seam, centered between side seams.
- Short sleeve: Center the transfer on the sleeve panel, 0.5 to 1 inch (1.3 to 2.5 cm) above the bottom hem.
Five-Step Verification on the Actual Garment
Treat those collar-drop figures as starting checkpoints, since V-necks, raglan sleeves, and drop-shoulder cuts shift seam positions. Following the measurement workflow in the DTF Dallas Transfer Placement Guide and standard shop practice, verify placement with five steps before pressing a batch:
- Lay the garment flat and find the center line: Smooth the blank on a table or platen, align shoulder and side seams, or fold the shirt vertically to press a light center crease.
- Check alignment with a ruler or T-square: Square a ruler or T-square against the collar rib and center line so the transfer does not follow a twisted side seam.
- Preview with a 1:1 paper cutout: Print the trimmed graphic at 100% scale on paper and tape it to the blank to check visual proportion and collar drop.
- Clear seams, pockets, and zippers: Keep every transfer edge off collar ribs, pocket seams, buttons, and zippers that block flat platen contact.
- Press a test garment and record the setup: Apply a sample transfer using our step-by-step guide on how to heat press DTF transfers to verify adhesion, hand feel, and placement before bulk pressing.
Matching Approved Sizes to Platens, Gang Sheets, and Repeat Orders
Before sending artwork to production, check three physical limits together: the garment’s flat print zone, the heat press platen’s contact area, and the usable film width. A 13 × 15 inch back print may fit a 2XL tee, but pressing it on a 15 × 15 inch platen leaves almost no margin near the edges where pressure can drop. If a pressing pillow raises the print area clear of a hoodie pocket seam, the transfer must fit inside that pad’s flat surface.
Once a transfer size is approved on the garment, lock its exact width and height when building the gang sheet. Never let manual packing or auto-nesting shrink a 10.5-inch chest graphic to 9.2 inches just to fit an extra sleeve logo in the same row. Shops ordering outsourced transfers can arrange pre-sized files on portals like the DTF Dallas Gang Sheet Builder, which lists 22 × 20 to 22 × 200 inch sheets for its service.
Shops printing in-house match their gang sheet canvas to the usable printable width of their roll-fed printer and film after deducting pinch-roller margins. Nominal machine classes like A3/30 cm or 24-inch/60 cm describe the general equipment tier, so operators should set canvas width to the specific printer configuration’s verified printable area. For details on matching roll width to order volume, see our guide on choosing a DTF printer for gang sheets.
Repeat-Order Sizing and Placement Record
As noted in the DTF Dallas Transfer Placement Guide, logging the approved setup on the first batch keeps reorders consistent months later. Saving a concise record with the print file stops operators from guessing which width or collar drop the customer approved.
| Record Field | What to Document | Example Entry (Illustrative) | Why It Matters for Reorders |
|---|---|---|---|
| Garment Blank & Tier | Brand, style, cut, and size group | Unisex Crewneck, Adult S–XL tier | Avoids using a box-cut size on a slim-fit blank. |
| Trimmed Artwork Size | Visible width × height, aspect locked | 10.5 × 8.2 in (26.7 × 20.8 cm), 300 DPI | Prevents accidental scaling on gang sheets. |
| Placement Reference | Zone, collar drop, and alignment tool | Center chest, 2.5 in (6.4 cm) below collar | Keeps placement height consistent across shifts. |
| Platen & Press Setup | Lower platen size, pillow, or threading | 16 × 20 in platen, single-layer threaded | Clears back seams and maintains even pressure. |
Frequently Asked Questions
For a standard Adult Medium crewneck tee, supplier charts typically start at 9 to 11 inches (22.9 to 27.9 cm) wide for a center-chest or full-front print. We Print U Press lists 9 to 11 inches for adult center chest, while DTF Transfers Now suggests 9.5 to 10 inches wide by 12 to 13 inches high. Check the blank’s chest width with a paper cutout before printing the batch.
Youth shirt transfers usually start at 7 to 9 inches (17.8 to 22.9 cm) wide for center-chest designs, or 7.5 to 8.5 inches wide across Youth XS to XL in the DTF Transfers Now guide. Youth left-chest logos typically scale down to 3 to 3.5 inches (7.6 to 8.9 cm) wide. Measure vertical clearance on Youth XS and Small blanks so tall designs do not crowd the bottom hem.
On a 3XL shirt, supplier references generally step front graphic width up to 11.5 to 12 inches (29.2 to 30.5 cm), or up to 13 inches wide on a full back. Stepping up from a 10-inch adult transfer keeps the graphic from looking small on a wider chest panel. Before exceeding 12 inches wide or 14 inches high, verify that your heat press platen and usable film width can handle the larger transfer.
This happens when the PNG or PDF file has empty transparent canvas around the visible graphic. Design and gang sheet software measure the full bounding box, so 1.5 inches of blank margin inside a 10-inch file leaves an 8.5-inch printed image. Trim transparent margins flush to the visible artwork before entering final dimensions.
No, a 1:1 paper cutout and a pressed sample check two different requirements. The paper cutout confirms visual proportion, centerline alignment, and seam clearance before spending film and ink. Pressing a real transfer sample verifies adhesive bonding, hand feel, and fabric behavior under heat and pressure on that exact garment.
Plan Your Transfer Sizes and Printing Workflow
Before starting the next apparel run, measure the flat printable zone on each garment bracket, trim transparent margins from the artwork, and tape a 1:1 paper cutout onto the blank to verify placement. Once those dimensions are approved, lock the width and height on the gang sheet and log the collar drop and platen setup for future reorders.
If your shop is evaluating in-house printing or comparing DTF printer machines to match your transfer sizes and gang sheet volume, share your typical garment placements, largest graphic dimensions, and order quantities with Xinflying. Our team can recommend a matched printer configuration, powder shaker, and workflow for your production needs.
Sources and References
- DTF Application & Care FAQ | Press Settings — DTF Dallas (Starting transfer widths by garment type and back placement ranges)
- DTF Transfer Placement Guide — DTF Dallas (Centerline measurement, T-square alignment, seam/pocket clearance, and repeat-order documentation)
- DTF Transfer Size Chart — We Print U Press (Infant, youth, and adult placement width matrix and starting collar-drop distances)
- DTF Size Guide & Print Dimensions — DTF Transfers Now (Unisex and youth shirt width-by-height examples and T-shirt vs. hoodie front dimensions)