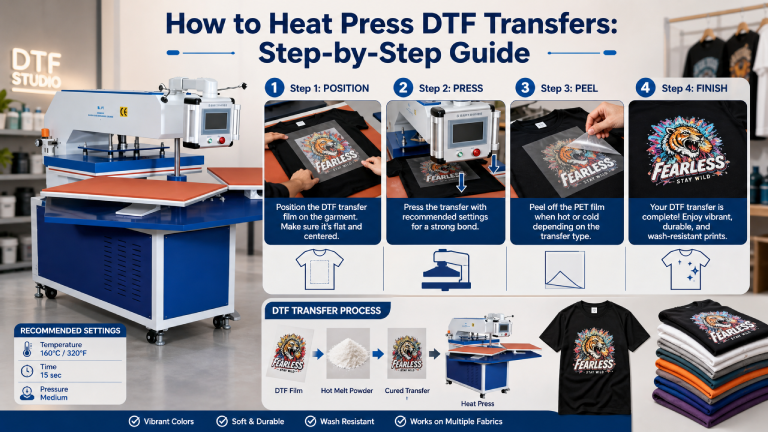
DTF transfers are one of the most versatile and beginner-friendly printing methods available today. But to get professional results, you need to apply them correctly. This step-by-step guide walks you through exactly how to heat press DTF transfers for vibrant, wash-durable prints every time.
| What You’ll Need: DTF transfer film • Heat press machine • Silicone sheet or parchment paper • Lint roller • Pre-pressed garment |
Step 1: Prepare Your Garment
Start with a clean, dry garment. Lint roll the print area to remove any dust, fibers, or debris — even small particles can cause adhesion issues. Lay the garment flat on the lower platen of your heat press.
Pre-press the garment for 3–5 seconds at your target temperature. This removes residual moisture and wrinkles, creating a smooth surface for the transfer to adhere to. Moisture is one of the most common causes of poor DTF adhesion.
Step 2: Position Your DTF Transfer
Place the DTF transfer ink-side down onto the garment in the desired position. The printed side faces the fabric; the film backing faces up toward the heat platen.
Use a ruler or alignment guides if you need precise placement. For chest prints, most standard positioning is 3–4 inches below the collar neckline, centered.
Step 3: Set Your Heat Press
| Setting | Recommended Value | Notes |
| Temperature | 300°F (148°C) | Adjust ±10°F for fabric type |
| Time | 12–15 seconds | Check your transfer film spec sheet |
| Pressure | Medium-firm (4–6/10) | Even contact across whole transfer |
| Cover Sheet | Silicone or parchment | Prevents direct platen contact with film |
Recommend Model:
- Xinflying DTF Fully Automatic Heat Press Machine-F1
- Xinflying Automatic Heat Press Machine-7CC
- Xinflying Semi Automatic Heat Press Machine-7BE-60
Step 4: Apply the Heat Press
Place a silicone sheet or parchment paper over the DTF transfer. This protects the film from direct contact with the hot platen and ensures even heat distribution.
Close the press firmly and hold for your set time. Do not open and re-close during the press — a single, consistent press is best.
Step 5: Peel the Film
This is the most critical step. Your DTF transfer film is either hot peel or cold peel — check the specification from your transfer supplier.
- Hot peel: Lift the film immediately after pressing while still hot. Pull slowly at a low angle (45°).
- Cold peel: Wait until the transfer has cooled completely (30–60 seconds), then peel.
Peeling at the wrong stage is one of the top causes of print failure. When in doubt, check the transfer packaging.
| ⚠️ Warning: Never guess the peel type. Using a hot-peel technique on a cold-peel film (or vice versa) will result in color lifting, incomplete transfer, or damaged prints. |
Step 6: Optional — Second Press
For extra durability and adhesion, especially on textured fabrics or thicker materials, apply a second press after peeling. Place parchment paper over the finished print and press again for 5 seconds at the same temperature. This helps embed the transfer more firmly into the fabric.
Step 7: Quality Check
Inspect the finished print for any lifted edges, bubbles, or uneven adhesion. Run your finger over the edges — they should feel smooth and firmly bonded. If corners are lifting, re-press that area with the parchment paper and additional pressure.
Settings Guide by Fabric Type
| Fabric | Temperature | Time | Pressure | Peel |
| 100% Cotton | 300–315°F | 12–15 sec | Medium | Hot or Cold |
| 100% Polyester | 275–290°F | 10–12 sec | Medium-Light | Cold |
| 50/50 Blend | 295–305°F | 12 sec | Medium | Hot or Cold |
| Nylon | 265–280°F | 10 sec | Light | Cold |
| Denim | 310–320°F | 15 sec | Medium-Firm | Hot |
| Fleece/Hoodie | 295–305°F | 13–15 sec | Firm | Hot or Cold |
Common Mistakes and How to Fix Them
Transfer Not Sticking
Cause: Too little heat, pressure, or time. Solution: Increase temperature by 5–10°F, add 2–3 seconds, and verify pressure is firm and even.
Print Feels Hard or Stiff
Cause: Too much pressure or temperature. Solution: Reduce pressure setting and temperature slightly. DTF prints should feel soft and flexible.
Colors Look Faded After Pressing
Cause: Excessive heat scorching the inks, or over-pressing. Solution: Lower the temperature and reduce press time.
Bubbles or Uneven Adhesion
Cause: Moisture in the fabric. Solution: Always pre-press for 3–5 seconds to drive out moisture before applying the transfer.
Care Instructions for Customers
- Machine wash inside out in cold water on a gentle cycle.
- Avoid bleach or harsh detergents.
- Tumble dry on low heat or air dry.
- Do not dry clean or iron directly on the print.
Frequently Asked Questions
Can I heat press DTF transfers with a home iron?
Not recommended. A household iron can’t maintain consistent heat across the full transfer area, and pressure control is impossible. Results will be unreliable and prints are likely to peel prematurely. Use a dedicated heat press for professional results.
How many times can I re-press a DTF transfer that hasn’t fully stuck?
You can attempt to re-press once or twice if adhesion is poor. Increase pressure and ensure pre-pressing to remove moisture. However, if the film has already been partially peeled, re-pressing results will vary.
Do I need a Teflon sheet for DTF?
A Teflon, silicone, or parchment sheet is strongly recommended. It protects the film from direct heat contact, distributes heat evenly, and prevents any adhesive residue from transferring to your heat press platen.
What temperature is too hot for DTF transfers?
Temperatures above 330°F (165°C) can begin to scorch fabric or break down the adhesive in DTF transfers. Always stay within the 275–320°F range and test first on a sample garment.
Final Thoughts
Heat pressing DTF transfers is a skill that improves with practice. Master your settings for each fabric type, always pre-press, and respect the peel temperature requirement of your transfer film. With consistent technique, DTF delivers professional, wash-durable results that rival any other printing method.