DTF printer maintenance is a repeatable set of daily, weekly, and monthly tasks that keeps the ink path moving, the capping station sealed, the encoder strip clean, and nozzle performance visible. A practical routine combines nozzle checks, lint-free cleaning, white ink circulation, controlled temperature and humidity, and planned replacement of wear parts.
The exact procedure varies by printer model, printhead, ink system, and production volume. Use this guide as an operating framework, then follow the instructions and service intervals supplied with your machine.
Procedure hierarchy: The current model manual and instructions from an authorized technician take priority over this general guide. Do not substitute a liquid, timing, syringe pressure, or carriage-release method from another printer model.
DTF Printer Maintenance Schedule at a Glance
| Frequency | Maintenance task | Why it matters |
|---|---|---|
| At startup | Check room conditions and print a nozzle test | Confirms the printhead is ready before production begins |
| During production | Use the software’s color-bar or wetting function and watch for banding | Keeps all ink channels active and catches nozzle loss early |
| At shutdown | Print another nozzle test, clean the wiper and capping area, and park the carriage correctly | Prevents ink residue and poor cap alignment from drying at the nozzle surface |
| Every 3 days | Clean the exterior printhead surface with approved cleaning fluid and a lint-free cloth | Removes ink buildup without scratching the nozzle plate |
| Weekly | Check damper ink levels, ink lines, leaks, aging, and air bubbles | Supports stable ink delivery and reveals developing problems |
| Every 3 weeks | Clean the encoder strip in one direction with a lint-free cloth and a small amount of alcohol | Helps the carriage read its position accurately |
| Weekly | Remove dust from the electrical-box cooling fan; clean the paper-feed, take-up, carriage-home, and capping-station sensors; inspect specified transmission points | Reduces dust-related faults, false position readings, and avoidable mechanical resistance |
| Monthly | Lubricate the guide rail with the specified grease and inspect ink tubing for visible wear | Supports smooth carriage travel without contaminating the encoder strip |
| Every 3 months | Inspect or replace the white ink filter according to the model schedule | White ink places heavier demands on circulation and filtration |
| Every 6-12 months | Inspect dampers, color ink filters, wiper, capping components, and ink pump | Replaces wear parts before they cause recurring ink-flow or cleaning problems |
| Before extended downtime | Follow the dedicated DTF printhead care during downtime guide | Protects the printhead and ink path during vacations or long shutdowns |
Why Routine DTF Printer Maintenance Matters
DTF printing uses white ink with suspended pigment. If circulation stops, the environment is unsuitable, or the printer sits idle without protection, pigment can settle and ink can begin to dry around the nozzle surface. Wiper contamination, a poorly sealed capping station, air in the ink line, and low damper levels can also lead to missing nozzles, banding, and interrupted production.
A maintenance routine does not make a printer maintenance-free or eliminate every clog. It gives operators a consistent way to detect nozzle loss early, protect the printhead during idle periods, and address normal wear before it causes longer downtime.
Maintenance needs also depend on ink-system design, wet capping, white-ink circulation, and service access. Xinflying’s commercial DTF printer configurations show how these systems are combined for different production volumes.
Prepare dedicated maintenance supplies before opening the printer:
- Manufacturer-approved printhead cleaning solution
- Manufacturer-approved moisturizing or storage solution
- Lint-free cleanroom cloths
- Dedicated foam or low-lint swabs
- A soft-bristle brush for approved non-printhead areas
- The specified guide-rail grease or lubricant
- Protective gloves and safety glasses
Power off the printer and unplug it before internal cleaning or electrical inspection. Keep the room ventilated because ink and cleaning-fluid vapors may be hazardous and flammable. Do not smoke, eat, or drink near open ink or solvent containers.
Never use facial tissue, paper towels, a stiff brush, a blade, or tweezers on the nozzle plate. Do not use alcohol or a corrosive cleaner on the printhead. Alcohol may be specified for the encoder strip, but that does not make it safe for the nozzle surface.
Daily DTF Printer Maintenance Checklist
Complete these checks at the beginning, during, and end of each shift:
- Verify room conditions. Keep the print room at 20-35°C (68-95°F) and 35%-70% relative humidity, unless your ink or printer supplier specifies a tighter range. Avoid direct airflow across the carriage and media path.
- Print a startup nozzle test. Confirm complete, unbroken lines for every color and white channel. Mark the strip with the date, time, machine, and operator. Day and night shifts should retain both the startup and shutdown strips so the next operator can see when a channel began to deteriorate. If lines are missing, use the approved weak-cleaning cycle and retest before production.
- Inspect the ink path. Look for low ink, leaks, kinks, or large air gaps. Shake ink bottles before refilling and never mix different brands or formulations.
- Keep channels active. Use the RIP software’s color-bar or wetting function when appropriate. The purpose is to fire channels that may not be used heavily in the artwork. Color-bar position, concentration, width, and spacing are model- and RIP-specific; copy the approved settings rather than guessing. If banding or missing color appears, pause the job immediately and correct the nozzle condition before resuming production.
- Protect the printhead from film contact. Do not touch, pull, or flatten PET film while the carriage is moving. Watch the film as it exits the powder shaker. If the film curls, wrinkles, rises, or begins to jam, stop the system before the film can strike the printhead or become trapped inside the shaker.
- Clean exposed maintenance areas. At shutdown, remove ink and debris from the wiper, capping pad, capping platform, print platform, pressure plates, carriage bottom, and shaker exterior. Power off and unplug the machine before accessing the carriage or printhead area. Use separate clean tools for the cap/wiper area and the nozzle surface so dried ink or powder is not transferred onto the printhead.
- Print a shutdown nozzle test. If channels are missing, use the approved cleaning routine and verify recovery before parking the carriage.
- Check the capping position. Confirm that the printhead is centered over the capping pad – not offset to the left or right – and that the cap closes against the nozzle surface. After an unexpected power failure, keep the machine off and use the model-specific procedure to return the carriage to its home/capping position. Never push the carriage against a powered motor.
- Empty waste ink before it approaches capacity. Overflow can contaminate the machine enclosure or electrical components.

Example of a RIP color-bar or wetting setup. Copy the approved position, concentration, width, and spacing for your printer rather than using these screen values as universal settings.

Wiper before and after cleaning. The wiping edge should be free of cured ink, powder, and loose fibers.

Capping pads and capping platform before and after cleaning. Residue on the sealing area can prevent the cap from closing evenly against the printhead.
How to Read a DTF Printer Nozzle Check
A DTF printer nozzle check is a small test pattern that shows whether each printhead channel is firing. Print one at startup, before shutdown, and whenever the output develops lines or missing color.
- Print the test pattern: Use the printer control panel or software’s nozzle-check function.
- Inspect every channel: A passing pattern has continuous, evenly spaced line segments for every expected color and white channel. A faint channel, a gap in one line, or one missing color is a failed test even if the rest of the pattern looks normal.
- Run a weak clean if needed: Use the normal low-intensity cleaning cycle first.
- Print a second test: Compare it with the first strip to confirm improvement.
- Stop after repeated failure: Compare each new strip with the previous one. If two or three approved weak-cleaning cycles do not produce measurable improvement, stop. Repeated cleaning wastes ink and may worsen flooding without correcting a restricted filter, low damper, air leak, poor cap seal, damaged wiper, or electrical fault.
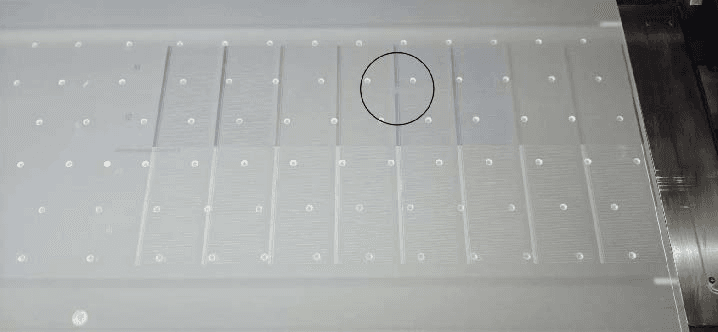
Failed nozzle test: the circled area contains missing or interrupted line segments. Do not begin production with this pattern.

Passing nozzle test: the expected channels appear as continuous, evenly spaced lines without visible gaps.
For a nozzle pattern that remains incomplete, use the dedicated DTF printer nozzle-check troubleshooting guide or contact technical support before attempting manual fluid injection.
How to Clean a DTF Printhead Safely
Clean the exterior nozzle surface about every three days, or sooner when the machine’s approved procedure calls for it. This is surface cleaning, not printhead disassembly or force-flushing.
- Shut down and unplug the printer. Never remove or install a printhead or electronic component while the machine is powered.
- Create safe carriage clearance. If your model uses a manual platform-height knob, turn the specified knob counterclockwise to lower the platform before moving the carriage; other models use a different control. Move the carriage only while the printer is off and only to the maintenance position shown in the model manual. Do not force it past resistance.
- Prepare a lint-free cloth. Lightly dampen it with the approved printhead cleaning solution. The source manual shows a blue cleaning solution, but color is not a chemical specification; use only the fluid approved for the installed printhead and ink. Do not flood the cloth.
- Wipe in one direction. Clean the nozzle surface from top to bottom with light pressure. Use a fresh area of cloth for each pass and stop when transferred ink or debris is no longer visible. Do not scrub back and forth.
- Keep liquid away from electronics. Prevent solution from reaching printhead cables, connectors, or circuit boards.
- Inspect the capping seal. Clean residue from the surrounding wiper and cap components with separate approved tools.
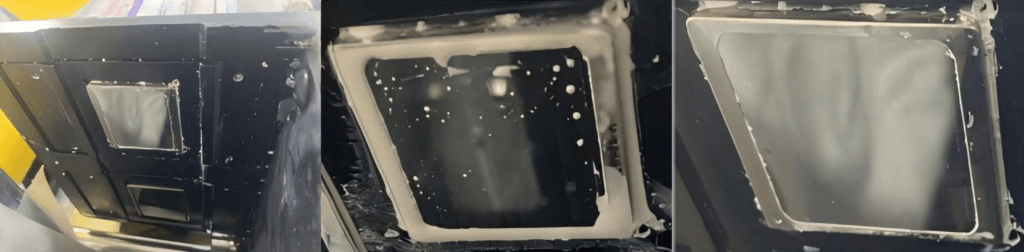
Printhead surface before, during, and after cleaning. Wipe from top to bottom with light pressure and use a fresh area of lint-free cloth for each pass.
The best DTF printhead wiping cloth is a clean, nonabrasive, lint-free cleanroom cloth that does not shed fibers. Paper tissue and ordinary shop towels can leave debris or scratch sensitive surfaces.
How to Judge Whether the Cleaning Is Complete
- Wiper: The wiping edge should be straight and free of cured ink, powder, fibers, and nicks. A hardened or deformed wiper should be replaced rather than scrubbed indefinitely.
- Capping pad and platform: The sealing rim should have no dried-ink ridge or trapped lint. The cap must sit flat and its drain path must not be blocked. Do not leave the cap flooded high enough to touch surrounding parts.
- Pressure plates and print platform: Remove deposits that could lift, mark, or drag across the PET film. Confirm that no cloth fibers remain near the media path.
- Carriage bottom: Remove ink mist and debris around the printhead mounting area without touching cables, nozzle electronics, or alignment hardware.
- Nozzle surface: Finish with a fresh area of lint-free cloth. The surface should show no visible bead of cleaning liquid, loose fiber, or dried-ink deposit before the carriage is returned to the cap.
Weekly and Periodic DTF Cleaning Tasks
Every Week
- Check the ink level in each damper. Refill or correct the ink supply if the level falls below approximately one-third, following the machine procedure.
- Inspect dampers and ink tubes for aging, leakage, kinks, and air bubbles.
- Review the saved nozzle-test strips for a pattern of recurring loss in the same channel.
- Check the waste-ink level and clean any new ink or powder residue around the machine.
- With power disconnected, remove loose dust from the electrical-box cooling-fan intake and guard. Do not blow dust deeper into the electrical box and do not disturb wiring.
- Clean the accessible paper-feed sensor, take-up/rewind sensor, carriage-home sensor, and capping-station sensor with the dry method specified for the model. Do not flood an optical sensor with cleaning liquid.
- Inspect the transmission points identified in the model manual. Lubricate only the points and with the lubricant specified by the manufacturer.
Every 3 Weeks
Clean the encoder strip, also called the grating strip, with a lint-free cloth and a small amount of alcohol. Wipe in one direction only. Do not rub back and forth, pull the strip, or transfer grease onto it.

Encoder or grating strip location. Support the strip gently and wipe in one direction without pulling it out of alignment.
Every Month
- Apply the specified grease to the guide rail.
- Check ink tubes for visible wear and replace damaged sections.

Guide rail location. Keep grease on the specified rail surface and away from the encoder strip.

Use only the grease specified for the printer. The container appearance alone does not confirm compatibility.
Do not apply a generic oil or grease to every moving part. Use only the product and location specified by the manufacturer because excess lubricant can attract dust or contaminate the encoder strip.
How to Prevent White Ink Settling and Clogs
White ink requires consistent circulation, clean filtration, and an intact ink path. Use the printer’s white-ink circulation system as designed, shake replacement ink before adding it, and check the dampers and tubes for leaks or air every week.
If the printer has been idle for two or three days, the approved restart routine may include running white-ink circulation for 15 minutes, stopping it for 10 minutes, loading ink for about 15 seconds, running a weak clean, and printing a nozzle test. Use these timings only when they match your machine’s operating instructions.
Replace the white ink filter on the specified schedule, commonly every three months. Never mix ink brands or formulas. When changing to a different approved ink, the cartridges, ink lines, and related components must be cleaned according to a controlled conversion procedure.
Film, Powder, and Ink Handling Rules
Maintenance extends beyond the printhead. Moisture, contaminated ink, and an unnoticed film jam can stop production even when the nozzle test was good.
PET Film and Hot-Melt Powder
- Keep PET film and hot-melt powder dry. If either will remain unused for more than three days, close the powder in a moisture-resistant sealing bag and wrap or reseal the film roll so ambient humidity cannot reach the coating.
- Watch the film where it exits the powder shaker. Stop the system if the film distorts, folds, or begins to catch; pulling the film while the carriage is moving can lift it into the printhead path.
- At the end of each shift, power down as required and remove loose powder from the shaker’s exterior and accessible body surfaces. The internal maintenance procedure excludes the powder tank and lower collection drawer from this daily exterior-cleaning step. Service those areas only with the separate model-specific powder-recovery procedure so powder is not dispersed into heaters, fans, or electrical parts.
- Keep the printer, shaker, and surrounding floor free of loose powder and unrelated objects. Do not use an uncontrolled blast of compressed air around electrical cabinets or airborne powder.
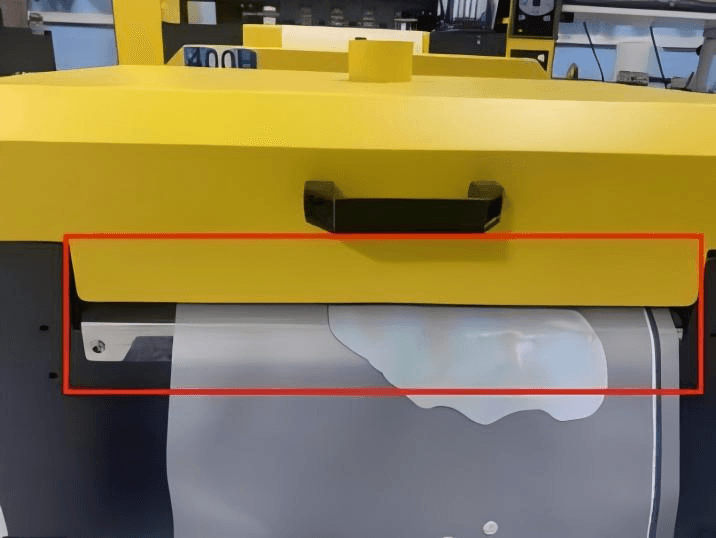
Watch the film at the shaker exit. Stop the system if the film folds, rises, or begins to catch inside the opening.
Ink Handling and Storage
- Shake each ink bottle thoroughly before adding ink so settled pigment is re-dispersed. Add ink only when the machine is in the state specified by the operating manual; do not pour ink while the machine is running.
- Use OEM-specified or manufacturer-certified ink. Never mix brands or formulations in the same cartridge, reservoir, tube, damper, or printhead.
- When changing ink brands, drain the old ink and clean the cartridges/reservoirs, lines, dampers, and affected channels using the controlled conversion procedure. Adding a new ink on top of the old ink is not a valid conversion.
- Store ink sealed in a cool, dry place away from heat and direct sunlight. Close the cap immediately after dispensing, label opened bottles with the opening date, and use opened ink promptly within the supplier’s stated shelf life.
What If the Printer Will Be Idle?
Routine maintenance is not enough when a DTF printer will sit unused. Before any shutdown longer than two days, complete and save a good nozzle test, protect the nozzle surface with the approved moisturizing or wet-capping procedure, center the carriage over the capping station, and secure the ink path as directed for the model.
Vacation and long-term shutdown procedures change according to the idle period and whether a trained operator remains onsite. The separate DTF printhead care during downtime guide covers two-day idle periods, one-to-two-week vacations, technician-only ink-path preservation, and the full restart sequence.
Do not treat powering the printer off as a storage procedure. An uncapped printhead, settled white ink, an unclamped line, or moisturizing solution left in the head during restart can turn a planned shutdown into a damaged printhead or extended production delay.
DTF Printer Wear-Part Replacement Schedule
| Component | Typical inspection or replacement interval | Replace sooner when… |
|---|---|---|
| White ink filter | About every 3 months | Flow becomes unstable or the approved service check shows restriction |
| Ink dampers and color ink filters | About every 6 months | There are leaks, air entry, aging, or repeated channel loss |
| Wiper, capping pad, and ink pump | About every 6-12 months | Cleaning performance or cap sealing declines |
| Encoder strip, pinch rollers, mechanical buffers, carriage belt, and reduction belt | About every 1-2 years | Wear, contamination, stretching, cracking, or tracking errors appear |
| Ink tubing and other wear parts | Inspect regularly | The tube hardens, kinks, leaks, rubs, or shows visible damage |

Color ink filters. Replace them on the planned interval or sooner when restriction, leakage, or recurring channel loss is confirmed.

White ink filter. The source maintenance schedule specifies replacement about every three months.

Ink pumps are wear components. Inspect cleaning and ink-delivery performance rather than waiting for complete pump failure.
These are planning intervals, not universal warranties. Production hours, ink chemistry, dust, humidity, and maintenance quality can shorten or extend component life.
DTF Printer Maintenance Mistakes to Avoid
| Prohibited action | Risk |
|---|---|
| Cleaning the printhead with alcohol or a corrosive liquid | Can damage the nozzle surface and produce uneven ink ejection |
| Using tweezers, blades, stiff brushes, or other sharp tools on the printhead | Can scratch the nozzle plate permanently |
| Removing a printhead or electronic component while powered on | Can damage the printhead, board, or other electrical systems |
| Mixing two ink brands or formulations | May cause an incompatible reaction, sediment, or clogging |
| Leaving a removed printhead exposed to air | Allows ink to dry inside the nozzles |
| Adding ink while the machine is running | Increases the risk of spills near electrical components |
| Changing head voltage, heating temperature, or service parameters without authorization | Can damage the printhead, media, or machine |
| Pushing the carriage while the printer is operating | Can cause mechanical misalignment or damage |
| Powering off for a long idle period without wet capping or preservation | Allows ink to dry and leaves mechanical parts unprotected |
Quick Troubleshooting Guide
| Symptom | First checks | Next action |
|---|---|---|
| Missing lines in the nozzle check | Damper level, air in the line, wiper condition, capping seal | Run an approved weak clean and retest; contact support after two or three unsuccessful cycles |
| Horizontal lines appear during printing | Nozzle pattern and active color-bar settings | Pause production, correct the nozzle condition, and restart only after a good test |
| White ink output becomes weak or inconsistent | Circulation, filter age, damper level, settling, and air leaks | Restore the approved circulation routine and service restricted or leaking components |
| Ink leaks or siphons after shutdown | Ink-line clamp procedure, cap alignment, tubing, and pressure system | Stop the leak, protect electronics, and have the pressure and ink path inspected |
| Carriage does not seal over the capping pad | Home position, sensor cleanliness, and cap alignment | Do not leave the nozzle surface exposed; follow the reset procedure or contact support |
| Film rises toward the printhead | Film tension, wrinkles, feed path, and shaker exit | Stop printing before a head strike and correct the media path |
Simple DTF Maintenance Log Template
Use a shared paper or digital log so every shift can see what changed.
| Date and shift | Startup nozzle check | Shutdown nozzle check | Cleaning completed | Ink or parts added | Abnormal result | Operator action |
|---|---|---|---|---|---|---|
| YYYY-MM-DD / Day | Pass / Issue | Pass / Issue | Wiper, cap, platform | Item and quantity | Channel or symptom | Cleaned, replaced, or escalated |
Record the exact channel, symptom, and response. A note such as “white channel 2 missing five lines after two weak cleans” is more useful than “printhead problem.”
Frequently Asked Questions
No. Do not use alcohol on a DTF printhead unless the printhead manufacturer explicitly instructs it. Alcohol may be approved for the encoder strip, which is a separate component. Use dedicated tools so the procedures are never confused.
Use a clean, soft, lint-free cleanroom cloth that does not shed fibers. Lightly dampen it with approved solution rather than soaking it. Avoid facial tissue, paper towels, shop rags, and reused cloths that may carry dust, grease, or dried ink.
Print a second test after one approved weak-cleaning cycle. If two or three cycles do not improve it, stop. Check damper levels, air bubbles, leaks, the capping seal, wiper condition, and filter age. Contact technical support before force-flushing or removing the printhead.
Use white-ink circulation, shake ink before refilling, maintain stable room conditions, inspect the ink path weekly, and replace filters on schedule. Keep the printhead wet-capped during idle periods and use approved ink. These steps reduce common clogging risks but do not replace nozzle checks and cleaning.
Yes, but only after preparing the printhead and ink system for the expected idle period. Follow the complete DTF printhead care during downtime guide for wet capping, line clamping, consumable storage, long-term preservation, and safe restart steps.
Build a Maintenance Routine Around Your Production Volume
The most effective DTF printer maintenance plan is specific enough that every operator can follow it and flexible enough to reflect actual production hours. Start with daily nozzle evidence, consistent cleaning, stable room conditions, white-ink circulation, and a dated replacement log. Escalate recurring nozzle loss instead of hiding it with repeated cleaning cycles.
If you are selecting or upgrading a DTF production system, explore Xinflying’s DTF printer machines and request a configuration recommendation based on your applications, materials, and expected production volume.