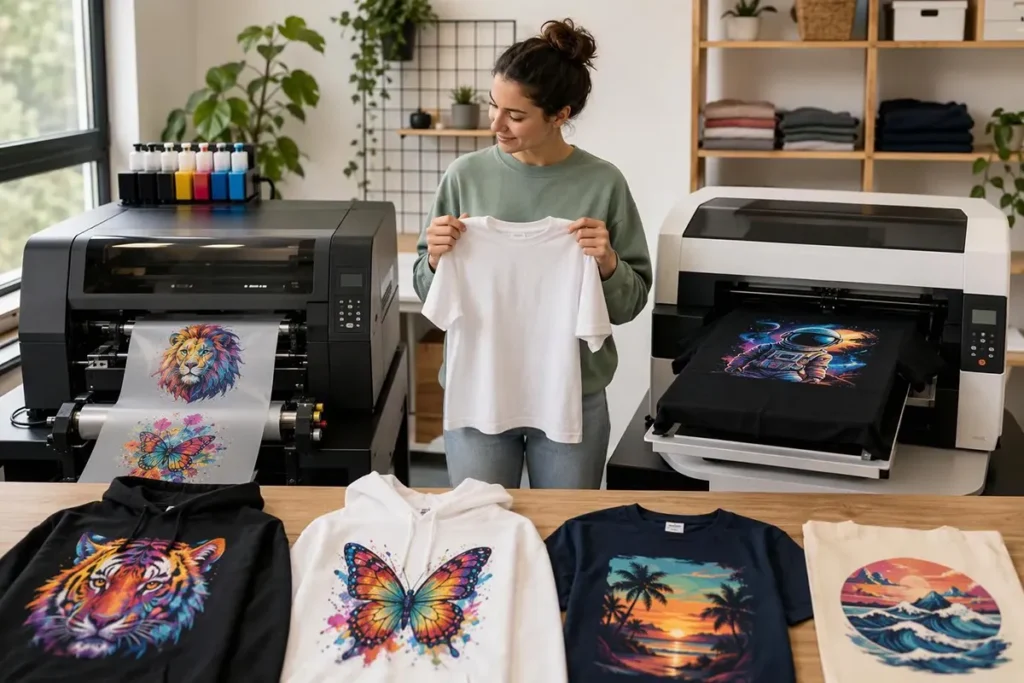
You can press DTF on hoodies made from cotton, polyester, and most blends. When a hoodie print fails, the cause is usually uneven contact, not the wrong temperature. The pouch pocket, side seams, zipper, and hood lift parts of the garment, so the platen presses hard in some spots and barely touches others.
That changes the order of work. First, confirm the fabric and surface. Then place the design on the real garment and load the hoodie so the print area sits flat and clear of obstructions.
After that, set time, temperature, pressure, and peel from the instructions for your film, powder, or transfer. This guide walks through each step of DTF printing on hoodies. It also covers how to read common failures and when a test hoodie is good enough to approve the full order.
Can You Put DTF on a Hoodie? Start With the Fabric and Surface
Yes, but one hoodie is not the same as another. Cotton, polyester, and blends react differently to heat. Fleece and coated fabrics add their own concerns, so check the fabric label and the face of the garment before choosing a setting.
| Fabric or surface | What to watch | What to do on the first piece |
|---|---|---|
| 100% cotton fleece | Thick fabric and a soft nap. Light pressure may leave weak spots, and the press frame can leave a visible mark. | Pre-press, check contact across the full design, and inspect the nap around the print after cooling. |
| Cotton/poly blends | Behavior varies with the blend ratio and the dye. A setting that works on one blend may not carry over. | Treat a new blend as a new job. Start from the transfer instructions and record what you used. |
| 100% polyester and performance hoodies | Polyester is more heat-sensitive. On dyed polyester, garment dye can migrate into the print, especially white areas. | Follow any lower-heat guidance for your transfer, press one piece, and check the white areas again after the garment has rested. |
| Coated or water-repellent surfaces | A coating can block adhesion. The word “performance” on a tag does not prove a coating exists, and it does not rule one out. | Confirm the fabric finish with the blank supplier. If a coating is present, check compatibility with your transfer maker before you run the order. |
| Heavy or brushed-face fleece | The texture compresses under pressure. Pile height affects how well the adhesive reaches the fibers. | Look for flattened nap or shine around the design and decide whether the customer will accept it. |
Transfer sellers say much the same thing. Both DTFSheet and Ink Rush warn that polyester often needs lower heat and a test press. DTFSheet also names dye migration as a risk on polyester.
The practical rule: a new fabric, color, or blank brand gets its own test piece. That rule matters more on hoodies than on tees. Hoodie blanks cost more, and one failed print can wipe out the margin on a small order.
Plan DTF Hoodie Placement on the Actual Garment
Placement on a hoodie is limited by things a T-shirt doesn’t have. The pouch pocket cuts into the front, the hood covers part of the back, and the cuffs make sleeves harder to press. A size chart gives you a starting point, but the final check happens on the blank.
Front: Work Above the Pocket
Measure the flat area between the neck seam and the top of the pouch pocket, and between the armhole seams. That box is your real front print area. If the design runs into the pocket, the press has to cross two fabric layers plus a seam, and the pocket edge often becomes the spot that lifts.
For a left-chest logo, STAHLS gives a simple guide in its hoodie heat printing article. Go straight down from where the shoulder seam meets the collar and straight across from where the sleeve meets the side seam. That lands roughly 4 to 5 inches down, depending on the garment.
STAHLS also suggests taping the transfer in place and trying the hoodie on before pressing. When in doubt, it recommends moving the logo toward the center, not toward the side.
Back: Allow for the Hood
When someone wears the hoodie, the hood drapes over the top of the back. STAHLS notes that on many hoodies, a back design sits about 5 to 6 inches below the collar seam so the hood doesn’t cover it. Check this on the real garment, because hood size varies by style.
Sleeves, Hood, and Small Placements
Sleeve prints work best on the flat part of the sleeve, clear of the cuff. Hood prints and inside-tag prints need a small, firm surface under the print area, which the next section covers.
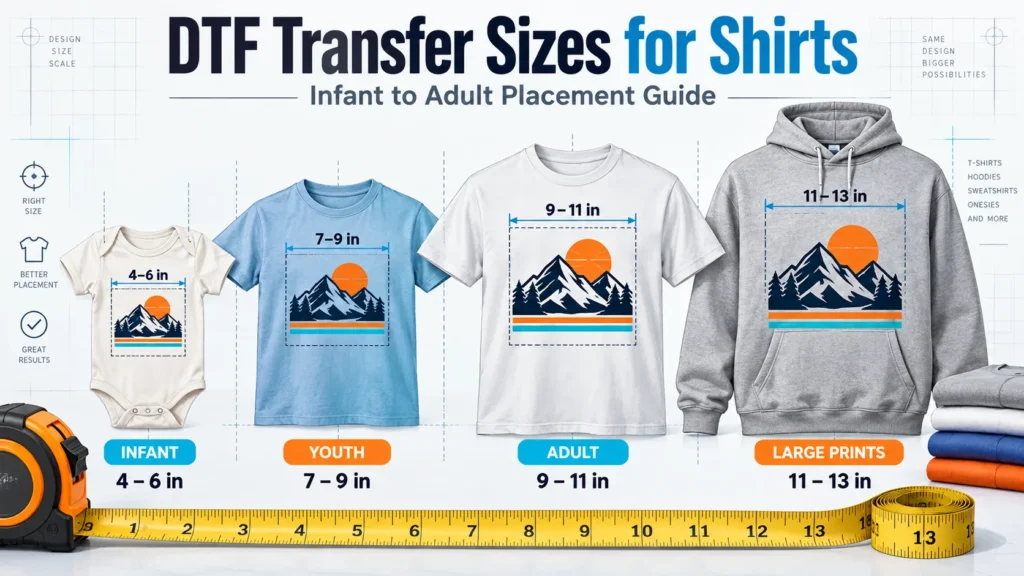
For starting widths by location, Ink Rush lists about 3.5 to 4.5 inches for a left-chest logo, 11 to 13.5 inches for a full front or back, and 2 to 3.5 inches for a sleeve. These are one seller’s starting figures, not fixed rules. Our DTF transfer size chart compares several supplier references and explains how to adjust for youth and plus sizes.
Fit the design to the flat area you measured, not to the biggest number on a chart. If a full-front design won’t clear the pocket, reduce the height first. Narrowing it usually makes it look out of proportion on the chest.
Load the Hoodie So the Print Area Gets Even Contact
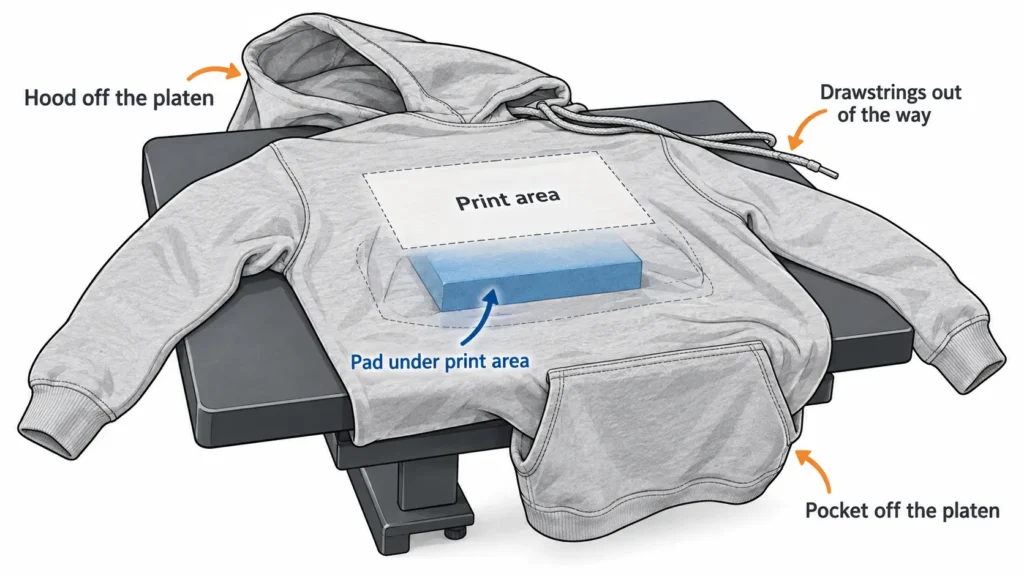
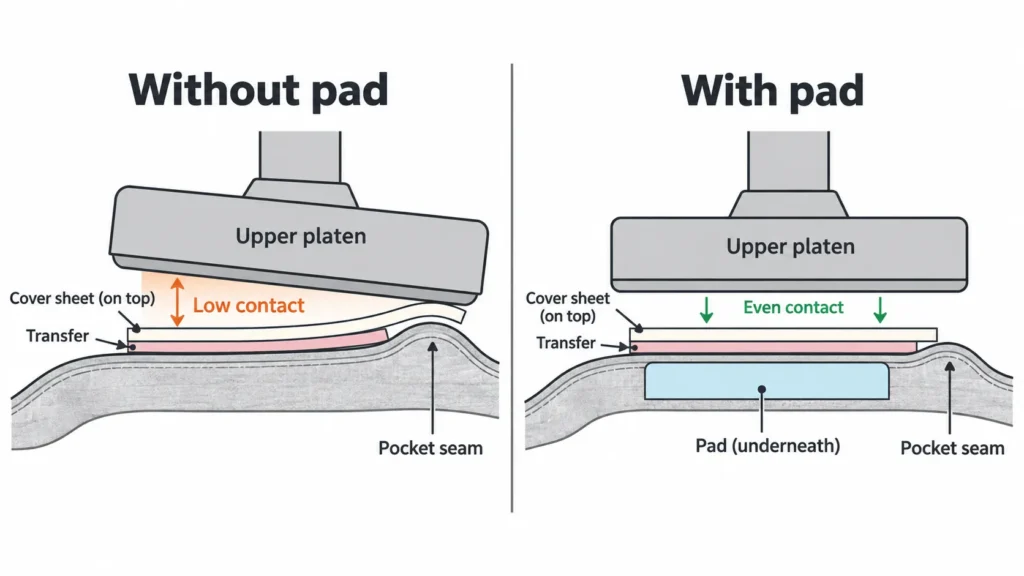
This is the step that separates a good hoodie print from a reprint. Your goal is to make the print area the highest, flattest surface on the press, so the upper platen meets the whole design with the same pressure. Anything thicker than the print area holds the platen up, and the adhesive near it gets less pressure.
STAHLS makes the same point in its article on heat press pressure settings. Seams, pockets, zippers, and V-necks need accessories to get even pressure across the design. The table below matches each common obstruction to a loading approach.
| Obstruction | What it does | How to load around it |
|---|---|---|
| Pouch pocket and its seams | Adds a second fabric layer and a raised edge below or inside the print area | Keep the design above the pocket. If the platen still lands on the pocket, use a smaller platen or a heat press pad under the print area so the pocket drops lower than the print zone. |
| Front zipper | Creates a hard ridge that blocks contact and can mark the platen or the fabric | Print on one side of the zipper, with the zipper hanging off the platen edge or sitting lower than a pad. For a design that crosses the zipper, plan separate pieces. |
| Buttons or snaps | Hard high points similar to a zipper | Use a heat printing pillow or pad so the print area rises above them. |
| Hood and drawstrings | The hood’s weight pulls the garment, and the cords can slide under the print area | Hang the hood off the back of the press. Pull the drawstrings out of the print zone before you close the press. |
| Neck and shoulder seams | Raised seams near a high chest or upper-back print | Load the hoodie so the seam sits off the platen edge, or use a pad that ends just before the seam. |
| Side seams on a full back | Seams at the edge of a wide design | Check that the design width clears the side seams on the smallest size in the order. |
| Sleeve cuffs and ribbing | Thick ribbing lifts the sleeve and pulls it crooked | Use a sleeve platen or pillow, or lay the sleeve across the platen with the cuff hanging off the edge. |
Pads, Pillows, and Smaller Platens
A heat press pad goes inside the garment under the print area. It lifts the design above the pocket, seam, or zipper beside it.
A heat printing pillow is softer and helps over uneven areas such as button plackets. A smaller platen on presses that accept interchangeable platens lets the pocket and hood drape off the sides.
STAHLS describes all three, and it points out a detail that’s easy to miss. When you change platen size, re-set the pressure for the new size. A smaller platen often reaches full pressure at a different setting than the large one.
If you don’t have accessories yet, start by repositioning. Hang the pocket or hood off the platen edge before you buy anything. The right tool depends on your press, so check what your machine accepts before ordering.
A Cover Sheet Is Not a Pad
Parchment, silicone, or PTFE sheets go on top of the transfer. They protect the film and the upper platen.
A pad or pillow goes under the print area. It changes the shape of the surface the platen presses against. A cover sheet cannot fix a pocket seam that holds the platen up, because the seam still sits under the design.
For zip hoodies, some decorators also place a protective pad over the zipper to shield it from the heat. That is a third job, separate from both of the above.
A Quick Contact Check Before the First Press
Before you press a new hoodie style, try this check on an empty load. Turn the press off or let it cool, then load the hoodie the way you plan to print it.
Slide strips of paper under the four edges of the print area and close the press to your pressure setting. Then tug each strip. A strip that slides out much more easily than the others marks a low-contact spot, usually next to a seam or the pocket edge.
Reposition the garment or add support, then repeat until the four strips grip evenly. It’s a rough comparison, not a pressure measurement. But it can show a contact problem before it costs you a transfer.
How to Heat Press DTF on Hoodies: Settings and Steps
Where the Settings Come From
Start with the time, temperature, pressure, and peel instructions for the exact transfer or film and powder you use. Those values are designed to work together. Your sample results tell you whether to adjust them for a particular hoodie.
Published hoodie settings vary between sellers. Ink Rush, for example, lists 280–320°F and 10–15 seconds at medium-to-firm pressure as a general range, and it still tells buyers to follow the instructions shipped with their order. A range that wide is a reminder that no single number fits every film and every press.
Three points matter more on hoodies than on tees:
- Thickness mostly changes pressure and contact, not temperature. A thick fleece needs the platen to reach the whole design firmly. Adding heat or time does not solve a contact problem, and DTFSheet notes that extra seconds won’t make up for weak pressure.
- The display isn’t always the platen. DTFSheet points out that two presses set to the same temperature can deliver different actual platen heat. If results drift, check the platen surface with a temperature gun or test strips before rewriting your settings.
- Firm should feel firm. DTFSheet’s rule of thumb: if the press closes with almost no resistance on the loaded hoodie, pressure is probably too low.
Step-by-Step Pressing Sequence
- Clean and pre-press. Lint-roll the print area, then pre-press briefly to remove moisture and wrinkles. On fleece, this also settles the nap.
- Load around obstructions. Set up the pad, pillow, or platen from the previous section. Hang the hood and pocket off the edge, and move the drawstrings out of the way.
- Position the transfer. Place it in the measured spot and use heat-resistant tape if the garment or film might shift.
- Cover and press. Add the cover sheet your transfer maker recommends. Close the press smoothly and hold for the full time without reopening.
- Peel the way the film requires. Hot, warm, and cold peel films behave differently. DTFSheet stresses that warm is not the same as cold, and peeling a cold-peel film too early can pull ink and adhesive back off. If an edge starts to lift, lay the film back down and re-press before you continue.
- Finish press if the instructions call for it. Many transfer makers recommend a short second press under a cover sheet after peeling. Others treat it as optional, so follow the instructions for your transfer.
- Inspect after cooling. Check the edges, the area nearest the pocket and seams, the white areas on dyed garments, and the nap around the design.
For more detail on film handling and peel timing, see our guide on how to use DTF transfer film. Our step-by-step DTF heat press guide covers the general T-shirt workflow these steps build on.
Hoodie DTF Problems: What to Check First
When a hoodie print goes wrong, it’s tempting to raise the temperature. Most hoodie failures trace back to contact, peel timing, or the fabric itself, so check those first. The table below lists what to check for each symptom, what to try, and when to stop pressing more pieces.
| What you see | Check first | What to try | Stop the run when |
|---|---|---|---|
| Edge lifts only near the pocket, seam, or zipper | Whether that edge sat on or next to the raised area | Re-load with a pad or smaller platen, or move the design. Re-press the test piece. | The same edge lifts on a second piece after re-loading. |
| Lifting across the whole design | Pressure on the loaded hoodie, peel timing, and actual platen temperature | Confirm firm resistance at closing. Re-check the peel type and the platen temperature. | Settings match the instructions and the print still lifts. Contact the transfer supplier before pressing more. |
| Ink or adhesive comes off with the film | Peel type and timing | Wait for full cooling on cold-peel film. Peel slowly and evenly. | It happens after you correct the peel timing. |
| Shiny box or flattened nap around the print | Pressure, platen size versus design size, and fabric type | Use a platen or pad closer to the design size. STAHLS notes that on cotton, a press mark is often moisture loss rather than true scorching, and a light mist of water can sometimes relax it. | The mark doesn’t relax on a test piece and the customer won’t accept it. |
| White areas turn pink, gray, or tinted | Whether the garment is dyed polyester or a poly blend, and how long after pressing the change appeared | Treat it as possible dye migration. Ask the transfer maker about lower-heat settings or a blocking option for that fabric. | Any tint appears on a test piece. Don’t run the order until a solution passes a test. |
| Fabric discolors or feels harsh around the print | Fabric content and actual platen temperature | Confirm the platen temperature and check whether the fabric needs lower heat. | The damage appears at the transfer’s recommended settings. |
| Print cracks or lifts after washing | Whether the first wash came too soon, how the garment was washed, and whether the finishing press was skipped | Re-test with the full instructions, including any finishing press, and follow the care instructions before washing. | A second test piece fails the same wash routine. |
Keep the symptoms separate. A shiny press box is not the same thing as scorching, and a color change is not automatically dye migration. If you label the problem correctly, you change the right variable and don’t create a new problem.
For transfers that fail to stick on any garment, not just hoodies, start with the contact and peel checks above. Then work through the film and powder steps in our heat press settings guide for DTF printing.
Test One Hoodie Before You Press the Whole Order
A first hoodie that looks good off the press has passed only the first check. Wash performance and delayed dye migration show up later, so approve a full run only after the test piece has been washed and rechecked. This matters most when the order uses a new blank brand, color, fabric blend, or transfer supplier.
What to Record for Each Test Piece
Keep a simple record for each new hoodie and transfer combination. You can reuse it the next time the same blank comes in.
| Record | Example of what to note |
|---|---|
| Garment | Brand, style, color, fabric content, size, and lot or order date if available |
| Transfer | Supplier or in-house film, powder, and peel type |
| Placement | Location, design size, and measured distance from the collar or pocket |
| Loading | Platen size, pad or pillow used, and which parts hung off the press |
| Settings | Temperature, time, pressure setting, pre-press, peel, and finishing press |
| Result after cooling | Edges, contact near seams, press mark, nap, and color of white areas |
| Result after care test | Condition after following the care instructions for at least one wash cycle |
When to Release the Full Run
Release the order when the test piece passes the cooled inspection and the wash check, and when the settings match what you recorded. If you change any part of the setup, re-test. That includes a different blank color, a new box of transfers, a different press, or a new platen size.
For larger orders, press one hoodie of each color and each size group before you run the batch. A design that clears the pocket on an Adult Large may cross it on a Small.

Give the Customer Care Instructions
Send care instructions that match your transfer. Sellers commonly advise waiting at least 24 hours before the first wash, washing inside out in cold water, skipping bleach, and drying on low heat or hanging to dry. Ink Rush lists this kind of routine in its hoodie guide. Use the version your transfer maker provides, because it is the one that applies to your product.
Frequently Asked Questions
Yes. Fleece is thicker and softer than a T-shirt, so firm, even contact matters more. Load the hoodie flat, keep the design clear of pocket seams, and check the nap around the print after cooling.
It’s best to keep the design above the pocket. Pressing across the pocket means pressing over two layers and a seam, and that edge often lifts. If a design has to sit on the pocket itself, use a pad so only the pocket surface is under the platen.
Use the temperature in your transfer or film instructions. Sellers publish different ranges, so a number from another product may not suit yours. On a thick hoodie, check pressure and contact before raising the heat.
Many transfer makers recommend a short finishing press after peeling. Others treat it as optional. Follow the instructions for your transfer, and include the finishing press in your test if they call for it.
Yes, but test first. Polyester is more heat-sensitive, and dyed polyester can bleed color into the white areas of the print. Press one hoodie, let it rest, and check the whites before you run the order.
Yes. Both need a small, firm surface under the print area, such as a sleeve platen, a pad, or a pillow. Keep sleeve designs clear of the cuff ribbing, and check that a hood print sits on a single layer of fabric.
Follow your transfer’s care instructions. Many sellers advise waiting at least 24 hours, then washing inside out in cold water.
Plan Your Hoodie Production
If you’re pressing a few hoodies with outside transfers, the loading table and the test record above cover most of what you need. If hoodies are becoming a regular part of your orders and you plan to print transfers in-house, the printer, film, powder, and heat press all need to suit the garments you sell.
Note your usual hoodie fabrics, the placements you print most often, typical design sizes, and expected monthly volume. Then compare Xinflying DTF printers and matching DTF printer supplies. You can also send those details through our DTF apparel production solutions page to get a configuration suggestion for your hoodie work.