
A job produced with uv printing on glass can look sharp the moment it leaves the printer bed, yet lift at the edge the next day when a fingernail catches it or look washed out once mounted against a dark wall. Getting consistent appearance and adhesion requires aligning four connected choices before production starts: matching the workpiece geometry to the right printer, choosing which side of the glass the viewer looks through, setting the white ink layer for the target background, and preparing the surface for the actual glass batch and end use.
UV-curable ink bonds well to glass when surface preparation, ink chemistry, and curing match the substrate. However, no single pretreatment works on every glass lot, and dishwasher resistance, outdoor exposure, or food-contact suitability must be verified separately rather than assumed from a dry surface off the platen.
Below, we start with the five-question order intake roadmap that links every decision together, then examine glass adhesion physics, equipment routing, first- vs. second-surface viewing, white ink strategies, surface preparation, and sample acceptance testing.
Plan the Glass Order First: Five Questions That Set Your Workflow
Ask five intake questions before you quote or clean a single glass blank. Answering these questions upfront connects equipment routing, file orientation, white ink channels, pretreatment trials, and customer care boundaries into one production plan:
| Order Intake Question | Why It Matters | What the Answer Decides in Your Workflow |
|---|---|---|
| 1. What is the workpiece shape, size, and mounting state? | Determines whether the glass sits flat on a vacuum bed, spins in a rotary chuck, or cannot be loaded into a printer. | Routes the job to a UV flatbed, a rotary cylinder UV printer, or UV DTF / vinyl transfer film. |
| 2. From which side and against what background is it viewed? | Controls whether ink is applied to the front or back face and how ambient or rear light passes through the panel. | Sets Right-Reading vs. Horizontally Mirrored artwork and First-Surface vs. Second-Surface viewing order. |
| 3. Which areas must be opaque, clear, or backlit? | Governs whether background walls show through translucent CMYK inks or reflect off an opaque white layer. | Selects Full-Flood White, Spot White, No White (CMYK Only), or a Backlit White Diffuser layer. |
| 4. What handling, cleaning, or environment will it face? | Indoor display awards face very different physical and chemical stress than washed drinkware or outdoor signs. | Sets the required surface prep trial, cleaning test, care label wording, or boundaries on unsupported claims. |
| 5. Can the buyer supply extra blanks from the production lot? | Factory surface coatings and glass handling vary across suppliers and production batches. | Allows side-by-side testing of cleaned-only vs. primed samples on the exact production glass before running the batch. |

How UV Printing on Glass Works — and Why Adhesion Needs Batch Testing
Direct digital printing on glass jets droplets of UV-curable ink straight onto the glass surface while UV-LED lamps beside the carriage cure each pass into a solid polymer film. As how UV curing works explains, there are no screens to burn, no plates to etch, and no transfer film to weed, making one-off proofs, variable personalization, and short multi-color runs practical without setup plates.
To see where direct UV printing fits alongside other glass decoration processes, compare the four main shop routes:
| Decoration Method | How It Works | Best-Fit Orders | Main Trade-Offs |
|---|---|---|---|
| Direct UV Printing | Jets UV ink onto flat glass or rotating bottles; UV-LED light cures ink inline | Short-to-medium runs, personalized awards, custom drinkware, quick proofs | Requires strict cleaning, batch-specific prep, and a bed or chuck that fits the item |
| UV DTF / Vinyl Film | Prints onto transfer film or vinyl, then applies to glass by hand or squeegee | Installed doors/windows, oversized panes, compound curves, or pre-printed decal stock | Adds manual application labor and leaves a raised film or adhesive perimeter |
| Screen Printing | Pushes ink through one mesh stencil per color onto the glass | High-volume runs of the same 1-to-10-color graphic | Slow setup, screen washout space needed, and seam limits on multi-color 360° wraps |
| Pad Printing | Silicone pad transfers ink from an etched cliché onto curved glassware | Simple 1-to-6-color promotional logos on small or uneven shapes | Limited color count and smaller maximum print area |
When glass is already mounted in a building or cannot be held level in a fixture, it is wiser to print the design on transfer film instead than to force a direct-print setup.
When shops ask how to print on glass permanently and run into peeling, the obstacle is surface bonding rather than nozzle resolution. Because glass is smooth and non-porous, ink cannot soak into fibers; the cured film must anchor directly to the surface, and five shop-floor variables can block that bond even when a print feels dry off the bed:
- Fingerprints and skin oils: Touching cleaned glass with bare hands leaves oils that prevent ink or primer from wetting evenly.
- Household cleaner residues: Glass sprays containing anti-fog agents, fragrances, or surfactants leave a thin barrier film behind.
- Factory glass coatings: In its technical glassware guide, equipment manufacturer Inkcups explains that glassmakers apply hot-end coatings (a thin tin-chloride film sprayed onto bottles before annealing to protect strength) and cold-end coatings (water-soluble, water-insoluble, polyethylene, or fatty-acid treatments applied after annealing to prevent scuffing on conveyor lines). Two clean bottles from different suppliers can carry completely different factory coatings.
- Misapplied adhesion promoters: Using a primer that clashes with your UV ink chemistry—or wiping it on too thickly without following the product sheet—creates a weak boundary layer.
- Incomplete curing: Surface dryness right after printing does not guarantee full cross-linking at the glass interface if lamp energy or pass settings are mismatched.
In commercial printing forums, operators report cases where early glass runs rub off under a thumbnail or lift at the border after an alcohol-only wipe. Those recurring issues show why surface preparation and curing must be checked on a sample from the actual glass lot before starting batch production.
Flat Panels, Bottles, or Installed Glass: Match the Job to the Equipment
Selecting a uv glass printing machine begins with workpiece geometry and whether the glass fits inside the printer frame. Assigning flat sheets and cylindrical drinkware to the hardware built for each shape prevents focus drop-off and registration distortion.
Flat Glass: Panels, Signs, Awards, and Photo Blocks
Flat glass sheets, corporate awards, photo blocks, and cabinet inserts belong on UV flatbed printers. As US manufacturer Direct Color Systems (DCS) notes, shops should match the flatbed size to their largest glass panel, build adhesion prep into the workflow, and use jigs or bed markers to hold blanks square. Always leave a small unprinted margin inside the glass rim so ink does not pool on beveled edges or reflect stray UV light back into the nozzle plate.
Two XINFLYING flatbed models serve different flat-glass production needs:
- XF-S6090S UV flatbed printer (4 × Epson i3200-U1 printheads): Built for multi-layer flat rigid production across glass awards, decorative panels, and architectural signs.
- XF-Y1218S-5G6 visual hybrid flatbed printer (5 × Ricoh G6 printheads with CCD camera positioning): Uses overhead visual recognition to locate blanks on the bed automatically, reducing alignment setup when running batches of small glass plaques or coasters.
Because bed dimensions, maximum substrate height, and ink channel assignments vary by machine build—and white ink or clear varnish may be optional on hybrid configurations—confirm the working bed size, maximum glass thickness, and white ink channels in your quotation. Also keep in mind that large solid color blocks or black-to-white gradients on big glass panels can reveal faint pre-wipe streaks, so print a large test swatch on the actual panel stock before quoting multi-panel signage.
Bottles, Tumblers, and Glass Cups
Running uv printing on glass bottles, pint glasses, or candle jars requires rotating the item smoothly beneath the carriage. Trying to print a wide logo across a cylinder on a stationary flatbed causes head-gap drop-off and blurred edges. Shops either mount a compatible rotary attachment onto a flatbed (as Roland DGA offers with its RotaPrint attachment and LONGER provides with its rotary accessory) or run a dedicated rotary cylinder printer.
For dedicated drinkware production, the XF-Z300 cylinder UV printer (XF-Z300-3I16U1) clamps cylindrical and conical vessels in an adjustable rotary fixture and jets W + CMYK + V (White + Color or White + Color + Varnish) in a single setup. Published XF-Z300-3I16U1 specifications cover workpieces 45–150 mm in diameter (customizable) and 80–280 mm in print length, with red-light positioning to speed up first-article alignment.
Before quoting glass bottles or tapered cups on any rotary system, check three physical boundaries on the blank:
- Neck and shoulder transitions: A 80–280 mm print length covers most straight bottle bodies, but where diameter narrows sharply at the shoulder or neck, sample the bottle to verify the usable print zone.
- Conical taper angle: Conical support does not mean every steep tumbler taper clamps identically—test the actual glass in the chuck first.
- Small-diameter vials: Bottles under 45 mm in diameter fall outside the standard clamping range and require separate fixture confirmation.
Summary: Matching Glass Geometry to Equipment
| Glass Workpiece Type | Recommended Route | What to Confirm in Equipment Selection | Key Sampling Focus |
|---|---|---|---|
| Flat panels, signs, awards, photo blocks | UV Flatbed (XF-S6090S or XF-Y1218S-5G6) | Bed size vs. largest panel, max thickness, white/varnish channels, jig or CCD positioning | Edge margins, white-to-color alignment, and whether large gradients show cleaning streaks |
| Cylindrical & conical bottles, tumblers, jars | Cylinder UV Printer (XF-Z300-3I16U1) or rotary attachment | Diameter range (45–150 mm on Z300), print length (80–280 mm), taper adjustment, chuck grip | 360° wrap alignment, shoulder height limit, and adhesion after the customer’s washing method |
| Installed windows/doors, oversized or compound glass | UV DTF Transfer Film or Vinyl Decals | Roll width, adhesive type, and lamination setup | Bubble-free application, edge hold during wiping, and clarity of unprinted areas |

First-Surface vs. Second-Surface Printing: Decide the Viewing Side
Because clear glass is transparent, you must choose which face carries the ink before building the print file: first-surface printing (ink applied to the viewer’s side) or second-surface printing on glass (ink printed in reverse on the back face and viewed through the front of the glass).
As Direct Color Systems defines the process, second-surface printing places a reversed graphic on the back of the panel so it is viewed through the glass and shielded by it—a standard choice for architectural signage, desk blocks, and backlit displays.
| Feature | First-Surface (Printed on Viewing Side) | Second-Surface (Printed on Back, Viewed Through Glass) |
|---|---|---|
| Artwork Orientation in File | Normal (Right-Reading) | Horizontally Mirrored (Reverse-Reading) |
| First Layer Seen by Viewer | Outer color (or clear varnish) layer on top | Color layer bonded directly against the back face of the glass |
| White Ink Position (Viewing Order) | Between the glass and the color layer (underbase) | Behind the color layer (rear backing layer) |
| Front-Side Ink Exposure | Directly exposed to fingers, abrasion, and wiping | Protected from front-side touch by the glass thickness |
| Typical Applications | Drinkware, bottles, tactile raised-varnish crests, frosted plaques | Door/partition signs, backlit displays, desk photo blocks |
| Main Setup Risks | Surface scratches and washing wear | Forgetting to mirror artwork; white-to-color registration shift; rear moisture or mounting tape damage |

Keep four operational rules in mind when setting up viewing direction:
- Spatial viewing order is not a universal jetting sequence: The table above describes the layer order relative to the viewer’s eye. How your printer physically jets those layers (single-pass multi-layer vs. separate pull-back passes) depends on your RIP software and printer mode—confirm your RIP’s reverse-print layer order on a test piece first.
- Back-side printing does not guarantee outdoor weatherability: Glass protects the front of the graphic from fingernails, but the rear ink backing remains exposed to wall condensation, mounting adhesives, or outdoor dampness unless properly sealed and specified.
- Two-sided viewing requires a registration test: Partition glass viewed from both directions sometimes uses a Color → White → Color sandwich stack, which requires tight opacity and alignment verification on a sample.
- Bottles and cups are always first-surface prints: Rotary cylinder printers jet ink onto the exterior wall of drinkware, leaving the cured film directly exposed to handling and washing.
White Ink on Clear Glass: Full Flood, Spot White, or None
Without white ink on clear glass, CMYK inks are translucent; printed alone on clear glass, colors appear pale and shift depending on the wall or light behind them. Both DCS and LONGER note that a glass-capable UV printer lets you lay down white as a full flood, restrict spot white strictly beneath colored elements, or omit white where you want glass transparency to remain.
| Desired Visual Result | White Ink Approach | Common Examples | What to Check on the Proof |
|---|---|---|---|
| Solid, opaque image unaffected by background | Full-flood white or solid white across the entire panel | Photo blocks, full-coverage plaques, solid signs | White uniformity (no pinholes or pass banding) and color accuracy |
| Vivid logo with clear glass around it | Spot white (generated only under colored pixels) | Office door logos, crystal awards, custom pint glasses | White-to-color registration; verify white does not peek out on fine lines or small text |
| Translucent “stained-glass” look | No white ink (CMYK only, or reduced white density) | Decorative window art, sun-catchers | Color vibrancy under the actual installation lighting and background |
| Backlit signage | White diffuser layer (tuned per device and sample) | Backlit menu boards, retail lightboxes | Appearance with the backlight both ON and OFF |
| Readable colors on dark/tinted glass | Opaque white underbase beneath all colored elements | Amber beer bottles, green wine bottles, smoked glass | Whether the dark glass tint muddies yellow or light ink tones |

When configuring white, color, and clear layers, verify three details on your pre-production proof:
- Evaluate the sample against the real background: Hold clear-glass proofs in front of the same wall color or window lighting where the buyer will mount them, not just over a white inspection table.
- Tune white choke on fine details: If spot white matches the exact pixel perimeter of the color layer, minor mechanical shifts can expose a white halo. Test two or three RIP choke (inset) settings on your smallest text and vector lines.
- Treat clear varnish as decorative rather than protective proof: Many UV systems (including XINFLYING, Roland DGA, and LONGER printers) offer clear varnish for gloss highlights or raised textures, but never assume a varnish overcoat makes a print dishwasher-safe or outdoor-durable.
Four Hypothetical Order Scenarios: Putting the Decisions Together
(Note: These four scenarios are hypothetical examples, not customer cases or test results, illustrating how equipment, viewing side, and white ink combine in practice.)
- Office Partition Logo (Uninstalled Panels): Viewed from a hallway looking into a room → Route to a UV flatbed (XF-S6090S), print second-surface (horizontally mirrored on the back) with spot white so surrounding glass remains clear, and check choke alignment under hallway lighting. If the glass is already installed in the wall, switch to UV DTF or vinyl decals.
- Glass Awards and Photo Blocks: Handled during presentations and displayed on desks → Route to a UV flatbed (XF-Y1218S-5G6 with CCD positioning for multi-piece batches); use first-surface if the buyer wants tactile raised varnish on a crest, or second-surface to protect a full-bleed photo behind the glass.
- Batch of Event Pint Glasses: Cylindrical/tapered drinkware within 45–150 mm diameter and 80–280 mm length → Route to the XF-Z300-3I16U1 rotary printer, print first-surface with a spot white underbase, keep the drinking rim unprinted, and test your planned hand-wash routine on samples before writing care cards.
- Backlit Glass Menu Board: Mounted over an LED lightbox → Route to a UV flatbed, print second-surface (mirrored) with a white diffuser backing, and inspect the proof with the LED box switched both on and off.
Surface Preparation: Clean, Treat, and Keep It Clean
Learning how to use uv printing on glass reliably comes down to disciplined surface preparation. Every glass job requires thorough cleaning and glove handling, while adhesion promoters are selected by testing your specific glass batch and end use:
- Clean and dry completely: Wipe the glass with an appropriate glass-cleaning solution and a lint-free cloth to remove oils, dust, and fingerprints, then allow it to dry completely before loading (as both LONGER and DCS advise).
- Wear gloves after cleaning: Never touch the cleaned print zone with bare fingers; skin oil immediately compromises ink wetting.
- Weigh both manufacturer positions on uv printing glass primer: – DCS states that glass printing typically requires an adhesion promoter to give cured UV ink a lasting grip on non-porous glass. – LONGER states that primer is not necessarily required for every glass product, noting that treatment depends on the glass, ink, and intended use, and advises test-printing new glass types first. – Practical shop rule: For items that will be handled, wiped, or washed, test side-by-side “cleaned-only” and “primed” samples on the exact production glass batch. XINFLYING’s flatbed workflow follows the same rule: “Clean surface; apply primer if needed.”
- Apply treatments strictly by product instructions: Wipe-on or spray-on promoters must follow their manufacturer sheet. Some flatbed systems (such as selected Roland DGA VersaUV LEF2 and IU-1000F models) offer jettable primer channels, while industrial bottle decorators also use flame treatment, Pyrosil®, or plasma treatment (listed by Inkcups) to break down cold-end coatings and activate glass surfaces.
- Prevent primer haze on unprinted clear glass: As LONGER warns, excess promoter on clear glass can cloud or streak transparent zones. Check on your sample whether promoter should be masked or restricted to the graphic area.
- Follow SDS safety and routine machine care: Use cleaners and primers with proper ventilation and PPE per their Safety Data Sheets, and follow a regular UV printer maintenance checklist plus proper curing lamp checks so nozzle deflections or stray UV reflections do not ruin glass solids.
Sample Verification and What You Can Promise the Customer
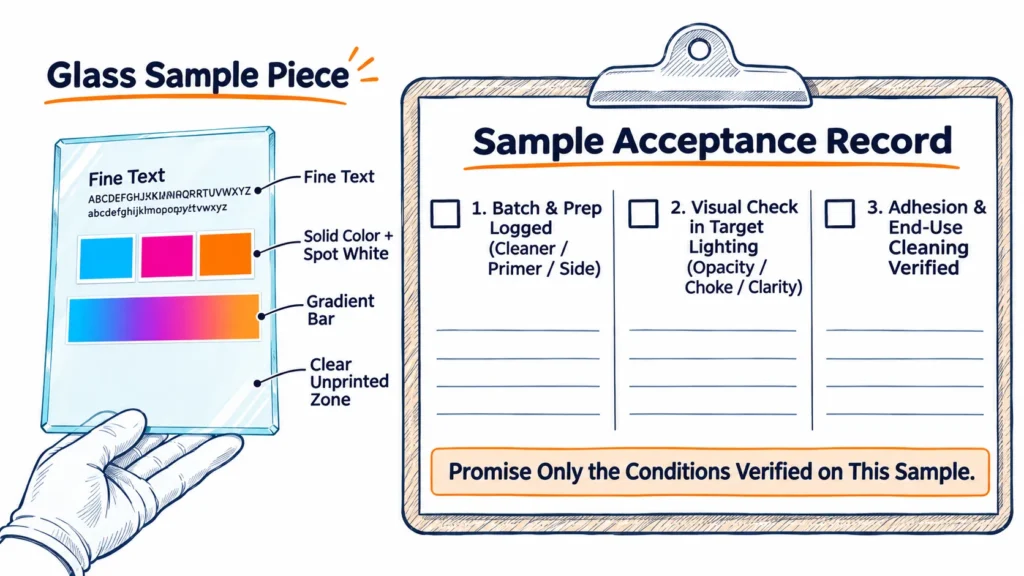
As DCS recommends, always sample on the exact glass blank you plan to run in production. Walk every pre-production proof through four verification steps before approving the batch:
- Print on a production-lot blank: Apply your planned cleaning and primer routine to a blank from the customer’s actual lot, and print a test layout containing small text, thin lines, solid blocks, gradients, and white-to-color borders.
- Check appearance in real viewing light: Inspect the sample against the target wall color, window, or lit LED panel for correct reading orientation, white opacity, edge choke, and unprinted glass clarity.
- Run shop adhesion checks: Decorators commonly use the scratch test, tape test, and crosshatch test (inspection methods listed by Inkcups) to check whether cured ink chips or lifts after cooling and post-print dwell. Treat these as shop verification tools rather than formal certifications, and remember that surface dryness off the bed does not equal final bond strength.
- Test the intended cleaning method: As LONGER advises for drinkware, test printed cups and bottles under their intended cleaning routine. Only evaluate dishwasher tests or 24-hour ice bucket tests (methods listed by Inkcups) if the buyer requires that use and you actually perform those trials on the sample.
Glass UV Printing Sample Acceptance Record & Customer Promise Guide
Log your sample results in the left columns below, and restrict your customer quotation and care card wording to the evidence boundaries on the right:
| Verification & Use Area | What to Record on Your Shop Sample Log | Evidence Needed Before Promising to a Buyer | Safe Default Advice Without That Evidence |
|---|---|---|---|
| 1. Blank Lot & Surface Prep | Supplier, batch, dimensions, printed side (optionally log air vs. tin side on flat glass), cleaner, glove use, and primer name/zone | Verified pass on a blank from the exact production batch (coatings vary across glass lots) | Require sample testing whenever the customer switches bottle or panel suppliers |
| 2. Viewing & RIP Setup | First vs. Second Surface, Mirror ON/OFF, White mode (Flood/Spot/None/Diffuser), choke setting, and real-light visual result | Approved visual proof held against the target background or lightbox | Do not run multi-panel or bulk drinkware orders from screen previews alone |
| 3. Indoor Display & Awards | Scratch, tape, or crosshatch check result after post-print wait period | Passed visual check + passed shop scratch/tape check on the production glass lot | Specify for indoor display and gentle dusting/wiping with a soft, non-abrasive cloth |
| 4. Hand-Washed Drinkware | Shop adhesion check + repeated hand-wash trials using mild soap and soft sponge | Passed shop adhesion check + passed repeated hand-wash trials on the exact bottle/cup blank | Label “Hand-wash gently; do not soak or scrub printed area” only after hand-wash trials pass |
| 5. Dishwasher or Ice-Bucket Use | Multi-cycle dishwasher or 24-hour ice-bucket trial logs on the exact blank | Passed multi-cycle trials on the exact blank + written support in ink and primer documentation | Do not claim “dishwasher safe” by default; quote as hand-wash or decorative glassware |
| 6. Outdoor Signage & Food/Rim Zones | Ink weatherability sheet, rear sealing method, or rim clearance measurement | Written outdoor durability or direct food-contact documentation from ink and primer suppliers | Keep drinkware prints below the lip/rim zone; note that second-surface glass does not seal the rear ink layer from moisture |
A sample proves only the conditions you tested. Never promise dishwasher resistance, outdoor weatherability, or food-contact suitability unless your sample test and supplier documentation both support that exact use.
Frequently Asked Questions
Yes. Flat glass panels, signs, and awards print on a UV flatbed printer, while cylindrical and conical bottles or tumblers print on a rotary cylinder UV printer or a flatbed equipped with a rotary attachment. Reliable results depend on thorough cleaning, batch-specific surface prep, and sample verification.
Manufacturer guidance differs: Direct Color Systems states that glass printing typically requires an adhesion promoter, while LONGER notes that primer is not required for every glass item and depends on the glass, ink, and end use. For items that will be handled or washed, compare cleaned-only and primed samples on the same glass batch and follow the product’s instructions.
UV ink usually scratches or peels off glass due to skin oils, household cleaner residues, factory hot-end or cold-end bottle coatings, a missing or misapplied adhesion promoter, or incomplete UV curing. Re-test on a freshly cleaned blank from the same lot to isolate whether surface prep or curing needs adjustment.
Use white ink whenever you need opaque, vivid colors unaffected by the background wall or lighting—or when printing on dark amber or green bottles. Omit white ink in selected areas only when you want clear glass or a translucent stained-glass appearance.
Second-surface printing means printing horizontally mirrored artwork on the back face of clear glass so the viewer looks through the front of the panel. Viewed from the front, the color layer sits directly against the glass with white ink behind it as a backing layer, shielding the graphic from front-side touch.
Not by default. Only promise dishwasher resistance if you have tested that exact glass blank, ink, and pretreatment through dishwasher cycles and confirmed support in your ink and promoter documentation; otherwise, label drinkware for gentle hand washing.
Yes, using a rotary cylinder UV printer (such as the XF-Z300-3I16U1 for 45–150 mm diameters and 80–280 mm lengths) or a flatbed rotary attachment. Always sample the actual bottle to verify printable height near tapered shoulders and test adhesion over factory bottle coatings.
A uv glass printing machine price depends on flatbed working area or rotary cylinder capacity, printhead configuration, and white/varnish channels. Request a quote matched to your largest glass piece and batch volume, and confirm which white ink channels, fixtures, and pretreatment supplies are included.
Match Your Glass Project to the Right UV Printer Setup
To get a configuration recommendation and quotation for your glass orders, send us five project details:
- Workpiece type and dimensions (flat panel size and thickness, or bottle diameter, length, and taper)
- Viewing direction and background (first-surface front print vs. second-surface mirrored back print, plus lighting setup)
- Target visual effect (full opaque white, spot white with clear glass, translucent color, or backlit diffuser)
- Expected handling and cleaning (indoor display, hand-washed drinkware, or specialized commercial use)
- Estimated order quantity and batch variety
Browse our UV printer machines or contact us with your project specs. Our team will recommend the right flatbed (XF-S6090S or XF-Y1218S-5G6), rotary cylinder printer (XF-Z300-3I16U1), or UV DTF alternative, confirm which white ink configurations, fixtures, and pretreatment supplies are included in your quote, and help arrange sample testing when you can ship target glass blanks.