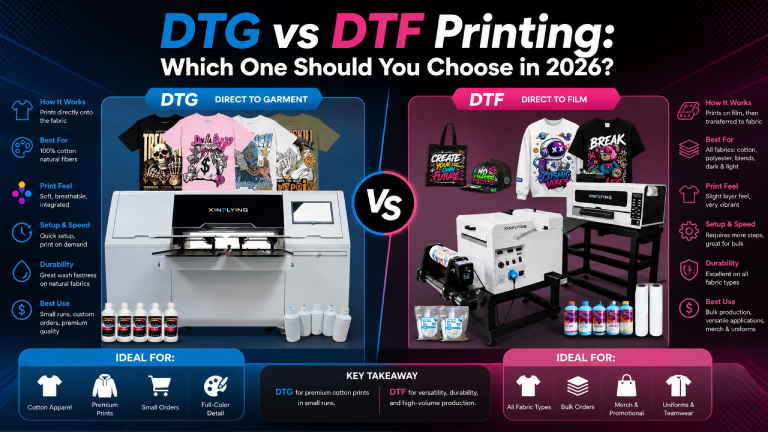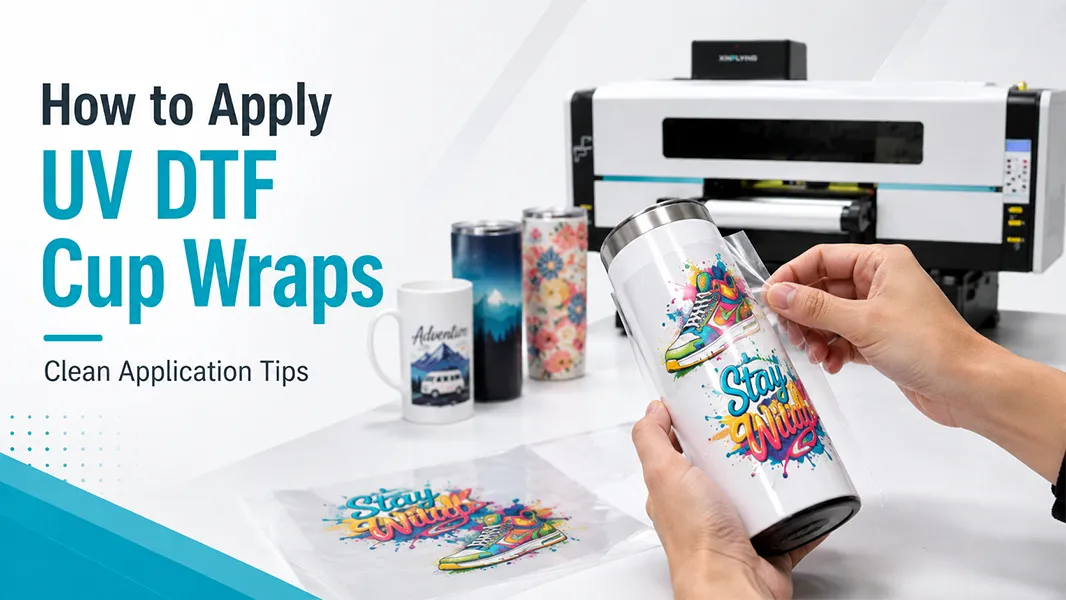
Applying a UV DTF cup wrap looks straightforward until you are working with a glossy tumbler, a tapered surface, and a one-off personalized design. The final result depends on careful preparation and controlled application, not force.
The good news: UV DTF transfers do not normally need a heat press. The less-good news: once the adhesive makes full contact, repositioning may be difficult or impossible. A slow, deliberate first application is much faster than trying to hide bubbles, wrinkles, or a crooked name graphic.
This guide explains how to apply a UV DTF wrap to cups and tumblers with cleaner alignment and fewer edge-lift problems.
Before You Apply: Confirm That the Cup Is Suitable
UV DTF wraps generally work best on smooth, clean, rigid surfaces. Test new blanks before using them in a customer order.
Better starting points include smooth powder-coated tumblers, glass cups, acrylic items, and hard plastic or metal surfaces with a stable coating. More difficult surfaces include rough texture, soft-touch coatings, flexible plastics, deep tapers, or heavily curved zones.
What You Need
Prepare everything before peeling any film:
- Finished UV DTF transfer or cup wrap. (If you don’t already have UV DTF Cup Wraps, you can browse our UV DTF Sticker Printer solution page.)
- The target cup or tumbler.
- Lint-free wipes.
- A surface cleaner compatible with the cup coating.
- A soft squeegee, felt-edge tool, or clean fingertip pressure method.
- Scissors or a craft cutter for trimming if needed.
- Low-tack tape or a visual alignment mark for long wraps.
- A clean, well-lit work surface.
Avoid applying transfers near powder, loose fibers, or active cutting debris. Dust trapped under a glossy transfer is surprisingly visible.
Step 1: Clean and Dry the Cup Surface
Wipe the decoration area using a lint-free cloth and a surface cleaner that is appropriate for the cup material. The goal is to remove fingerprints, oils, dust, packaging residue, and moisture.
Let the surface dry completely before applying the wrap. Do not touch the cleaned area with bare fingers afterward. Oils from hands can reduce adhesion in small but important spots, especially near the edges.
For coated drinkware, test the cleaner first. An aggressive solvent can damage certain coatings or create a hazy patch, which will be more noticeable after a clear carrier film is removed.
Step 2: Check the Wrap Size and Position Before Peeling
Hold the transfer against the cup without removing the release liner. Check height, seam position, and where the design will sit when the cup is held naturally.
For a wrap that goes most of the way around a tumbler, decide where the seam will be. Put it in a less visible position – usually opposite the main front graphic or near the back. For names or logos, use the lid, handle, or cup geometry as a reference point so that every application is positioned consistently.
If you are applying a long or wide transfer, use a small piece of low-tack tape as a hinge. This lets you secure the location, lift one side, remove the release liner gradually, and apply in a controlled direction.
Step 3: Identify the Correct Film Layer
UV DTF film systems are often described as A film and B film, but suppliers do not always use the same names. Before beginning, identify:
- The release liner that is removed before the adhesive graphic contacts the cup.
- The clear carrier film that remains in place during the initial application and is removed only after the transfer has bonded.
Do not rely on the letter alone. Confirm your film supplier’s instructions with a small test. Peeling the wrong layer at the wrong time is one of the fastest ways to damage a transfer.
Step 4: Apply From the Center Outward
Peel back only a small section of the release liner first. Anchor the center or one edge of the graphic, then apply gradually.
Use controlled pressure from the center outward. Your goal is to push air toward the edge, not trap it under the transfer. Work in small sections rather than trying to lay down the whole wrap at once.
For a straight tumbler, you can apply along a vertical reference line. For a tapered cup, use smaller sections and allow the geometry of the cup to guide the design. A large rectangular transfer may need a planned seam, gap, or slight overlap to avoid wrinkling.
Step 5: Burnish the Transfer Thoroughly
Once the whole design is in place, burnish it firmly but carefully. Pay special attention to:
- Edges and corners.
- Fine lines and small text.
- Areas around cup curvature.
- Seams or any overlap zone.
- Spots that look slightly cloudy or less bonded.
Use a soft tool to avoid scratching the carrier film or cup finish. Excessive force is not the goal; even contact is. On a curved object, repeated passes with controlled pressure are safer than one aggressive press.
Step 6: Allow a Short Set Time, Then Remove the Carrier Film Slowly
Give the transfer time to establish contact according to your film supplier’s instructions. Then begin removing the clear carrier film slowly and at a low angle, pulling back nearly parallel to the cup surface rather than straight away at 90 degrees.
Watch the design as you peel. If a detail begins to lift, stop. Lay the carrier back down, burnish that area again, wait briefly, and retry. Do not pull harder – that usually worsens edge lift.
A slow, low-angle peel gives the adhesive layer a better chance to remain attached to the cup while the carrier film releases.
Step 7: Inspect the Finished Wrap Before Packaging
Check the cup under normal indoor light and angled light. Look for:
- Bubbles or air channels.
- Lifted edges.
- Wrinkles on the curve.
- Misalignment at the seam.
- Incomplete transfer of fine details.
- Dust or fingerprints trapped under the graphic.
If you find a small bubble near an edge, it may be possible to re-burnish carefully. If the graphic is severely wrinkled or misaligned, replacing the transfer is usually more professional than trying to hide the defect.
How to Handle Tapered Cups and Curved Tumblers
A tapered cup is not a flat rectangle. The more the diameter changes from top to bottom, the more likely a full-width rectangular graphic will wrinkle or overlap unpredictably.
Use these approaches:
- Make the wrap shorter or use partial decoration.
- Split the artwork into separate panels.
- Create a tapered template from the actual cup dimensions.
- Place the main graphic on the least curved area.
- Design the seam into a pattern or background element.
For customer orders, standardize your best-selling cup models. A library of approved templates saves more time than forcing every new cup into the same wrap size.
Common UV DTF Application Problems
Bubbles under the wrap
Usually caused by applying too much film at once, uneven pressure, surface contamination, or cup curvature. Apply more slowly and work from the center outward.
Edges lift after the carrier is removed
Check surface cleanliness, substrate compatibility, burnishing, set time, and peel angle. Also confirm that the cup coating has not been treated with a silicone-like or soft-touch finish that resists adhesion.
The transfer wrinkles around the side
The wrap geometry does not match the cup geometry. Use a smaller design, a tapered template, or split the graphic.
Small details remain on the carrier film
Stop peeling, lay the carrier film back down, burnish the area again, wait, and peel more slowly at a lower angle. If this happens repeatedly, review the film system, surface preparation, and curing/lamination quality of the transfer itself.
The cup looks scratched or cloudy after cleaning
The cleaner may be too aggressive for the coating. Test every blank and cleaning product before you use them on paid orders.
Care Instructions: Be Conservative Until You Have Tested the System
Care advice should come from your own material testing, not a generic internet claim. The durability of a UV DTF wrap depends on the specific film, ink, cup coating, application quality, and customer use conditions.
Until you have validated a reliable care profile, conservative instructions are sensible:
- Hand wash gently.
- Avoid abrasive scrubbers.
- Avoid prolonged soaking.
- Do not assume dishwasher, microwave, or high-heat safety without testing the exact cup and transfer system.
This protects the customer experience and helps you build a repeatable product standard.
Turn Application Into a Repeatable Process
The most efficient UV DTF application workflow is based on standardization: a limited number of cup blanks, documented templates, approved film settings, a fixed cleaning method, and a simple quality-control checklist.
Once you can apply the same wrap cleanly ten times in a row, it becomes much easier to sell personalization confidently. That is the difference between a craft process and a scalable custom-product workflow.
FAQ: How to Apply UV DTF Cup Wraps
Do UV DTF cup wraps need heat?
Generally, no. UV DTF transfers are normally applied with pressure rather than a heat press. Follow the material supplier’s instructions for the specific film system.
Can I reposition a UV DTF wrap after it touches the cup?
Sometimes only minimally, and often not at all. Position the wrap carefully before allowing full contact. A low-tack tape hinge can help with longer transfers.
Why is my UV DTF wrap lifting at the edges?
Common causes include surface contamination, an unsuitable cup coating, insufficient burnishing, fast carrier removal, incorrect film handling, or a wrap that is fighting the cup’s curvature.
Should I tell customers the cup is dishwasher safe?
Only after you have tested the exact cup, film, ink, application method, and dishwasher conditions. Without validated testing, provide conservative hand-wash guidance.