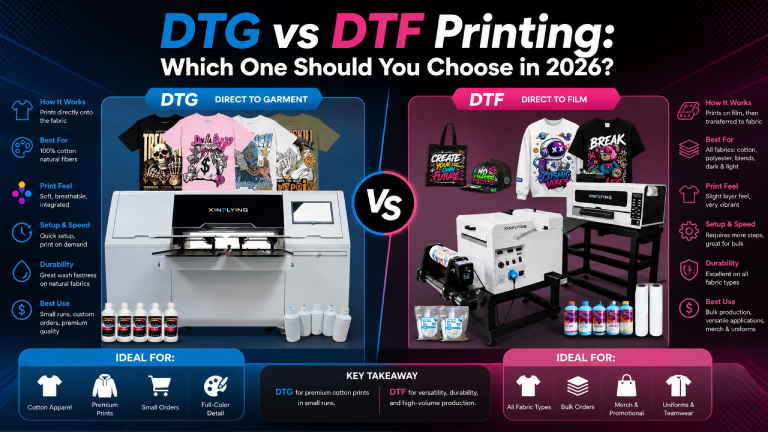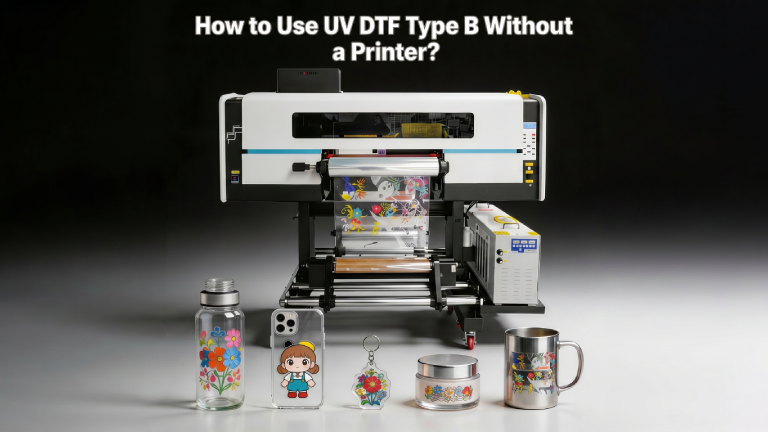
If you’ve been eyeing UV DTF (Direct-to-Film) Type B transfers but don’t own a UV printer, you’re not alone. The good news is that pre-printed UV DTF Type B transfers are widely available — and applying them is surprisingly straightforward. This guide walks you through everything you need to know to get professional-quality results on hard surfaces, from tumblers and phone cases to keychains and glass, all without touching a printer.
What Is UV DTF Type B?
UV DTF Type B is a specialty transfer film designed for hard, non-porous surfaces. Unlike regular DTF (which bonds to fabric with heat), UV DTF Type B uses a UV-cured ink system that self-adheres once activated, allowing it to stick to materials like:
- Glass (cups, bottles, windows)
- Metal (tumblers, keychains, water bottles)
- Acrylic and plastic (phone cases, plaques, signs)
- Ceramic (mugs, tiles)
- Wood (finished/sealed surfaces)
Type B transfers come pre-printed and laminated on a two-layer film — a clear carrier film on top and a release liner on the bottom. No heat press. No printer. Just your hands and a flat surface.
What You Need
Before you start, gather these supplies:
- Pre-purchased UV DTF Type B transfer sheets (custom or pre-made designs)
- The item you want to decorate
- Isopropyl alcohol (70% or higher) and a clean lint-free cloth
- A squeegee, credit card, or your fingernail
- Optional: a heat gun or hairdryer (for curved surfaces)
Step-by-Step Application Process
Step 1: Clean Your Surface
This is the most critical step. Any dust, oil, or residue will prevent proper adhesion.
- Wipe down your item thoroughly with isopropyl alcohol.
- Let it dry completely — don’t touch the surface with bare hands after cleaning.
- For glossy surfaces (glass, coated tumblers), a second wipe-down is recommended.
Step 2: Prepare Your Transfer
- Lay your UV DTF Type B sheet flat on a clean surface.
- Carefully cut around your design, leaving a small border (about 2–3mm).
- Do not peel the release liner yet.
Step 3: Position the Transfer
- Hold the transfer up to your item and plan your placement.
- For flat surfaces, this is easy. For curved items like tumblers, start at the center of the design and work outward.
- Mark your placement lightly if needed.
Step 4: Peel the Release Liner
- Gently peel back the white/clear release liner from the bottom of the transfer.
- You’ll now see the sticky adhesive side of the design.
- Avoid touching the adhesive — handle it from the edges.
Step 5: Apply to the Surface
- Align the design carefully with your surface.
- Press down from the center outward to avoid air bubbles.
- Use a squeegee or the edge of a credit card to firmly press the entire design down with smooth, even strokes.
- For curved surfaces (tumblers), work in small sections, stretching the film gently as you go. A heat gun on low can soften the film to help it conform to curves — keep it moving and don’t overheat.
Step 6: Remove the Top Carrier Film
- Allow the transfer to sit for 30–60 seconds after pressing.
- Slowly peel back the clear top carrier film at a low angle (almost parallel to the surface).
- If the design starts to lift with the carrier, press it back down and wait another minute before retrying.
- Pull steadily and evenly — don’t yank.
Step 7: Final Press and Finishing
- Once the carrier film is removed, use your squeegee one more time over the design to ensure full adhesion.
- Check edges and corners — press down any areas that didn’t fully bond.
- Let the item rest for 24 hours before washing or heavy use.
Pro Tips for Better Results
For tumblers and bottles: Use a heat gun on low heat (around 120–140°F / 50–60°C) to warm the film before applying. This makes it more pliable and dramatically reduces bubbles on curved surfaces. Work in quarters — apply one section at a time.
Avoid these common mistakes:
- Skipping the alcohol clean — this causes peeling within days
- Rushing the carrier film removal — patience is everything
- Using on rough or matte surfaces — UV DTF Type B bonds best to smooth, finished surfaces
- Submerging items in water right away — wait 24–48 hours for full cure
For small or intricate designs: Use a toothpick or pin to gently press down tiny details before removing the carrier.
Durability and Care
When applied correctly, UV DTF Type B transfers are:
- Water-resistant (but not dishwasher safe at high heat)
- UV-resistant (color stays vibrant outdoors)
- Scratch-resistant compared to stickers or vinyl decals
Hand wash recommended. For tumblers, top-rack dishwasher with a gentle cycle is often fine, but high-heat cycles may loosen edges over time.
Where to Buy Pre-Printed UV DTF Type B Transfers
You don’t need a printer — just a reliable supplier. Look for:
- Custom print shops offering UV DTF transfers (Etsy sellers, local print shops)
- Bulk gang sheet orders (cost-effective for multiple designs)
- White-label UV DTF suppliers if you’re reselling
When ordering, always specify: Type B (hard surface) — not Type A, which is for fabric and requires a heat press.
Final Thoughts
UV DTF Type B is one of the easiest ways to add full-color, professional designs to hard surfaces — and you absolutely do not need a printer to get started. With pre-made or custom-ordered transfers, a clean surface, and a little patience during application, you can produce results that look just as good as anything coming off a UV flatbed printer.
Whether you’re starting a small business, personalizing gifts, or just experimenting with a new craft, UV DTF Type B is a skill worth adding to your toolkit.