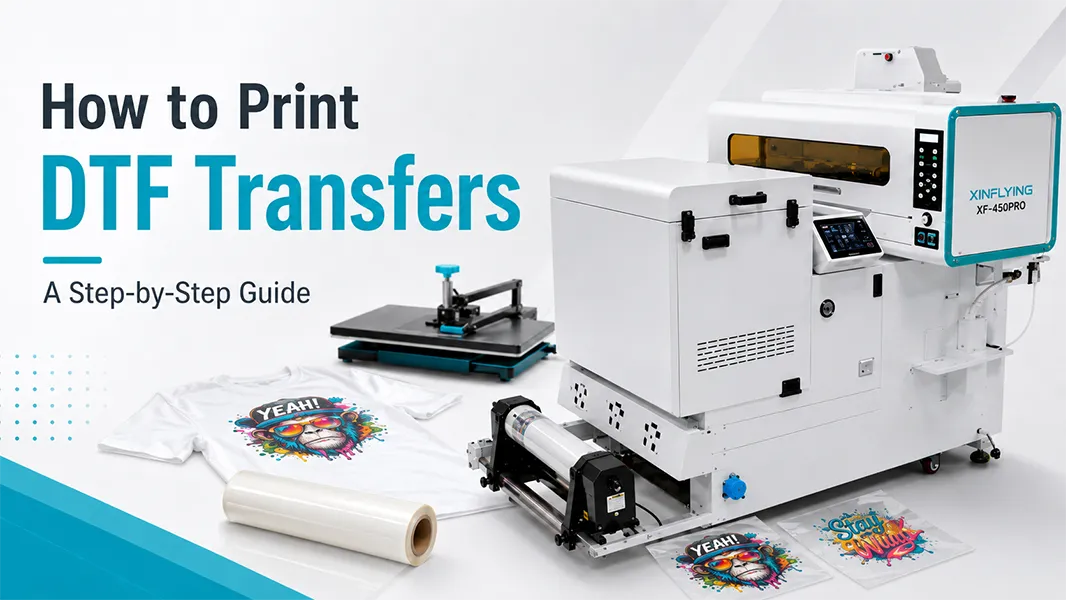
DTF transfer printing is often described as a simple sequence: print, powder, cure, press. That is broadly true – but consistent production comes from controlling the handoffs between those stages. Artwork preparation, white ink performance, powder coverage, curing, and heat-press conditions all affect the final transfer.
This guide explains a production-minded DTF workflow for apparel decorators, print shops, and businesses moving shirt production in-house. It is written for operators who want repeatable transfers rather than one good sample.
What You Need Before You Start
A basic DTF workflow requires more than a printer. Prepare the whole chain before you run a job:
- A DTF Printer Machine with RIP software and a maintained white-ink system.
- DTF PET film that is compatible with your printer and powder.
- DTF inks, including white ink.
- Hot-melt adhesive powder.
- A shaker/curing unit or a controlled curing setup.
- A heat press with even pressure and stable temperature.
- Clean garments or substrates for testing.
- Lint-free wipes, a nozzle-check routine, and a simple job log.
How DTF Transfer Printing Works
In a standard DTF workflow, the printer lays down the color image on PET film and then prints white ink as the backing layer. Adhesive powder is applied while the ink is still wet. The coated film is cured so the powder melts into a stable adhesive layer. The finished transfer is then heat-pressed onto the garment.
The important point is that DTF is a system. A change in one part of the system can show up later as poor opacity, weak adhesion, rough texture, color shift, edge lift, or inconsistent peeling.
Step 1: Prepare Artwork for DTF Printing
Start with a clean, high-resolution design. For most production work, use the original vector artwork or a high-quality raster file with a transparent background. Check fine details, semi-transparent effects, gradients, and small text at actual print size – not just on a large monitor.
Before sending the file to RIP, confirm these items:
- The design size matches the intended garment placement.
- Transparent pixels are actually transparent, not a white background.
- Fine lines are thick enough to survive powdering, curing, and transfer.
- Colors have been reviewed using a known-good print profile.
- You understand your RIP’s handling of white ink and print order.
Do not mirror artwork by habit. In many DTF workflows, the image is printed in normal reading orientation and the white layer is created behind the color layer in RIP. Follow the requirements of your RIP and film system, then verify with a small test before committing to a production run.
Step 2: Prepare the Printer and Check White Ink
White ink is usually the most maintenance-sensitive part of a DTF setup. Before printing, make sure white ink circulation, agitation, and filtration are operating as intended for your machine.
Run a nozzle check. Do not try to compensate for missing nozzles by increasing white ink density or adding more passes. Fix the print condition first. A clean nozzle pattern is the foundation for smooth color, solid white coverage, and predictable powder adhesion.
Keep the print environment stable. Temperature and humidity changes can affect film behavior, ink drying, and static. A short daily checklist is far more valuable than troubleshooting the same issue after a long production run.
Step 3: Print on DTF PET Film
Load the correct side of the PET film for your material system. Film orientation differs by product, so confirm it before printing a full roll.
Print the color layer first, followed by the white backing layer as configured in RIP. Watch the first section of output for these early warning signs:
- Banding or missing detail in solid colors.
- Weak or uneven white backing.
- Excessive ink spread in small text or fine artwork.
- Film tracking that shifts the image across the roll.
If one of these appears, pause and correct it. A poor print cannot be rescued by better powdering or a longer press.
Step 4: Apply Hot-Melt Adhesive Powder Evenly
Apply adhesive powder while the printed ink is still wet. The goal is complete, even coverage on the printed image – especially around small details and edges – without loose powder remaining in unprinted areas.
A shaker is helpful because it controls powder distribution and removes excess powder more consistently than manual handling. Whether you use an integrated unit or a separate process, inspect the transfer under good lighting. Random powder on transparent film can become unwanted specks after pressing.
Step 5: Cure the Powder Without Overheating the Transfer
Curing melts the adhesive powder into a stable layer. Use the time and temperature profile recommended for your powder and film combination. Do not assume one setting works for every supplier or machine.
Under-curing can lead to weak adhesion. Over-curing may make the adhesive brittle, increase gloss, or reduce the flexibility of the finished transfer. The transfer should look evenly fused, not grainy and not scorched.
For production consistency, record the powder, film, curing profile, garment type, and press profile used for each approved job. This makes reorders much easier to reproduce.
Step 6: Trim or Cut the Transfer
After curing, inspect the printed sheet before cutting. Look for clean edges, complete white backing, correct artwork orientation, and any powder contamination.
Gang sheets are efficient, but they need sensible spacing. Leave enough room between designs for trimming and avoid placing fine details too close to the edge of the film. A clean cutting stage reduces handling errors at the heat press.
Step 7: Heat Press the DTF Transfer
Place the transfer with the printed side against the garment. Use an even, firm press and follow the recommended temperature, time, and peel method for your consumables. Depending on the film, the carrier may be peeled hot, warm, or cold.
Avoid treating press settings as universal. Garment composition, fabric texture, transfer size, powder, and film all matter. A setting that works well on a smooth cotton tee may need adjustment for fleece, polyester blends, nylon, or textured workwear.
Many operators use a short finishing press after peeling, with a protective sheet where appropriate. This can help set the transfer surface and improve the feel, but it should be tested with your specific film system rather than added automatically.
Quality-Control Checks Before You Ship
A practical DTF quality check should include more than visual inspection. Test a representative transfer on the target garment and assess:
- Adhesion: Are the edges fully attached after cooling?
- Stretch recovery: Does the graphic stretch without cracking or lifting excessively?
- Fine detail: Are thin lines and small text still readable?
- Opacity: Does the artwork hold up on dark fabric?
- Surface feel: Is the transfer smooth and appropriate for the design area?
- Wash-test readiness: Have you saved a sample from a new material combination for wash testing?
For commercial orders, test the complete combination – garment, ink, film, powder, curing, and pressing conditions. A transfer can look perfect immediately after pressing but behave differently after a wash cycle.
Common DTF Problems and What They Usually Point To
Weak adhesion or edge lifting
Check the curing profile, powder coverage, heat-press pressure, garment surface, and peel timing. Also confirm that the garment has not been treated with a coating or softener that interferes with adhesion.
Patchy white or poor opacity
Start with the nozzle check and white ink circulation. Then review white ink density in RIP, print settings, and the condition of the PET film coating.
Powder in unprinted areas
Review shaker settings, powder removal, humidity/static, and how the film is handled between printing and curing.
Transfer feels too heavy
Assess whether the artwork contains large solid areas, whether white ink density is higher than necessary, and whether the powder layer is excessive. The best answer is not always “less powder”; it is a balanced profile that keeps adhesion reliable.
Build a Repeatable DTF Workflow
The fastest DTF workflow is not the one with the highest headline speed. It is the one that produces approved transfers without reprints, blocked nozzles, adhesion complaints, or last-minute press adjustments.
For businesses needing a compact all-in-one configuration, the Xin Flying XF-450PRO DTF Printer is positioned as a 16.5-inch solution. It should be evaluated as a complete workflow: expected order mix, available workspace, operator maintenance routine, consumable supply, and after-sales support – not just print speed. You also can read the DTF Printer for Shirts solution page.
FAQ: How to Print DTF Transfers
Do DTF designs need to be mirrored?
Usually, no – not automatically. Most DTF workflows print the artwork in normal orientation and use RIP to build the white backing layer. Verify this with your RIP and film system before printing a production job.
Can DTF transfers be used on cotton and polyester?
DTF is commonly chosen for multi-fabric garment production because the adhesive layer allows it to be applied to cotton, polyester, blends, and many other textiles. Always test unusual fabrics, heavily textured garments, and coated materials before production.
Why does white ink need more attention?
White pigment tends to settle more readily than CMYK inks. Stable circulation, agitation, nozzle checks, and cleaning routines help protect print quality and reduce downtime.
What is the most important DTF quality check?
Test the final transfer on the actual garment. A good-looking film is not the same thing as a durable finished print.