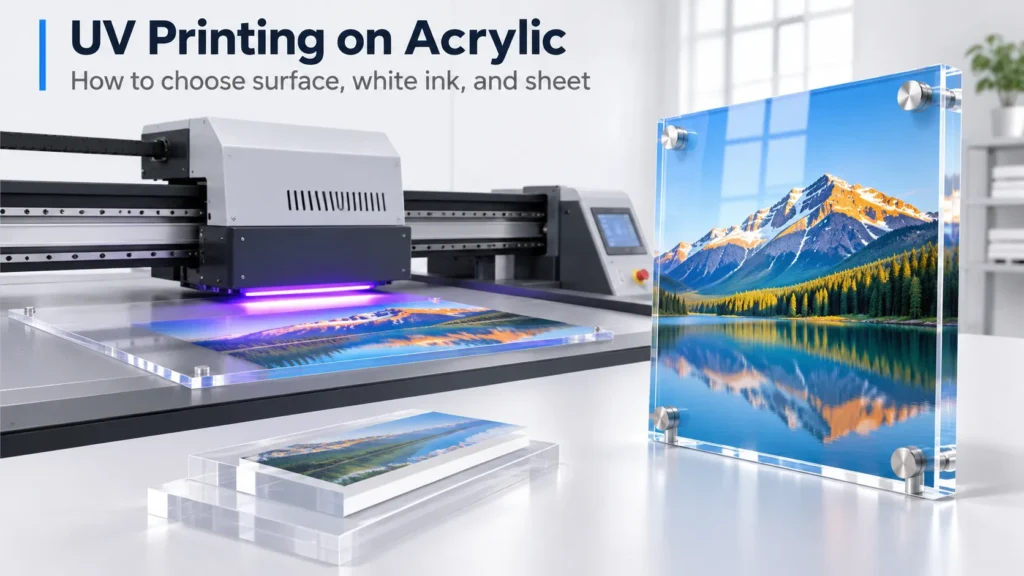
Reliable uv printing on acrylic starts by working backward from the finished viewing side before loading any sheet. Every order requires three linked decisions up front. First, choose the front face (sur la première surface) or the clear rear face (second-surface / reverse printing).
Next, decide where the artwork flips horizontally and where white ink sits in the pass order. Reversing the white-and-color sequence on a back-printed plaque hides graphics behind a solid white wall. Likewise, double-mirroring turns every word backward.
Your next choices depend on the polymethyl methacrylate (PMMA) grade on your pallet. Cast, general-purpose extruded, and digital-print sheets—such as Plaskolite OPTIX DA digital acrylic—follow different rules for primers, annealing, outdoor use, and cleaning. Wiping stressed laser-cut edges with acetone or concentrated alcohol triggers peeling ink and silver micro-cracks (stress crazing).
Use the matrix below to lock in your print side, mirroring rule, and layer order first. Then follow the reverse-print, cleaning, laser-cutting, flatbed, and proofing guides.
Acrylic UV Printing Setup Matrix: Viewing Goal → Print Side → Mirroring → Layer Sequence
| Target Visual Effect & Use Case | Acrylic Sheet Type | Print Side (Surface) | Artwork Orientation | Layer Order (First → Last) | White Ink Role & Conditions |
|---|---|---|---|---|---|
| Glass-Like Depth & Protected Front (Awards, lobby signs, photo blocks) | Clear or Frosted-Back Acrylic | Second Surface (Back) | Mirrored (Flip once in RIP) | 1. Mirrored CMYK → 2. White Backing → 3. Optional Blockout | Spot Under-base keeps background clear; Full Flood makes an opaque face |
| Opaque Sheet or Tactile Finish (Dark, colored, mirror, or raised textures) | Black, Colored, Mirrored, White, or Clear | First Surface (Front) | Right-Reading (Normal) | 1. White Underbase → 2. CMYK Color → 3. Optional Varnish | Solid white under color stops dark or clear sheets from shifting hues |
| Translucent / Stained-Glass Look (Lucent awards, window panels) | Clear Acrylic | First or Second Surface | Normal (Front) / Mirrored (Back) | CMYK Color Only (optional front varnish) | No White Ink so light passes through translucent CMYK inks |
| Double-Sided Graphic on Clear Sheet (Keychains, two-way tags) | Clear Acrylic | Single-Side Multi-Layer Stack | Rear mirrored; front right-reading | 1. Mirrored Back CMYK → 2. White (or W-B-W) → 3. Front CMYK | Requires separate front/back files and multi-layer RIP support for text |
| Backlit LED Lightbox Panel (Day/night retail & architectural signs) | Light-Diffusing, White, or Clear | First or Second Surface | Matches print side | Color + White Diffuser (or CMYK → White → Color) | Balances daytime reflection with even LED diffusion at night |
How Does Viewing Side Decide First-Surface vs. Second-Surface Layer Order and Mirroring?
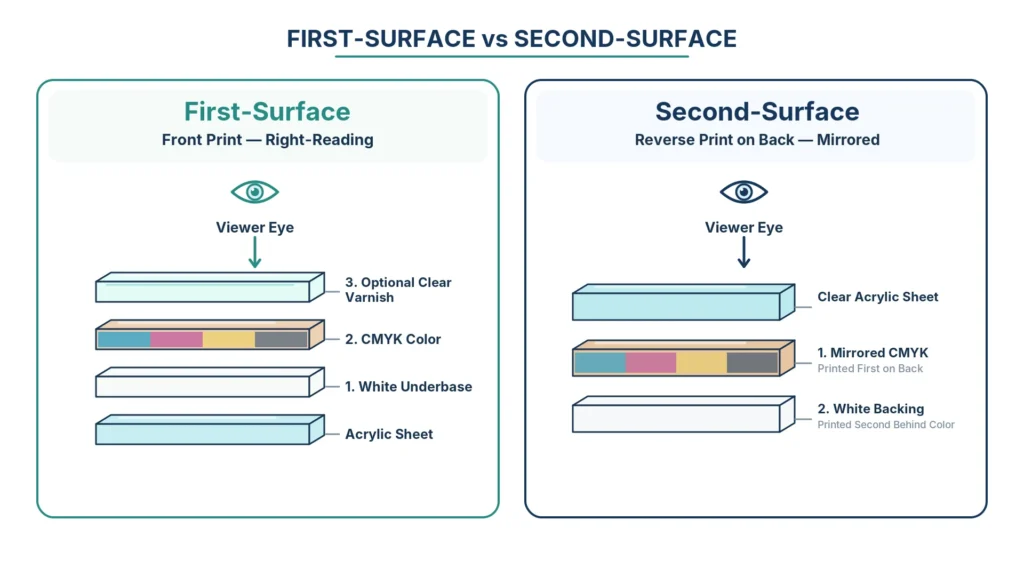
When planning uv printing on clear acrylic, check whether viewers see exposed ink directly or look through clear plastic. Testrite Visual defines first- and second-surface printing by viewing path. First-surface printing puts ink on the front face, while impression sur la deuxième face (reverse printing on acrylic) puts a mirrored image on the rear face.
For clear corporate awards, lobby signs, and photo blocks, US Acrylic Awards and Akrylix treat second surface uv printing on acrylic as standard practice. Rear printing uses the rigid acrylic front to guard ink against wiping and scratches. Meanwhile, sheet thickness refracts light for crisp glass-like depth.
In contrast, choose impression sur la première surface on the front face in three cases:
- Opaque or reflective sheets: Viewers cannot see through black, colored, mirrored, or two-ply metallic engravable sheets.
- Raised surface textures: Embossed clear varnish, matte-gloss contrast, and tactile lettering belong on top (see what UV printing is).
- Thin instrument panels: Front printing prevents visual parallax around LED cutouts and skips extra backing lamination.
Why the White Ink Pass Order Reverses Between Front and Back
UV ink stacks upward from the printer bed, while viewers always look from the finished front. Therefore, switching from front to back reverses the pass sequence:
- Front Print Needing a White Base (First-Surface): Jet 1. White Underbase → 2. CMYK Color → 3. Optional Clear Varnish. That order keeps white directly beneath the color.
- Reverse Print Needing a White Backing (Second-Surface): US Acrylic Awards states, “The color layer is printed first. After that layer is cured, the printer applies white ink behind selected portions of the artwork.” Consequently, mirrored CMYK touches the clear rear face first, followed by the white backing layer and optional blockout.
White coverage depends on your visual target. Award shops skip white ink for translucent designs like US Acrylic Awards’ Lucent line. Alternatively, they print a spot white under-base behind logos so open areas stay clear.
Set spot white as a named spot channel in your layout file. Operators often apply a slight inward choke in the RIP to hide white edges. For example, one metallic-acrylic tutorial used 0.15 mm, though choke values vary by registration and never guarantee zero bleed.
On frosted-back sheets, Akrylix warns that “Frosted backs make halos.” Therefore, use clear sheet or a full white flood for sharp edges.
Preventing Double-Mirrored Files and Backward Double-Sided Text
No UV printer or RIP detects whether a designer already flipped an artwork file. In commercial signage workflows, Akrylix notes that “the mirror flip happens in production, not in the design file.” Keep design files right-reading and let the RIP operator mirror once for second-surface jobs.
Take extra care on double-sided clear acrylic prints like keychains or tags printed from one side. Standard sandwich modes stack Back-View CMYK, an Opaque White Barrier, and Front-View CMYK.
To stop light bleed-through, LogoJET’s “Oreo cookie technique” inserts black ink between two white layers (CMYK → White → Black → White → CMYK). However, running one file through a 3-layer mode makes text or asymmetrical logos read backward on one side.
When art includes words, confirm your RIP can queue two registered files—one mirrored bottom pass and one right-reading top pass. Otherwise, keep lettering outside clear see-through zones.
How Do Cast, Extruded, and Digital-Print Acrylic Grades Change Cleaning and Primer Rules?
Before wiping a panel or spraying primer, verify the exact PMMA grade on your pallet. Plaskolite’s acrylic (PMMA) overview et technical specification library (FAB004, FAB012, and TEC413) separate sheets into two base manufacturing routes: cast (OPTIX Cell Cast, Plazcast, OPTIX-L) and extruded (general-purpose OPTIX). Within extruded sheet, Plaskolite also makes application-formulated digital-print grades like OPTIX DA and abrasion-resistant OPTIX E-DA.
Cast acrylic delivers the highest molecular weight, craze resistance (Plaskolite TEC413), and clean laser edges. However, its wider thickness tolerance requires checking height on every sheet. Also check pallet labels instead of relying on paper vs. PE masking myths, since Plaskolite supplies PE film on extruded grades too.
General-purpose extruded OPTIX holds tighter thickness tolerance, yet carries higher internal stress. As a result, it can show uneven UV-LED adhesion unless you pre-treat and anneal it per FAB004. In contrast, OPTIX DA bonds UV ink without pretreatment, prohibits primers, needs plain unprinted PE film to avoid logo “ghosting” (FAB004), and is generally not recommended by Plaskolite for outdoor use (FAB012).
Crazing-Free Cleaning, Static Control, and Primer Selection by Grade
In Plaskolite’s chemical compatibility bulletins (FAB004, TEC405, and TEC408 in the Plaskolite downloads library), strong solvents attack acrylic fast. Specifically, acetone, MEK, toluene, thinner, pharmacy ethyl alcohol, methyl alcohol, and undiluted 90–99% IPA cause stress crazing. Match your cleaner, static control, annealing, and primer to each grade:
| Acrylic Grade or Task | Approved Cleaning & Static Control | Primer, Annealing & Boundary |
|---|---|---|
| Everyday Cleaning (All OPTIX) | Mild dish soap, lukewarm water, and soft microfiber, rinsed well (TEC413; FAB004) | Safe low-stress baseline. Skip ammonia glass sprays and rough pads. |
| Digital-Print (OPTIX DA) | Normally needs no pre-clean. If needed, FAB012 allows water + IPA (30% max.) briefly. Keep >50% RH and ground beds; skip anti-static sprays. | Never use adhesion promoters (FAB012). Print indicated side; order plain PE film. Not recommended outdoors; check OPTIX E-DA separately. |
| General Extruded & Cast OPTIX | Use mild soap and water first. TEC275 permits 30% water-diluted IPA, while TEC405 flags immersion—wipe briefly and dry fast. | Indoor reverse signs often print unprimed. For heavy-wear front prints, test an acrylic UV primer and anneal per thickness chart. Never use PP primer (Boston Industrial). |
| Unannealed Cut or Bent Edges | Keep all alcohols and chemical cleaners off raw cut or bent edges (FAB012). Wipe dust with mild soapy water only. | Anneal fabricated parts per maker thickness charts first. Avoid printing over stressed laser edges. |
How Should You Sequence Laser Cutting, Flatbed Setup, and Pre-Run Proofing?
1. Sequencing Laser Cutting and UV Printing
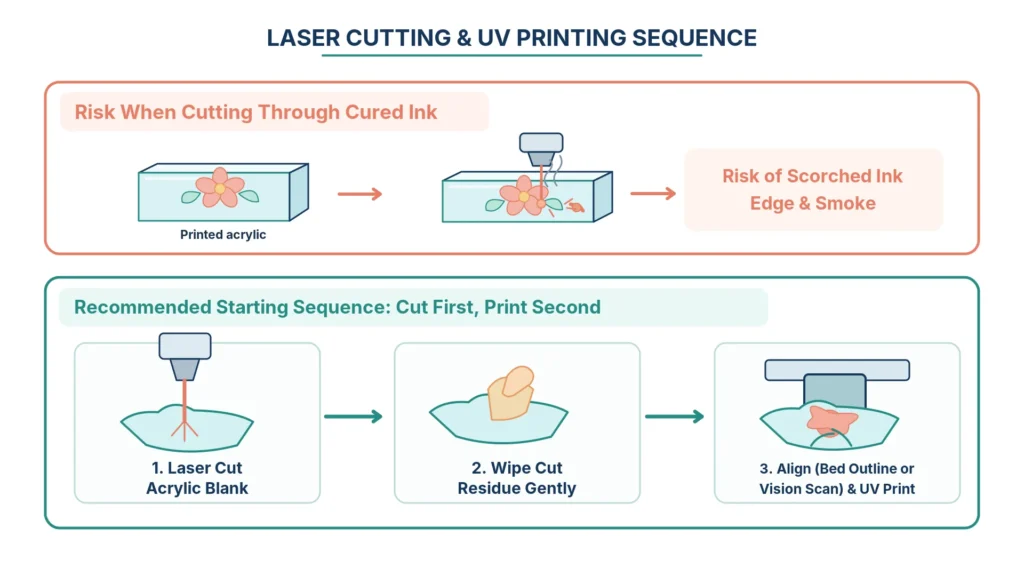
For custom shapes, laser cut first, UV print second is the safest starting workflow. Shop tutorials show that CO2 laser cutting through cured UV ink scorches printed edges and releases acrid smoke. If a job requires cutting after printing, verify SDS and TDS safety documents for your laser, sheet grade, and ink first—or use mechanical sawing and routing face-up per Plaskolite FAB012.
When printing pre-cut blanks, wipe away dust gently before loading. Hold thin 1–2 mm panels flat on the vacuum bed with hold-down strips or tacky mats so UV-LED heat cannot bow plastic into a head strike. Next, align pre-cut parts using a CMYK-only outline pass (no white ink) on bed paper, or scan part contours with overhead camera vision.
For outdoor or wet-zone signs, keep two warranty boundaries straight. Plaskolite’s 10-year limited sheet warranty et 80–90% UV light filtering (up to 98% on OPTIX UVF and OPTIX-L Museum Grade, per FAB004) cover raw PMMA sheets, not printed ink. Therefore, always seal or capture the rear ink layer and edges on outdoor second-surface signs (Akrylix) and test under real conditions.
2. Matching Acrylic Jobs to Commercial UV Flatbed Configurations
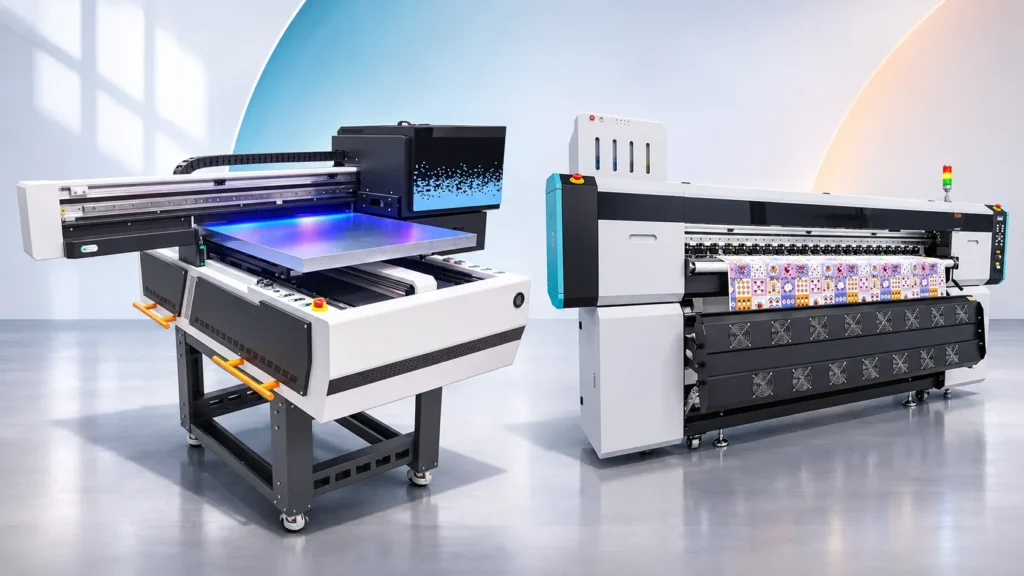
Screen printing still fits huge runs of 1-to-2-color panels, and UV DTF decals handle curved bottles. However, direct uv printing on acrylic sheets and award blocks requires a rigid flatbed from our UV flatbed printer lineup:
- Mid-Size Signage and Thick Award Blocks (60 × 90 cm): Le Xinflying XF-S6090S-4I32U1 uses a 60 × 90 cm lit à aspiration d'air, 4 × Epson i3200-U1 heads (CMJN + CMJN + B + B), and 720 × 1 800 dpi resolution. Its current English brochure lists a 6-pass speed of 5–9 m²/h (an earlier page lists 6–11 m²/h). It also offers manual height checks, optional auto height measurement, et un 0–200 mm customizable height confirmed by order.
- Large Panels and Vision-Aligned Cut Blanks (120 × 180 cm): Le Xinflying XF-Y1218S-5G6 pairs a 120 × 180 cm bed with 5 × Ricoh Gen6 heads (CK + MY + LC + LM + W + V) and 100 mm media thickness. Its spec sheet lists a 2 à 23 mm high-drop capability (distinct from 2–3 mm flat-sheet head gaps). It also lists 18 m²/h speed and 960 × 900 dpi resolution as separate fields. Its Positionnement visuel par CCD scans outlines to assist alignment, while hold-down strips or fixtures still depend on blank flatness.
3. Three Pre-Run Proofing Checks Before Full Production
Alongside daily white-ink agitation and cap-top care, test one sample from your production sheet lot across three checks:
- Approve the Proof Through the Sheet as It Will Hang: Follow Akrylix’s rule—“Approve the proof as the sign will hang, not as the file looks on a screen.” Inspect reverse prints through the real acrylic front under final lighting.
- Verify Text Orientation and Clear-Zone Cleanliness: Confirm reverse or double-sided text reads left-to-right on every viewing face. Then check open clear areas under angled light for white edge bleed, static misting, or primer haze.
- Test Adhesion Only After Post-Cure Dwell: Let the UV ink and any primer finish their supplier-specified room-temperature post-cure window first. Afterward, run a cross-hatch tape check on a scrap edge.

Foire aux questions
Retail custom second-surface clear acrylic signs with standoffs sell from $43.99 to $281.99 by size on sites like Displays2Go. In-house on a UV flatbed, you pay zero screen setup fees. Instead, direct material cost equals your blank PMMA sheet plus the milliliters of CMYK, White, and Varnish ink tallied by your RIP.
Four practical limits apply. First, white underbase and multi-layer passes run slower than CMYK-only prints and require daily white-ink circulation. Second, general-purpose extruded acrylic can show patchy UV-LED adhesion unless annealed or pre-treated per Plaskolite FAB004.
Third, wiping acrylic with acetone or concentrated alcohol triggers stress crazing. Finally, outdoor second-surface signs require rear and edge sealing (Akrylix).
Small-to-mid shops running signs up to 60 × 90 cm, backlit plaques needing dual white (CMYK + CMYK + W + W), or thick award blocks choose the Xinflying XF-S6090S-4I32U1 (confirming 0–200 mm customizable height by order). For 120 × 180 cm panels or laser-cut blanks needing Positionnement visuel par CCD, step up to the 5-head Ricoh Gen6 Xinflying XF-Y1218S-5G6.
On digital-print sheets like Plaskolite OPTIX DA, Plaskolite states primers are unnecessary and should not be used (FAB012). Similarly, shops often print indoor second-surface plaques directly after mild soap cleaning.
However, general-purpose extruded sheets (TEC413) and high-wear front prints benefit from testing an acrylic-specific UV primer. Never apply polypropylene (PP) primer, since Boston Industrial Solutions warns it ruins acrylic adhesion.
For clear awards, lobby signs, and photo blocks, print on the back (second-surface / reverse printing). Jet mirrored CMYK first, cure it, and add the white backing layer second (US Acrylic Awards) so clear acrylic guards the ink and adds depth. In contrast, print on the front (first-surface) for opaque colored, black, or mirror acrylic, or whenever designs need raised varnish textures.
For custom shapes, start with laser cutting first and UV printing second. Creator tests show CO2 cutting through cured UV ink scorches edges and produces acrid smoke. If your workflow requires cutting after printing, verify SDS and TDS safety compatibility for your laser, acrylic grade, and ink first.
Match Your Acrylic Workflow to the Right UV Flatbed Configuration
Consistent acrylic awards, backlit panels, and laser-cut signs start by locking in viewing side, white-ink order, and grade-safe cleaning before batch runs.
Share your acrylic grades, panel sizes, thicknesses, front- or second-surface needs, and laser-cut blank specs on our UV printer for acrylic solutions page. Our team will match the right XF-S6090S-4I32U1 ou XF-Y1218S-5G6 configuration and test your artwork on sample sheets.