DTF (Direct-to-Film) printing produces vibrant, durable transfers — but only when paired with the right heat press technique. Whether you’re just getting started or troubleshooting inconsistent results, this guide covers everything you need to know about using a heat press for DTF printing.
| In This Article: What a heat press does in DTF printing • Ideal temperature, pressure & time settings • Heat press types compared • Common mistakes & how to fix them • FAQs |
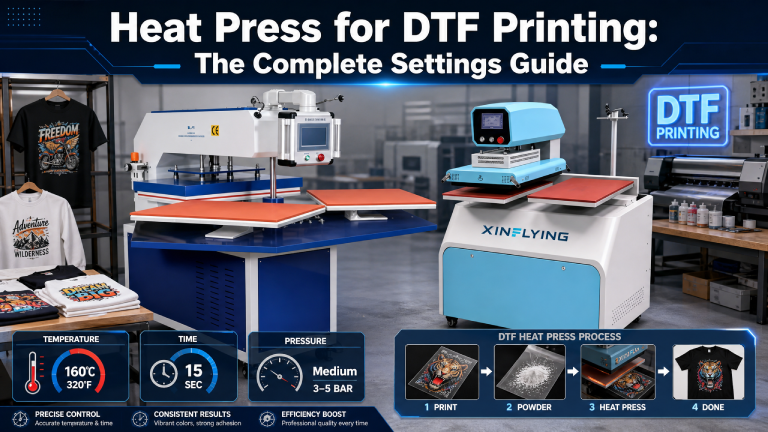
What Does a Heat Press Do in DTF Printing?
In the DTF workflow, the heat press is the final step. A completed DTF transfer — film printed with ink and coated with hot-melt adhesive powder — is placed onto the garment, and the heat press applies the precise temperature and pressure needed to bond the transfer permanently to the fabric.
Unlike sublimation, DTF transfers sit on top of the fabric surface. This means proper heat and pressure are critical: too little and the transfer won’t adhere; too much and you risk scorching the fabric or cracking the print.
Ideal Heat Press Settings for DTF Printing
| Parameter | Recommended Setting | Notes |
| Temperature | 275–320°F (135–160°C) | Start at 300°F; adjust by fabric type |
| Pressure | Medium-firm (4–6 out of 10) | Even pressure across the entire transfer |
| Press Time | 10–15 seconds | Varies by transfer film brand |
| Peel Type | Hot peel or cold peel | Check your transfer film specification |
| Second Press | Optional 5 sec | Improves adhesion on textured fabrics |
| ⚠️ Pro Tip: Always test a small swatch before a full production run. Settings can vary between transfer film brands, ink types, and fabric weights. |
Heat Press Types for DTF: Which Is Best?
Clamshell Heat Press
The most common and affordable option. The top platen opens upward like a clamshell. Great for flat items like T-shirts, but can have uneven pressure at the edges. Ideal for beginners and small shops.
Swing-Away Heat Press
The top platen swings out to the side, giving full access to the lower platen without risk of burns. Pressure is more consistent than clamshell. The go-to choice for mid-volume DTF production.
Draw (Shuttle) Press
The lower platen slides out toward the operator. Very safe and efficient for production environments. Excellent pressure consistency. Common in commercial DTF print shops.
Auto Press
Automatically after the set time. Reduces operator error and improves consistency. Worth the investment for high-volume operations.
Step-by-Step: Applying a DTF Transfer
- Pre-press the garment for 3–5 seconds to remove moisture and wrinkles.
- Place the DTF transfer face-down on the garment in the desired position.
- Cover with a silicone sheet or parchment paper to protect the film.
- Apply heat press at your target settings (300°F / 12 seconds / medium pressure).
- Lift the press and peel the film immediately (hot peel) or allow to cool (cold peel) per your film type.
- Optional: place parchment paper over the transfer and press again for 5 seconds for extra adhesion.
Common Heat Press Mistakes with DTF
- Too much pressure: Can cause ink to bleed at the edges or create an overly glossy finish.
- Too little pressure: Results in poor adhesion, peeling corners, or patchy color.
- Wrong temperature for fabric: Delicate fabrics like nylon or thin polyester can scorch at higher temps.
- Skipping the pre-press: Moisture trapped in the garment can cause bubbling or poor bonding.
- Using the wrong peel method: Hot-peel film peeled cold (or vice versa) leads to damaged prints.
Recommended Fabrics & Their Ideal Settings
| Fabric | Temp (°F) | Time (sec) | Peel |
| 100% Cotton | 300–315°F | 12–15 sec | Hot or Cold |
| Polyester | 275–290°F | 10–12 sec | Cold Peel |
| Cotton/Poly Blend | 295–305°F | 12 sec | Hot or Cold |
| Nylon | 265–280°F | 10 sec | Cold Peel |
| Denim | 310–320°F | 15 sec | Hot Peel |
Frequently Asked Questions
Do I need a special heat press for DTF printing?
No special press is required. Any quality clamshell, swing-away, or draw press with accurate temperature and pressure control will work for DTF transfers. Consistency is more important than brand.
Can I use a home iron instead of a heat press for DTF?
A household iron is not recommended. It cannot maintain consistent temperature across the entire transfer or apply even, controlled pressure. Results will be inconsistent, and adhesion may fail after washing.
Why is my DTF transfer peeling after washing?
The most common causes are insufficient heat, too little pressure, or incorrect peel timing. Check your settings against your transfer film’s specifications, pre-press the garment to remove moisture, and ensure you’re applying the transfer to a compatible fabric.
How long does a DTF heat-pressed print last?
With correct application, DTF prints can withstand 50+ wash cycles without significant fading or peeling. Washing inside out in cold water on a gentle cycle extends print life considerably.
Final Thoughts
A quality heat press and dialed-in settings are the difference between professional DTF output and costly reprints. Master your temperature, pressure, and timing — and your DTF transfers will consistently deliver vibrant, durable results that customers love.