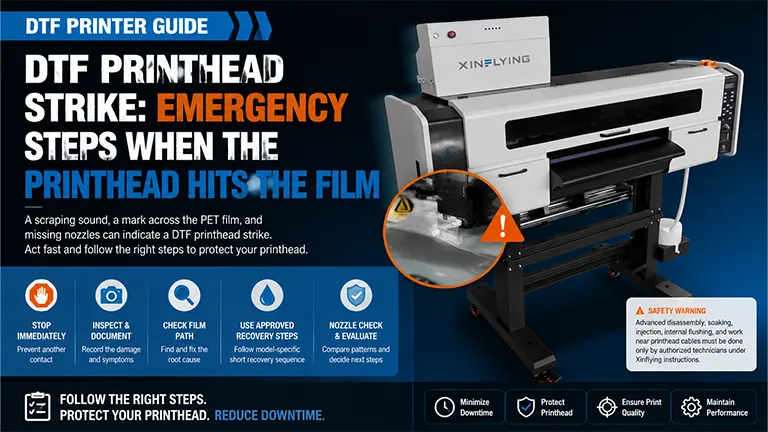
Un bruit de frottement, une rayure sur le film PET et des buses manquantes peuvent indiquer un choc de la tête d'impression DTF. Les premières mesures prises sont cruciales, mais un nettoyage trop agressif peut transformer une interruption réparable en dommage physique ou électrique.
Si une tête d'impression DTF entre en contact avec le film, interrompez le travail et évitez tout nouveau contact. Inspectez le parcours du film et consignez les dommages sans toucher la surface des buses. En l'absence de fuite, d'alerte électrique ou de dommages graves visibles, effectuez uniquement le test des buses et la courte séquence de récupération approuvés pour votre modèle. Signalez toute perte persistante de buses au support technique.
Ne reprenez pas la production pour le client avant d'avoir déterminé pourquoi le film a atteint la tête d'impression et d'avoir vérifié que la configuration des buses est adaptée à l'impression.
Avertissement de sécurité : Le démontage de la tête d'impression, son trempage, l'injection à l'aide d'une seringue, le rinçage interne, le réglage de la pression et toute intervention à proximité des câbles de la tête d'impression ne doivent être effectués que par un technicien agréé, conformément aux instructions spécifiques au modèle fournies par Xinflying. La présence de liquide sur les câbles de la tête d'impression peut provoquer un court-circuit et endommager de manière irréversible la tête d'impression ou les composants électroniques.
Qu'est-ce qu'un choc de la tête d'impression DTF ?
On parle de « choc de la tête d'impression DTF » lorsque la tête d'impression ou la zone située autour de sa plaque à buses entre physiquement en contact avec le film PET. Les opérateurs peuvent décrire ce phénomène comme un choc, un frottement ou une rayure de la tête d'impression sur le film.
Le contact peut :
- Laissez une rayure, un trait d'encre ou une zone abîmée sur le film.
- Diriger les particules issues de l'enrobage ou tout autre débris vers la zone de la buse.
- Interrompez un ou plusieurs canaux de buse.
- En cas de contact trop intense, cela peut endommager la plaque de la buse.
- Cela perturberait le défilement du film et provoquerait une nouvelle interruption.
Une rayure ne signifie pas nécessairement que la tête d'impression est définitivement endommagée. Un test des buses peut révéler une absence temporaire de jet d'encre suite à une contamination ou à une interruption du débit d'encre. Des dommages physiques, la présence de débris ou un problème d'alimentation en encre peuvent entraîner des symptômes similaires ; il convient donc de commencer par inspecter et consigner les constatations plutôt que de procéder à un nettoyage agressif.
Arrêtez-vous immédiatement si vous remarquez ces signes avant-coureurs
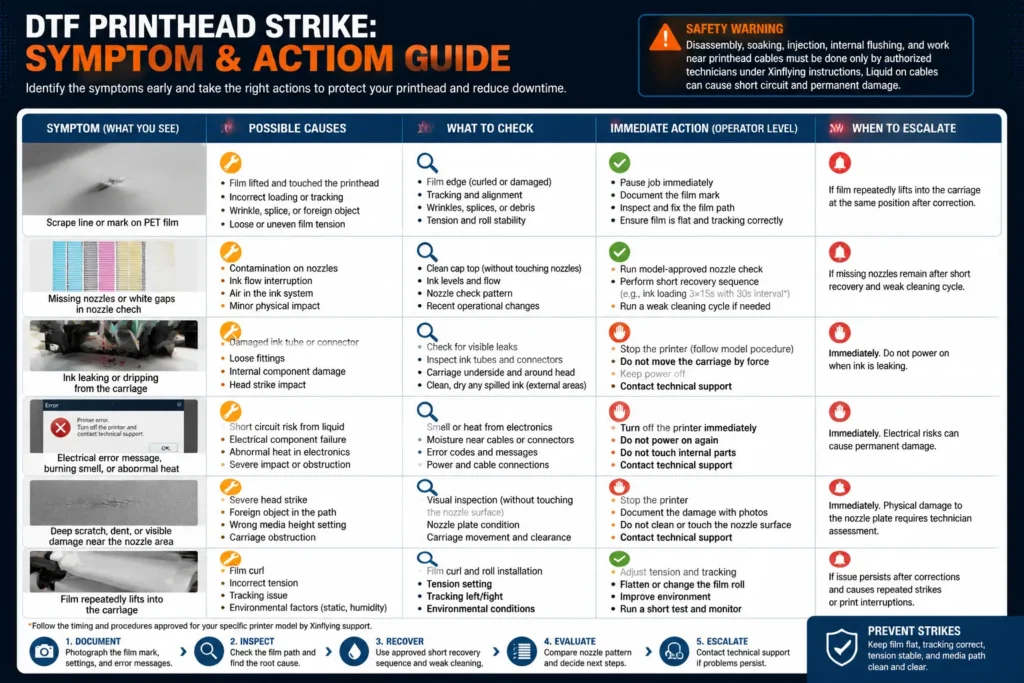
Éteignez l'imprimante en suivant la procédure spécifique à votre modèle et contactez le support technique si vous constatez :
- Présence d'encre, de liquide de nettoyage ou d'humidité à proximité du câble ou du connecteur électrique de la tête d'impression.
- De l'encre s'écoule ou coule du chariot.
- Une rayure profonde, une bosse, une fissure ou tout autre dommage visible au niveau de la buse.
- Un dysfonctionnement électrique, une odeur de brûlé, une chaleur anormale ou un arrêt inopiné.
- Un bruit important provenant du châssis ou une obstruction empêchant le mouvement normal.
- Le film remonte à plusieurs reprises dans le chariot une fois la tâche mise en pause.
Ne remettez pas l'imprimante sous tension simplement pour “ voir si elle fonctionne encore ” lorsqu'une partie du circuit électrique risque d'être mouillée. Ne déplacez pas le chariot en forçant.
Réaction appropriée en cas d'urgence après un choc à la tête
La procédure suivante distingue les vérifications à effectuer par l'opérateur de celles réservées aux techniciens. Le manuel de votre imprimante et les instructions fournies par le service d'assistance Xinflying prévalent.
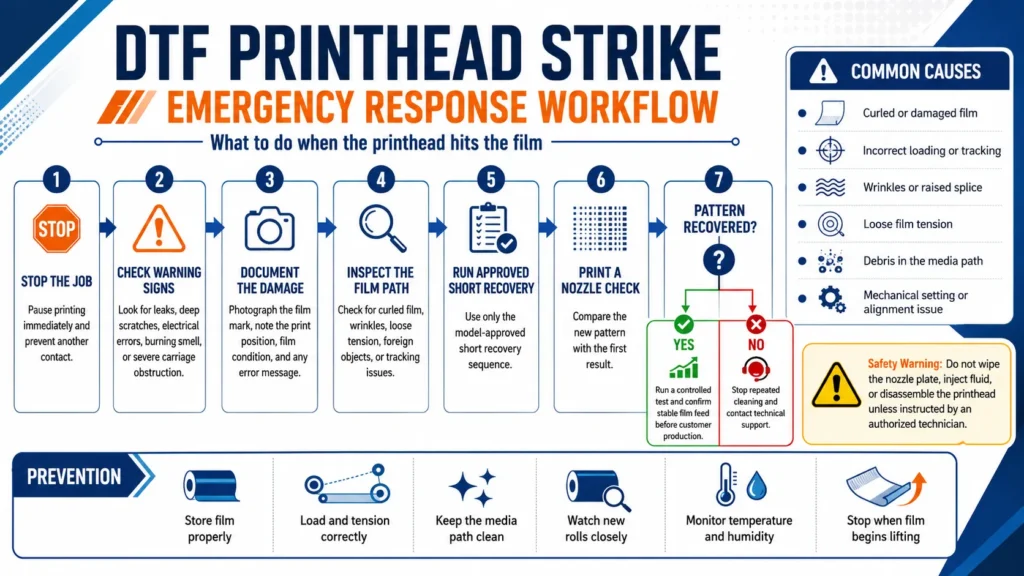
1. Mettre le travail en pause et empêcher tout autre contact
Arrêtez l'impression dès que vous entendez un grincement ou que vous constatez que le film se soulève. Si vous poursuivez l'impression, des débris risquent d'être entraînés vers la zone des buses ou le contact physique risque de se reproduire.
Respectez la procédure de mise en pause ou d'arrêt homologuée pour ce modèle. Ne mettez pas les mains dans la trajectoire d'un chariot en mouvement.
2. Consigner les faits
Avant de procéder au nettoyage, recueillez des éléments permettant de distinguer une contamination d'un dommage physique ou mécanique :
- Prenez une photo de la marque sur la pellicule.
- Notez à quel endroit de la largeur d'impression le contact s'est produit.
- Notez si le film était gondolé, décollé, froissé ou s'il déviait latéralement.
- Enregistrez les paramètres de travail, le mode de passage, le type de film et les informations relatives à la bobine.
- Notez tout message d'erreur ou bruit inhabituel.
Si la machine peut fonctionner en toute sécurité et qu'il n'y a ni fuite ni dommage visible grave, imprimez le modèle de contrôle des buses approuvé. Conservez une photo de ce modèle.
3. Inspectez le parcours du film sans toucher la surface de la buse
Cherchez une raison évidente pour laquelle le film a été diffusé :
- Un bord de pellicule gondolé ou abîmé.
- Chargement ou suivi incorrect.
- Un pli, une jonction en relief ou un corps étranger.
- Tension du film insuffisante ou instable.
- Débris se trouvant dans une zone de passage des fluides homologuée et accessible.
- Un soulèvement répété au même endroit du rouleau.
N'enlevez ou ne corrigez que ce que le manuel d'utilisation autorise. Ne frottez pas, ne grattez pas et n'appuyez pas sur la plaque de buse avec un chiffon sec, un mouchoir en papier, un outil ou le doigt.
4. N'utilisez que la séquence de récupération courte approuvée pour ce modèle
Le document d'entretien Xinflying fourni avec ce guide décrit une procédure d'urgence comprenant trois cycles de chargement d'encre de 15 secondes chacun, espacés de 30 secondes. Il préconise ensuite une réévaluation et un cycle de nettoyage léger.
N'utilisez ces valeurs de synchronisation que lorsque le service d'assistance Xinflying aura confirmé que la procédure s'applique à votre imprimante et à votre tête d'impression. Les noms des menus, le comportement lors du chargement de l'encre, les niveaux de nettoyage et les limites de répétition sans risque peuvent varier.
Évitez de procéder à des nettoyages intensifs répétés. Le nettoyage consomme de l'encre et peut ne pas permettre de remédier à une plaque d'éjecteurs endommagée, une fuite d'air, un amortisseur bouché, un joint de capuchon défectueux ou un problème d'alignement mécanique.
5. Comparer la répartition du jet
Comparez ce nouveau contrôle de la buse avec le premier :
| Résultat | Prochaine action recommandée |
|---|---|
| Le motif est complet et la trajectoire du film est stable | Effectuez un test contrôlé avant de reprendre le travail chez le client |
| La tendance s'améliore, mais reste incomplète | Envoyez les deux contrôles des buses au service d'assistance ; ne répétez l'opération que si on vous le demande. |
| Ces mêmes buses sont toujours manquantes | Cessez les nettoyages répétés et faites remonter l'information |
| La perte de débit au niveau de la buse s'aggrave | Arrêtez-vous et contactez le service d'assistance |
| L'encre fuit, coule ou entre en contact avec un câble | Éteignez l'appareil en toute sécurité et ne le redémarrez pas |
| Le film revient sur le devant de la scène | Arrêtez-vous ; identifiez la cause mécanique ou liée au support avant de poursuivre l'impression. |
Une amélioration à court terme ne prouve pas que la cause profonde a été éliminée. Vérifiez que le film défile de manière régulière et stable avant de reprendre la production normale.
Pourquoi le rinçage et le trempage des seringues sont des procédures relevant de la compétence des techniciens
Le document source décrit une procédure de récupération avancée impliquant le trempage de la tête d'impression et l'utilisation d'une seringue de 10 ml. Il précise également que l'imprimante doit être mise hors tension et que les câbles doivent être protégés de tout contact avec le liquide.
Cette mise en garde est importante, mais elle ne suffit pas à rendre cette procédure applicable à tous les modèles. La conception de la tête d'impression, le tracé des canaux, les joints d'étanchéité, les amortisseurs, les fluides homologués, les méthodes de démontage et la pression de sécurité varient d'un modèle à l'autre. L'utilisation d'un liquide inadapté, un sens d'application incorrect, une pression inappropriée, une surface de contact inadéquate ou un remontage incorrect peuvent :
- Provoquer la délamination ou endommager les canaux internes de la tête d'impression.
- Introduire de l'air ou des impuretés.
- Joints ou amortisseurs endommagés.
- Poussez les débris plus loin dans le circuit d'encre.
- Les câbles mouillés peuvent provoquer un court-circuit.
- Rendre le diagnostic à distance plus difficile.
N'injectez pas d'eau purifiée ni de solution de nettoyage dans une tête d'impression, à moins qu'un technicien agréé n'ait confirmé le type de liquide, le canal, la direction, la pression, le temps de maintien, la protection des câbles et la procédure de redémarrage spécifiques à votre modèle.
Si le service d'assistance autorise un rinçage interne, suivez scrupuleusement ses instructions, qu'elles soient données oralement ou par écrit. Ne les remplacez pas par une méthode de nettoyage générique trouvée sur Internet.
Pourquoi la tête d'impression a-t-elle heurté la pellicule ?
Le rétablissement du schéma de pulvérisation ne représente que la moitié de la réparation. Si la cause physique persiste, la prochaine intervention pourrait à nouveau endommager la tête.
Voici quelques points à vérifier :
- État du film : Un film PET gondolé, endommagé, mal stocké ou incompatible risque de ne pas rester à plat pendant le transport.
- Chargement et tension : Un mauvais chargement de la bobine, un mauvais alignement, une tension inadéquate ou un mauvais comportement de l'enrouleur peuvent provoquer un soulèvement ou une déformation du film.
- Chemin d'accès au média : Une salissure, un rebord ou tout autre obstacle peut modifier la hauteur du film.
- Écartement des têtes ou réglage mécanique : Un réglage incorrect propre au modèle peut réduire le jeu.
- Conditions statiques et ambiantes : Une humidité instable et l'électricité statique peuvent nuire à la manipulation des films.
- Accumulation liée à l'entretien : La présence d'encre séchée ou de salissures dans les zones d'entretien autorisées peut perturber le fonctionnement normal du chariot ou du support d'impression.
- Alignement mécanique : Un contact répété au même endroit peut nécessiter une inspection technique.
Ne modifiez pas les valeurs relatives à la hauteur de refoulement, au vide, à l'alimentation, à la pression ou à l'alignement sans consulter le manuel du modèle ou le service d'assistance technique.
Comment éviter un nouvel accident impliquant une tête de DTF
Intégrer la prévention dans la manutention des matériaux et dès le début de chaque cycle de production :
- Conservez le film PET à plat et conformément aux recommandations environnementales du fournisseur.
- Rejeter les bobines présentant des sections endommagées, gondolées, froissées ou mal raccordées.
- Chargez et tendez le film conformément au manuel de l'imprimante.
- Inspectez la partie initiale d'un nouveau rouleau avant de lancer la production en mode automatisé.
- Veillez à ce que le parcours des fluides et les zones de maintenance agréés restent propres.
- Surveillez la température et l'humidité à proximité de l'imprimante.
- Arrêtez dès que le film commence à se soulever ou à onduler, au lieu de continuer à imprimer malgré ce problème.
- Vérifiez chaque défaut récurrent avant de reprendre la production.
Pour les imprimantes DTF Xinflying, la plage de fonctionnement confirmée est comprise entre 20 et 30 °C (68 et 86 °F) et entre 45% et 65% d'humidité relative. Roland DGA explique également le principe, valable pour toutes les marques, selon lequel la température et l'humidité influencent le comportement des supports et les performances des buses.
Un entretien régulier du système d'encre et de la station de maintenance permet également de réduire le nombre de variables à analyser après une interruption de production. Utilisez la gamme complète Imprimante DTF guide d'entretien concernant les contrôles quotidiens, les périodes d'inactivité, la gestion de l'encre blanche et les limites de sécurité en cas d'escalade.
Informations à fournir au service d'assistance technique de Xinflying
Des éléments probants pertinents peuvent accélérer le diagnostic et aider le technicien à donner des instructions adaptées au modèle concerné. À envoyer :
- Modèle et numéro de série de l'imprimante.
- Type de tête d'impression installée.
- Photo du film rayé ou marqué.
- Contrôles des buses effectués avant et après la tentative de récupération autorisée.
- Une courte vidéo montrant le déplacement du film et le comportement du chariot, si les conditions permettent de filmer en toute sécurité.
- Codes d'erreur ou messages d'avertissement.
- Température ambiante et humidité relative.
- Informations concernant le film, l'encre et les opérations d'entretien récentes.
- Les opérations de nettoyage déjà effectuées.
- Si du liquide a pu atteindre un câble ou un connecteur.
Contactez le support technique de Xinflying avant de retirer la tête d'impression, d'ouvrir le circuit d'encre, de modifier les valeurs calibrées ou de purger un canal interne.
Foire aux questions
Oui, un choc violent de la tête d'impression DTF peut endommager physiquement la plaque à buses ou les composants associés. Un contact plus léger peut en revanche entraîner une contamination ou une perte temporaire de buses. Inspectez le film, enregistrez un contrôle des buses et contactez le support technique si le motif ne s'améliore pas après la courte séquence de nettoyage recommandée pour le modèle.
Non. Continuer pourrait entraîner une répétition du contact, faire glisser des débris sur la zone des buses, gaspiller du matériau et aggraver les dégâts. Interrompez la production, inspectez le parcours du film, consignez l'incident et assurez-vous que le jet des buses est complet et que l'alimentation en film est stable avant de reprendre la production destinée au client.
Uniquement lorsqu'un technicien agréé a validé la procédure spécifique à l'imprimante et à la tête d'impression concernées. Le type de fluide, le sens d'écoulement, la pression, la sélection des canaux, la protection des câbles et les étapes de redémarrage sont des éléments essentiels. Un rinçage à la seringue trop vigoureux ou mal effectué peut endommager la tête d'impression, introduire de l'air, mouiller les composants électroniques ou propager la contamination plus profondément dans le système.
Des résidus de film ou d'autres débris peuvent atteindre la zone des buses, tandis qu'un contact physique peut également perturber l'alimentation en encre ou endommager la plaque à buses. L'absence de buses est un symptôme, et non un diagnostic complet. Comparez les résultats des contrôles des buses et signalez les problèmes persistants, graves, liés à des fuites ou récurrents.
Utilisez un film compatible et correctement stocké ; chargez-le et tendez-le conformément au manuel ; veillez à la propreté du circuit de passage du support ; contrôlez les conditions ambiantes de la salle d'impression ; et surveillez le début de chaque nouveau rouleau. En cas de contact répété au même endroit, faites intervenir le support technique avant de reprendre la production.
Protégez la tête d'impression et remédiez à la cause du problème
Une intervention rapide après un choc sur une tête d'impression DTF peut limiter les dommages supplémentaires, mais un nettoyage excessif n'est pas toujours la meilleure solution. Interrompez le travail, consignez les constatations, corrigez les problèmes visibles au niveau du cheminement du film et n'exécutez que la séquence de récupération approuvée pour votre modèle. Confiez le démontage, le trempage, le rinçage interne et les interventions sur le système électrique à un technicien agréé.
Les imprimantes DTF Xinflying utilisent une circulation dynamique de l'encre blanche, une filtration en plusieurs étapes, un bouchage automatique à l'état humide, un déclenchement périodique des buses, un contrôle de l'encre par dépression et une régulation de la température afin d'assurer un débit d'encre stable. Ces systèmes réduisent les risques courants liés au fonctionnement, mais n'empêchent pas les dommages causés par le contact avec le film et ne remplacent pas l'entretien régulier.
Contacter le support technique de Xinflying pour obtenir des instructions de réinitialisation spécifiques à chaque modèle, ou consultez le site Xinflying Imprimante DTF prise en compte lors de l'évaluation d'une configuration de production tenant compte des besoins en matière de maintenance et d'assistance.