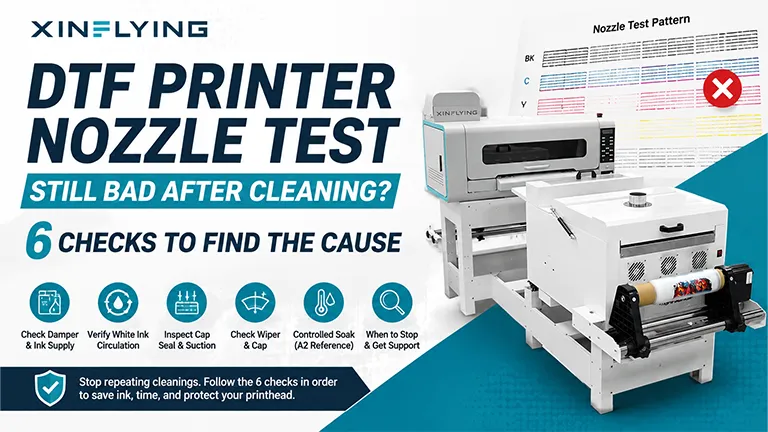
When a DTF printer is not drawing ink through the printhead, the fault can be anywhere in the suction path. Common causes include a poor capping-station seal, a blocked waste line, a weak pump, a pinched supply tube, a restricted damper, or a severe printhead blockage. Test the path in sections before assuming the printhead is clogged.
This guide adapts the diagnostic sequence in XINFLYING’s A2 All-in-One Printer FAQ. It is intended as a general troubleshooting framework, not a universal service procedure. Component layouts, flow direction, and safe pressure limits vary by printer and printhead. Follow the service instructions for your exact model before disconnecting tubing, moving the carriage, or testing the pump.
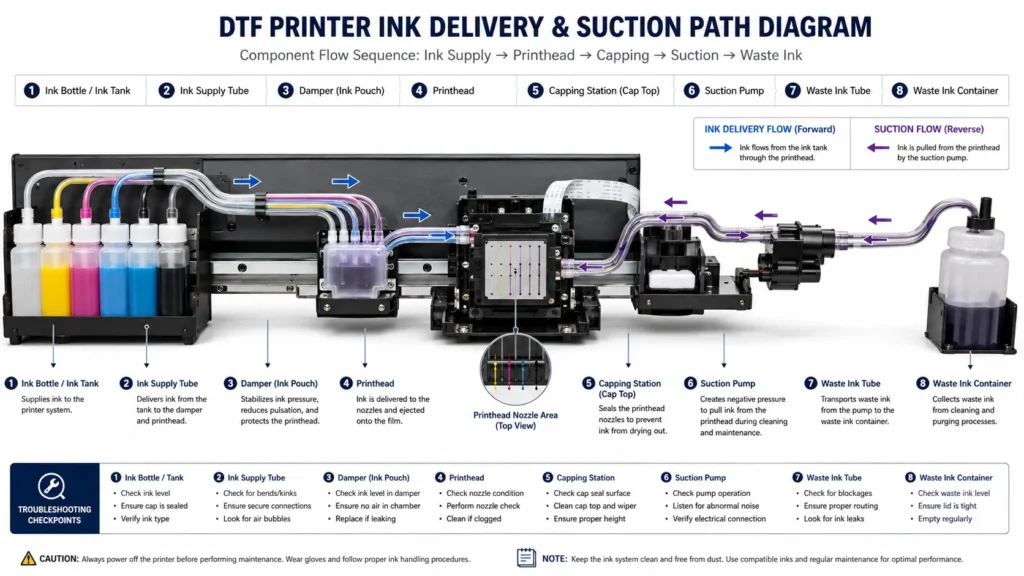
Confirm That No Suction Is the Actual Symptom
First, distinguish between two different conditions:
- No ink can be drawn: Check the cap seal, waste path, pump, supply tube, damper, and possible severe blockage.
- Ink can be drawn, but the nozzle test is poor: Check for air in the ink path, low damper fill, weak white-ink circulation, cap or wiper contamination, and partial nozzle blockage.
If your DTF printer is not pulling ink at all, do not run repeated automatic cleaning cycles. Cleaning cannot compensate for a detached tube, damaged cap, blocked waste path, or pump that is not producing suction. Repeated cycles also consume ink without correcting the underlying fault.
Safety Before You Inspect the Ink Path
Power the printer off before touching internal tubing, cables, or moving parts. Wear the personal protective equipment specified for the ink and cleaning fluid in use. Keep all liquids away from printhead cables, connectors, and circuit boards.
Syringe tests can create enough pressure to damage ink-path components or the printhead. Operators can perform visual checks. A trained technician should handle pump-bypass tests, damper extraction, and printhead clearing according to the model-specific flow direction and pressure limit.
1. Check Printhead-to-Cap Alignment
The cap must sit directly beneath the printhead and close evenly during pumping. If the cap is offset or tilted, the pump may draw air at the cap edge instead of producing useful suction through the nozzles.
Observe a normal cleaning movement from a safe distance. Look for:
- The carriage reaching its intended maintenance position.
- The cap rising squarely beneath the printhead.
- Full contact around the cap lip.
- No visible obstruction preventing the cap from closing.
The XINFLYING A2 technical FAQ begins its no-suction diagnosis with this alignment and closure check. The principle applies broadly, but cap height and carriage position are model-specific. Do not adjust either one without the correct service specification.
2. Inspect the Cap, Drain, and Waste Tube
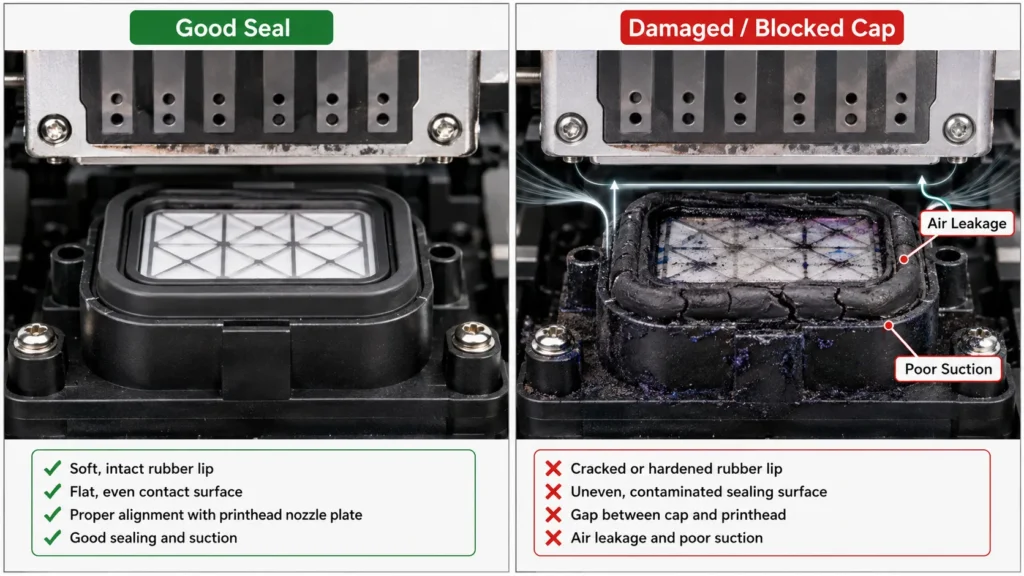
A cap can lose suction when its lip is cut, hardened, distorted, or coated with dried residue. The tube beneath the cap can also detach, crack, kink, or clog.
With the power isolated and the carriage positioned only as the manual permits:
- Inspect the cap edge under good light.
- Check whether liquid can drain from the cap.
- Trace the accessible waste tube for kinks or loose connections.
- Look for leakage around fittings.
Replace damaged parts with the correct model-compatible component. A cap that looks similar may still have the wrong dimensions or sealing characteristics.
3. Determine Whether the Pump Produces Suction
The A2 technical document recommends comparing the pump path with a controlled syringe test. If ink can be drawn when the pump is bypassed, the pump or its connected waste path may be restricted or faulty.
This test must be performed by a trained technician. The correct disconnection point, test direction, and pressure depend on the printer’s plumbing design. Applying suction to the wrong line can introduce air into the ink system or expose the printhead to excessive pressure.
A technician should record whether:
- The pump runs during the commanded cleaning cycle.
- The pump makes an abnormal sound.
- The waste line moves ink or only air.
- Suction returns when a known-clear section is tested.
- The pump receives the expected electrical command.
4. Look for a Pinched Ink-Supply Tube
Trace the visible ink line from the supply system toward the carriage. A cover, cable carrier, clamp, or tight bend can compress the tube and restrict ink flow to the printhead. If the manual allows safe observation, check the tube at both ends of carriage travel.
Do not pull on the tubing to open the path. Correct the routing, bend radius, or clip position so the line remains free without contacting moving parts.
5. Check Each Damper for Restriction or Air
The damper stabilizes ink delivery near the printhead. A restricted damper, blocked inlet, damaged membrane, or large air pocket can stop normal flow.
The A2 FAQ calls for drawing ink from each damper individually to identify the affected channel. This is a technician-only procedure. The damper connection is close to the printhead, and spilled ink can reach electrical contacts.
If one channel behaves differently from the others, record the ink color and damper condition. Note whether the restriction remains after its supply line is checked. Replace a suspect damper with the correct part instead of forcing it open.
6. Treat Severe Printhead Blockage as the Last Possibility
A severe printhead blockage becomes more likely only after you confirm cap alignment, cap integrity, waste-tube condition, pump function, supply routing, and damper flow. It should not be the first assumption.
The A2 document includes syringe-assisted clearing, but excessive pressure or incompatible cleaning fluid can damage the printhead. Ask XINFLYING support for the approved procedure for your exact printer and printhead. Stop immediately if liquid approaches a cable, connector, or printhead electronics.
Record the Diagnostic Evidence
A short diagnostic record helps technical support identify the failed section without repeating every test.
| Check | Normal observation | Evidence to send support |
|---|---|---|
| Cap alignment | Cap closes evenly beneath the head | Short video of the cleaning movement |
| Cap and waste line | No cuts, kinks, leaks, or standing blockage | Photos of the cap and accessible tubing |
| Pump | Runs and moves waste ink | Video with sound and the cleaning command |
| Supply tubing | Free path throughout carriage movement | Photo of any pinched or tight section |
| Dampers | Similar fill and flow across channels | Photo identifying the affected color |
| Cabeçote de impressão | No liquid on cables or connectors | Nozzle test and close-up without touching |
Perguntas frequentes
A DTF printer may stop pulling ink because the capping station does not seal or the waste tube is blocked. Other possible causes include a weak pump, a pinched supply tube, or a restricted damper. Check the suction path in that order. Treat the printhead as the likely cause only after the other sections pass inspection.
Start with the cap seal, waste line, and pump path. A trained technician can isolate sections of the path using the model-approved test procedure. If suction returns when the pump is bypassed, the pump or connected waste path may be faulty. If the full path works but ink still will not pass, the printhead becomes more suspect.
Not as an operator-level test. A syringe can apply excessive pressure, introduce air, or push liquid toward printhead electronics. Only a trained technician should perform syringe-assisted tests using the correct connection point, flow direction, pressure limit, and cleaning fluid for the exact printer and printhead model.
When to Stop and Submit an Inquiry
Stop operator-level troubleshooting if you find damaged tubing, ink near a cable, or an error code or control-board warning. You should also stop if the pump does not run or the next check requires disconnecting printhead-side components.
XINFLYING provides DTF printer machines and integrated production solutions. For model-specific troubleshooting, enviar uma consulta with your printer model, affected ink channel, nozzle test, and a short video of the cleaning cycle. These details help the support team identify the next safe check.
Sources and Technical Scope
- XINFLYING, A2 All-in-One Printer FAQ , an undated bilingual internal technical document supplied as the primary technical basis for this article.
- XINFLYING Impressora DTF
- Suporte da XINFLYING
The diagnostic order in this article is based on the A2 document and has been presented as a general framework. It does not replace the service manual, approved test points, or pressure limits for a specific printer and printhead configuration.
If your DTF printer is still not drawing ink after these checks, submit an inquiry with your printer model, nozzle test, and a video of the cleaning cycle.