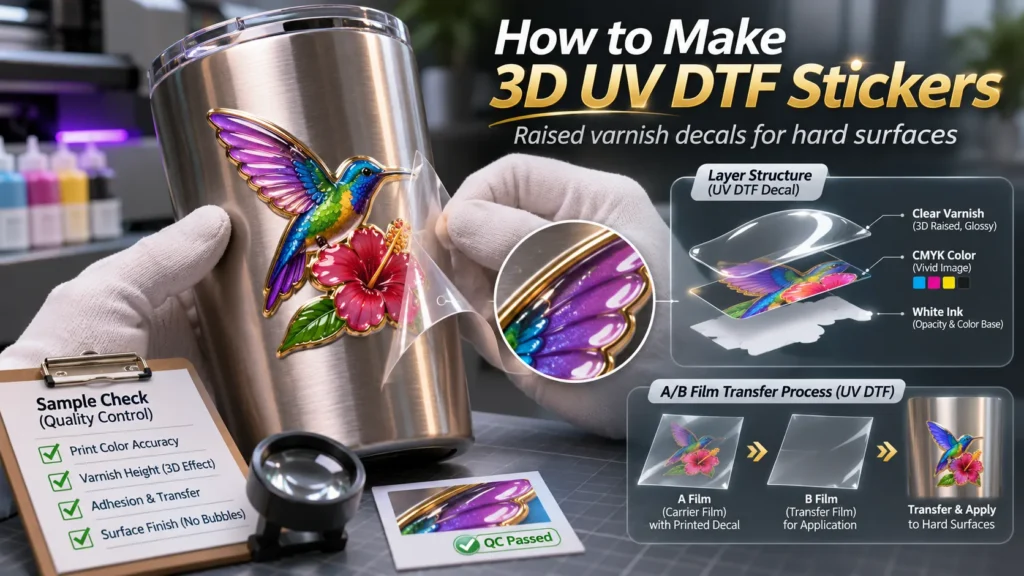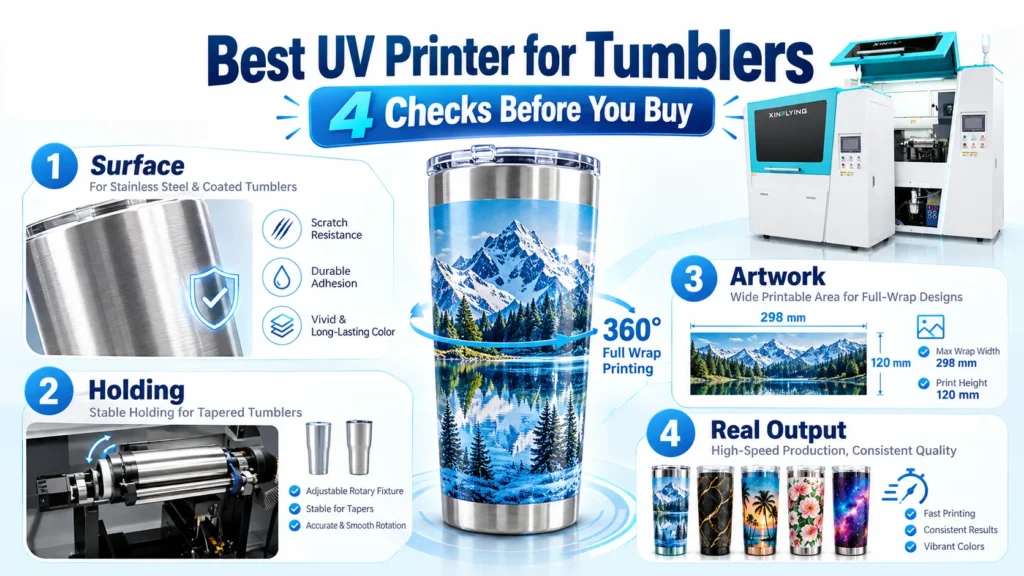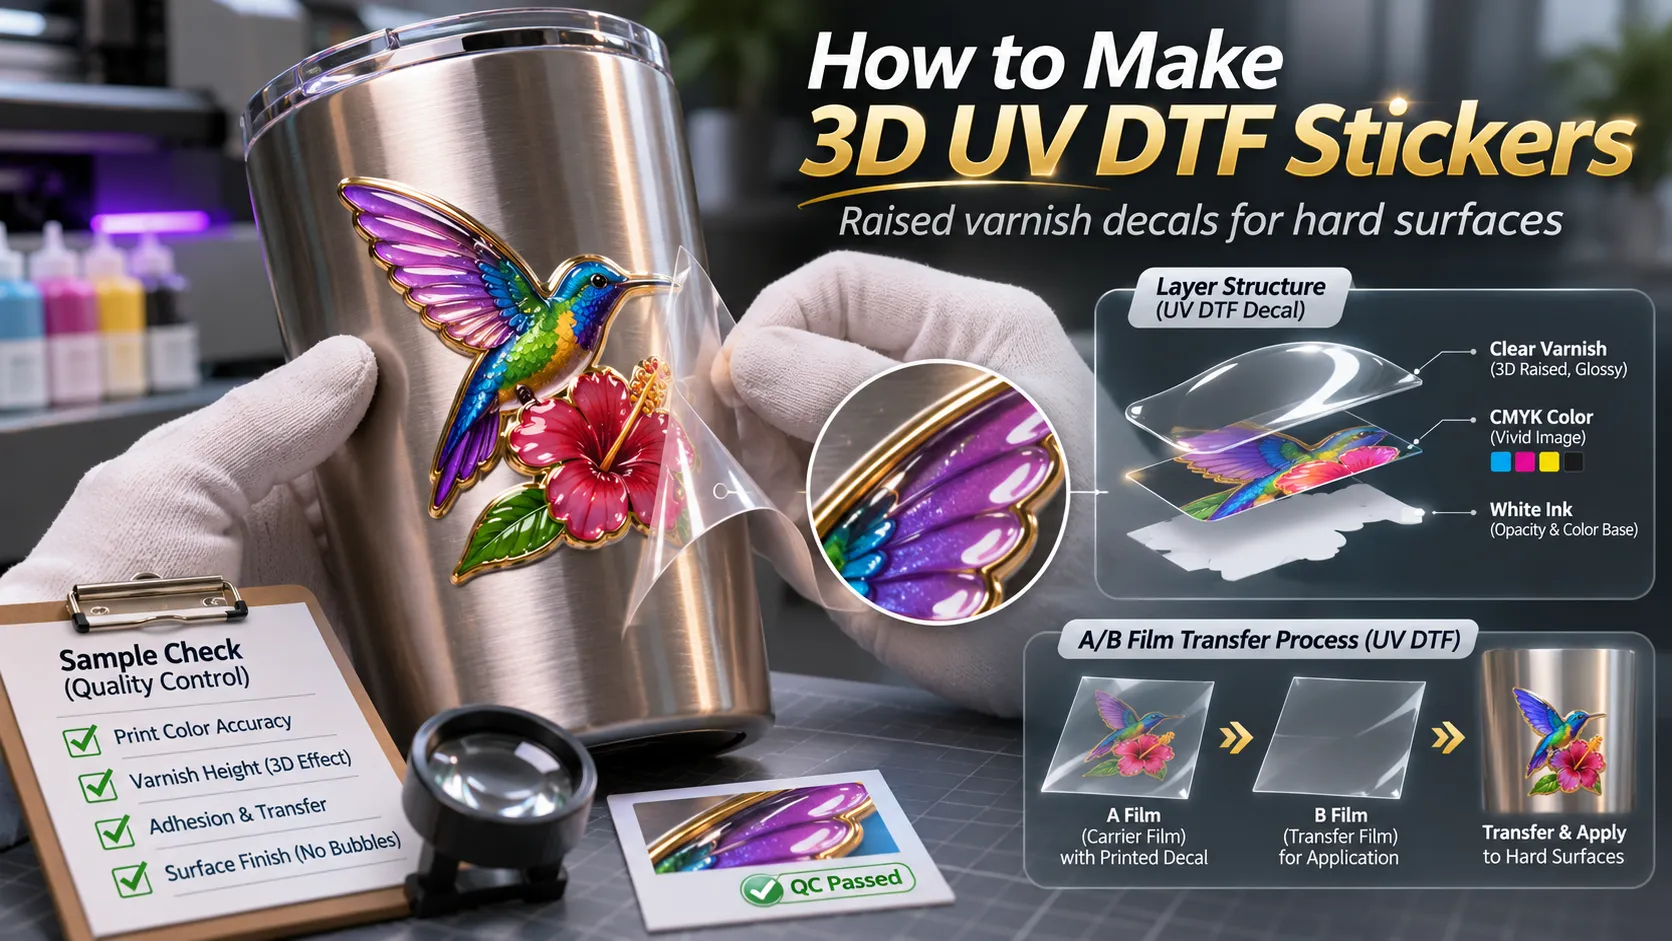
To make a hard-surface 3D UV DTF sticker, print white ink, CMYK color, and clear UV varnish onto adhesive Film A, cure the ink with UV light during printing, laminate transfer Film B on top, and press the decal onto a clean rigid item. The raised feel on a standard UV DTF decal comes from the cured ink stack and the glossy varnish coat, not from a vinyl backing sheet.
Before setting up a print job or buying equipment, check what kind of “3D” your order actually requires. Suppliers use the same phrase for slightly raised glossy tumbler decals, thick direct-to-object UV embossing, and heat-pressed 3D apparel badges. Each of those uses a different ink behavior, film or platen setup, and transfer method.
First Clarify What “3D UV DTF Sticker” Means for Your Order
“3D UV DTF” is not a single standardized process. In online guides and product listings, the label covers four different production setups. Mixing them up leads shops to buy the wrong film, expect millimeter-tall relief on a curved cup wrap, or apply a rigid decal to a shirt.
Match the customer’s sample or reference photo against the complete production system—ink, film, adhesive, transfer method, and target surface—using the table below.
| What people call “3D UV DTF” | Ink and layer build | Film or platform | How it transfers | Target surface |
|---|---|---|---|---|
| Standard raised-varnish UV DTF decal (crystal label) | UV-curable white underbase, CMYK color, and clear varnish for gloss and light tactile relief | UV DTF Film A (print side) laminated with Film B (carrier) | Cold pressure by hand or squeegee; peel carrier | Smooth hard goods: glass, metal, ceramic, acrylic, rigid plastic |
| Direct-to-object UV relief / embossing | Repeated UV ink passes built directly on the item | Flatbed or rotary jig holding the object (no transfer film) | Not transferred; printed straight onto the product | Flat plaques, phone cases, magnets, coasters, cylinders |
| Flexible 3D raised apparel badge / faux embroidery | High-build flexible white ink stacked for height, plus flexible CMYK and finish coat | Special textile transfer film and TPU hot-melt adhesive system | Contour cut and applied with a heat press | Apparel and fabric goods: hoodies, jerseys, caps, canvas bags |
| Marketing name on standard transfer stickers | Standard CMYK + white + varnish UV DTF print | Standard A/B film | Cold pressure and peel | Hard surfaces; “3D” simply describes the no-background, slightly raised look |
This guide focuses on the first category: hard-surface UV DTF decals made with A/B film. For a broader overview of the base technology, see our guide on what UV DTF printing is. If your customer wants flexible transfers for shirts or hoodies, compare the two workflows in DTF vs. UV DTF printing.
What Gives a Hard-Surface UV DTF Sticker Its Raised Feel?
On a hard-surface UV DTF decal, the tactile effect comes from cured UV ink layers topped with clear varnish. Unlike vinyl stickers that sit on a flat PVC sheet, a UV DTF transfer leaves only the cured ink and adhesive on the object. When you run a finger across the finished decal, you feel the step from the bare surface up to the capped ink stack.
Each ink layer has a distinct job in that stack:
- White ink acts as the optical foundation. On clear glass, stainless steel, or dark tumblers, CMYK ink alone looks translucent and dull. The white layer sits behind the color to block the background and keep colors bright.
- CMYK ink forms the visible graphic. It prints over the white foundation to produce logos, gradients, text, and illustrations.
- Clear UV varnish creates the surface finish and localized relief. Varnish adds a glossy dome-like sheen, protects the color layer from everyday rubbing, and gives selected elements a noticeable tactile edge.
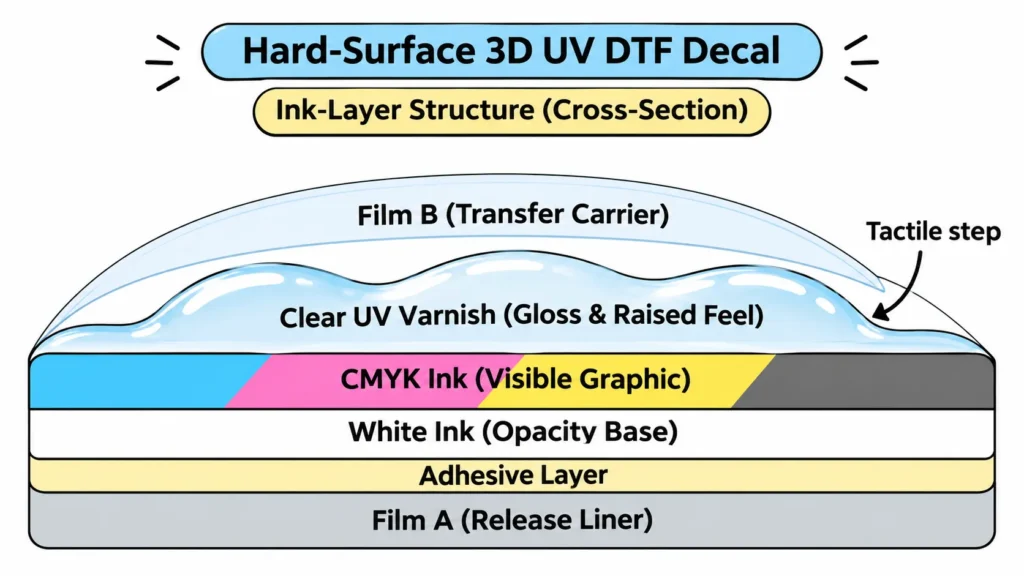
Why film transfers have practical height limits. In a transfer workflow, the printed A film must pass through lamination with Film B, release cleanly from the A backing, conform to the item, and let the B carrier peel away without tearing the design. If an ink stack is built too thick or cured into a brittle block, the laminator leaves air gaps along the steep side walls. Thick, rigid edges also catch when peeling the carrier and lift off curved cups. Controlled gloss and clean edges matter more on a transfer decal than chasing maximum thickness.
Equipment, Inks, and Films You Need Before Starting
A reliable 3D UV DTF workflow requires hardware, software, and consumables that are matched to work together. Check five components before running production:
- A compatible UV DTF printer or UV printer setup. Dedicated roll-to-roll UV DTF printers feed Film A, print CMYK, white, and varnish, and laminate Film B inline. Compact desktop UV flatbed printers can also print onto Film A sheets or rolls, provided they support white and varnish channels and pair with a separate laminator.
- Matched UV inks with white and varnish channels. Confirm whether your printer configuration uses rigid, soft, or ultra-soft UV ink so the cured layer matches your target items and film release. Because white UV ink contains heavy titanium dioxide pigment, the printer needs active white ink circulation or stirring and regular nozzle care. Keep our قائمة مراجعة صيانة الطابعة التي تعمل بالأشعة فوق البنفسجية by the machine for daily routines.
- A/B transfer film sets. Film A is the adhesive-coated print carrier; Film B is the transfer film that picks up the cured design during lamination. Always verify which side of Film A is the print surface according to the supplier’s instructions. You can review standard film and ink options on our UV printer supplies page.
- RIP software with spot-channel control. Your RIP software (such as RIIN, PrintFactory, Maintop, or PhotoPrint, depending on your printer model) tells the printer where to lay down white ink, color, and varnish. It must let you set white choke and define a dedicated varnish mask.
- Lamination and application tools. If your printer does not laminate inline, you need an external laminator to bond Film B to Film A evenly. Keep a felt-edge squeegee, lint-free cloths, and isopropyl alcohol on hand for surface prep and transfer.
Step-by-Step: How to Make and Apply 3D UV DTF Stickers
Follow the workflow recommended for your specific printer, RIP software, and A/B film. Layer order, lamp settings, and laminator heat vary by equipment, so treat the five steps below as the operational structure rather than universal numerical settings.
Step 1: Prepare the Artwork and Spot Channels
Start with a high-resolution PNG with a transparent background or a vector file (SVG, PDF, EPS, or TIFF, depending on what your RIP accepts) sized to the final print dimensions. Avoid faint semi-transparent shadows around the edges; the RIP may place white ink under those pixels and create a visible halo.
Decide which parts of the graphic should feel raised. You can apply varnish across the entire decal for a uniform glossy seal, or create a separate spot-varnish channel in your design software so only specific letters, borders, or icons get the raised highlight. Keep tiny isolated text and razor-thin lines separate from heavy relief zones so they remain easy to peel.
Step 2: Set White Choke and Varnish Layers in the RIP
Import the file into your RIP software and generate the white underbase and varnish channels. Apply a slight white choke (contracting the white mask inward by a small margin relative to the CMYK edge) so white ink does not peek out around dark outlines.
Select the print mode and pass setting supported for your ink and film combination. Higher pass counts and multi-layer varnish profiles deposit more varnish for a stronger tactile feel, but they also increase print time and require stable registration across every pass.
Step 3: Load Film A and Print With UV Curing
Run a nozzle check before starting the batch. A few missing white or varnish nozzles will leave streaks or uneven texture in a raised print.
Place Film A on the printer bed or roll feeder, removing the protective top liner if your film uses one. Keep the film flat so the printheads maintain an even gap and do not strike the media. As the printer lays down white, CMYK, and varnish, the onboard UV-LED lamp cures the ink into a solid, tack-free structure on the adhesive surface of Film A.
Step 4: Laminate Film B onto Film A
On an all-in-one roll-to-roll UV DTF printer, the machine presses Film B onto the printed Film A automatically as the roll advances. On a sheet or desktop setup, feed the printed Film A and Film B into your laminator with the printed side facing the transfer side of Film B.
Use the pressure and temperature settings specified for your A/B film so Film B bonds around the raised varnish edges without trapping air bubbles. Once laminated, cut the sheet or roll into individual decals; you do not need to contour-cut or weed around individual letters. For full-wrap drinkware layouts, see our guide on كيفية صنع ملصقات أكواب DTF المقاومة للأشعة فوق البنفسجية.
Step 5: Clean the Surface, Burnish, and Transfer
Wipe the target hard surface with isopropyl alcohol or soapy water and let it dry completely. Dust, skin oils, or factory residue will prevent the adhesive from gripping.
Before peeling the backing, rub firmly across the face of the decal 2 to 4 times with the padded edge of a squeegee so the carrier grabs every small detail. Peel the A backing away slowly while watching that all fine elements stay on Film B. Position the decal on the item—center-out for small stickers, or rolling from one side to the other on larger decals—burnish firmly across all raised edges, and peel the B carrier back slowly at a low angle. Our step-by-step guide to applying UV DTF cup wraps covers alignment and bubble control in detail.
How to Verify Printer Claims Before You Buy or Promise a Job
Do not assume a printer’s maximum embossing height applies to A/B film transfers. Several desktop and multi-function UV printers advertise impressive relief figures—such as 5 mm or 7 mm 3D textures—alongside UV DTF sticker capability. When you read the product pages closely, those height numbers are either tied to direct flatbed printing on rigid blanks or listed as a general machine specification without stating the printing path, while the UV DTF film sections describe glossy, water-resistant decals.
Similarly, a specification table that lists CMYK + W + V confirms that the machine has a varnish channel. It does not tell you how many varnish layers the RIP can stack on film, how long a multi-layer pass takes, or whether the laminated B film will still release cleanly over that height.
Before buying a machine or quoting a customer on a specific raised effect, ask the supplier four concrete questions:
- Was the sample printed directly on the object or transferred via A/B film? Ask to see the unapplied laminated A/B transfer as well as the finished item.
- Which exact model, ink type, and RIP setting produced that sample? Confirm whether it used standard UV ink, ultra-soft UV ink, or a special textile TPU system.
- What was the actual print speed in that raised mode? Multi-pass varnish or structural layering runs slower than standard production modes.
- How do fine lines and small text behave on the same sheet? Heavy varnish build can bridge narrow gaps or cause tiny letters to lift with the carrier film.
Sample Check Table: Test Artwork, On-Film Check, and Applied Result
Never judge a 3D UV DTF sticker solely by how it looks on the uncut film. A transfer only succeeds when the raised texture, fine details, and edges survive lamination and bond cleanly to the customer’s actual product.
Build one test file that combines the hardest elements from your real orders: a solid logo block, a raised spot-varnish highlight, sharp corners, and fine text or thin lines. Print, laminate, and apply that sample to the exact cup, bottle, or container you plan to sell, then log the result against this table.
| What the order needs | What you see on Film A & after Film B lamination | What stays on the item after transfer | What fails | Where to check or adjust next |
|---|---|---|---|---|
| Noticeable gloss and tactile relief | Varnish zone looks clear, smooth, and slightly raised under Film B | Finger feels a distinct, smooth step over the varnished elements | Surface looks dull, rough, or flat | Check varnish nozzle health, RIP varnish percentage/passes, and UV curing strength |
| Clean color edges with no white halo | CMYK covers the white base evenly on the film | No white rim shows around dark letters or borders on the product | White edge peeks out on one or all sides | Increase white choke in the RIP; check bidirectional alignment and film feed stability |
| Fine lines and tiny isolated text stay intact | All small characters sit cleanly on Film A with adhesive coverage | Every letter transfers to the item and stays down when Film B is peeled | Small dots stay on Film A, or thin lines chip when peeling Film B | Burnish harder before and after placing; peel slower; reduce varnish thickness on tiny text |
| No silvering or air pockets around raised steps | Film B hugs the edge of the ink stack without a wide silver halo | Edges sit tight against the substrate with no trapped air | Bubbles or silver gaps outline the raised logo | Adjust laminator pressure/temperature per film instructions; avoid over-building steep ink walls |
| Firm edge hold on curved or smooth surfaces | Decal bends smoothly with the carrier without cracking | Edges stay flat after 24 hours on the actual curve | Corners lift on a tapered tumbler or tight radius | Re-check surface cleaning; match ink flexibility to the curve; keep heavy build off compound curves |
| Scratch-resistant cured finish | Ink feels fully cured, not tacky or oily prior to lamination | Normal handling and fingernail rub do not smear or flake the gloss | Varnish smears, cracks, or peels away from the color layer | Check UV lamp output, print speed vs. cure time, and ink compatibility |
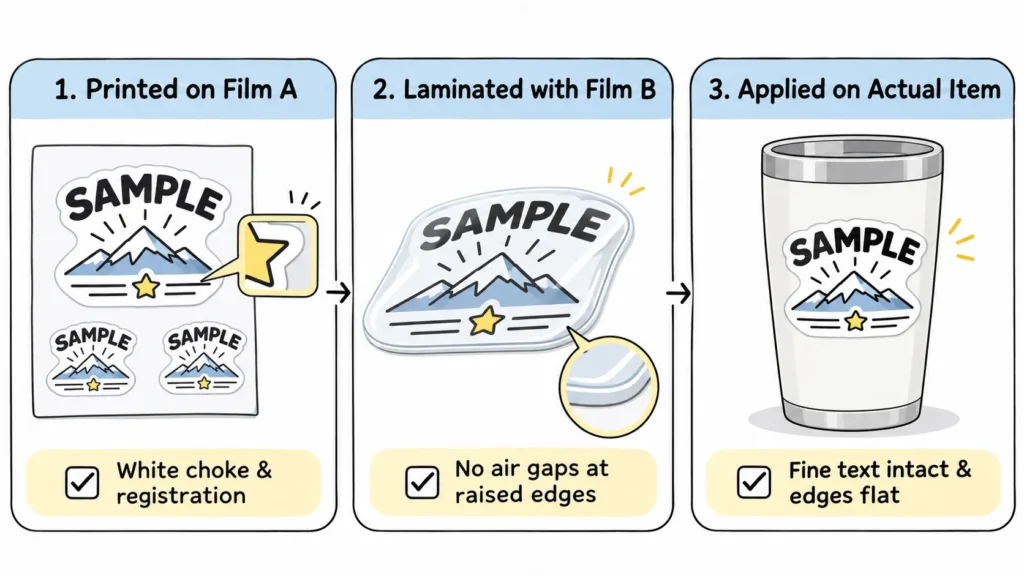
Record visual appearance, tactile feel, and adhesion separately. A sample that looks glossy on the table but lifts along a tumbler curve after a few hours is an adhesion or flexibility mismatch, not a varnish failure. Only set a millimeter height target if the customer’s contract requires it and you have an agreed way to measure it on the finished part.
Surface Limits, Care, and What Standard UV DTF Cannot Do
Standard A/B film UV DTF decals are built for clean, non-porous, rigid or semi-rigid surfaces. Good candidates include glass bottles, coated or stainless steel tumblers, ceramic mugs, acrylic signs, smooth rigid plastics, and sealed wood.
Avoid applying standard hard-surface UV DTF transfers to these materials:
- Silicone and low-surface-energy plastics: The adhesive cannot form a lasting bond and often lifts within hours.
- Soft rubber and flexible TPU cases: Repeated bending breaks the bond between the cured ink stack and the surface.
- Unsealed wood, rough stone, or heavy textures: Peaks and valleys prevent full adhesive contact.
- Tight compound curves: Gentle cylinder tapers work well, but sphere-like curves force the film to wrinkle and lift.
- Everyday washable apparel: Standard A/B film decals crack and peel in the laundry. If an order calls for raised, embroidery-style patches on hats, hoodies, or canvas bags, use a dedicated textile process—see our 3D embroidery UV printing solution for how specialty fabric workflows differ.
Care and durability boundaries. Cured UV DTF decals handle water and normal hand-washing well. However, high heat and water jets inside a dishwasher weaken the adhesive over time, so recommend gentle hand-washing for decorated drinkware. Do not rely on placing a finished cup in sunlight or under a UV lamp for 30 to 60 seconds after transfer to fix poor adhesion; once transferred, bond strength depends on surface prep and the A/B film’s pressure-sensitive adhesive. Finally, check the ink and film safety data sheets before making any claims about indirect or direct food contact.
الأسئلة الشائعة
تتميز معظم ملصقات DTF المطبوعة بالأشعة فوق البنفسجية بملمس بارز قليلاً مقارنةً بالملصقات الفينيلية المسطحة، وذلك لأن طبقات اللون الأبيض والألوان الأخرى والورنيش المُعالجة تقع مباشرةً على السطح دون طبقة خلفية. ويعتمد مدى بروز هذا النتوء على إعدادات طبقة الورنيش وسمك الحبر الذي تدعمه الطابعة وبرنامج RIP.
في ملصقات الأفلام A/B القياسية ذات الأسطح الصلبة، يُعد الورنيش الشفاف المقاوم للأشعة فوق البنفسجية الطبقة الرئيسية المستخدمة لإضفاء اللمعان وارتفاعًا ملموسًا في مناطق محددة، بينما يوفر الحبر الأبيض التعتيم تحت ألوان CMYK. ويُستخدم الحبر الأبيض الهيكلي عالي السماكة بشكل أساسي في عمليات إنتاج الشارات النسيجية المرنة المتخصصة أو في الطباعة البارزة المباشرة على الأجسام.
لا. تتطلب العملية طابعة تعمل بالأشعة فوق البنفسجية (UV) مع أحبار قابلة للتصلب بالأشعة فوق البنفسجية (بما في ذلك قنوات اللون الأبيض والورنيش) ومصباح تصلب بالأشعة فوق البنفسجية لتصلب طبقات الحبر على الفيلم A، بالإضافة إلى التصفيح بالفيلم B. لا يمكن للطابعة النفاثة القياسية رش أو تصلب الحبر بالأشعة فوق البنفسجية، على الرغم من عدم الحاجة إلى آلة قطع لأن عمليات النقل بالأشعة فوق البنفسجية (UV DTF) لا تتطلب إزالة الأجزاء الزائدة.
تتميز الخطوط الرفيعة جدًّا والنقاط الصغيرة المنفصلة بمساحة لاصقة ضئيلة للغاية، وقد يؤدي تراكم طبقة الورنيش الكثيفة إلى جعلها صلبة. إذا بقيت هذه العناصر ملتصقة بالفيلم «أ» أو انفصلت مع الفيلم «ب»، فقم بتمرير الممسحة على الملصق بقوة أكبر قبل وأثناء عملية التطبيق، وقم بنزع الطبقة الحاملة ببطء بزاوية مستوية، وقلل من تراكم الورنيش على النصوص الدقيقة في برنامج RIP الخاص بك.
تتميز ملصقات DTF القياسية المخصصة للأسطح الصلبة بمقاومتها للماء عند الغسل اليدوي، لكن حرارة وبخار غسالة الأطباق قد يؤديان إلى تدهور مادة اللصق وتسبب تقشرها. كما أنها غير مخصصة للملابس القابلة للغسل؛ لذا يُنصح باستخدام نقل DTF المخصص للأقمشة أو نظام شارات الملابس المرنة المخصص للملابس.
في سير العمل القياسي لطباعة DTF بالأشعة فوق البنفسجية، يتم معالجة الحبر بالأشعة فوق البنفسجية داخل الطابعة قبل تصفيح الفيلم «B». ويتم ضغط الملصق على القطعة عن طريق نقل لاصق حساس للضغط، لذا لا تكون المعالجة اللاحقة تحت أشعة الشمس ضرورية عادةً، ما لم يوجه مورد الحبر والفيلم الخاص بك بخلاف ذلك.
Test Your Artwork on a Matched UV DTF Setup
Start by building a single test file that includes your smallest text, a solid color block, and the exact spot-varnish areas your customer wants. Run that file through the three-stage check table on your actual product blank before promising a specific relief height or turnaround time.
If you are comparing equipment to produce raised-varnish decals, cup wraps, or specialty transfers in-house, explore our آلات الطباعة بتقنية DTF بالأشعة فوق البنفسجية. Share your target items, artwork sizes, and expected weekly volume on that page, and our team will recommend a matched printer, ink, and A/B film configuration and provide a custom quote for your setup.