إذا كنت قد تساءلت يومًا عن الكيفية التي تُحقق بها الملابس الرياضية المخصصة تلك الطبعات الزاهية التي تغطي السطح بالكامل وتصمد أمام مئات عمليات الغسيل — أو كيف يمكن أن يحتوي الكوب على صورة مُستنسخة بشكل مثالي ولا تتلاشى — فإن الإجابة هي «التبخير الصبغي». وهي إحدى أكثر عمليات الطباعة الرقمية المتوفرة اليوم متانةً وحيويةً وتنوعًا.
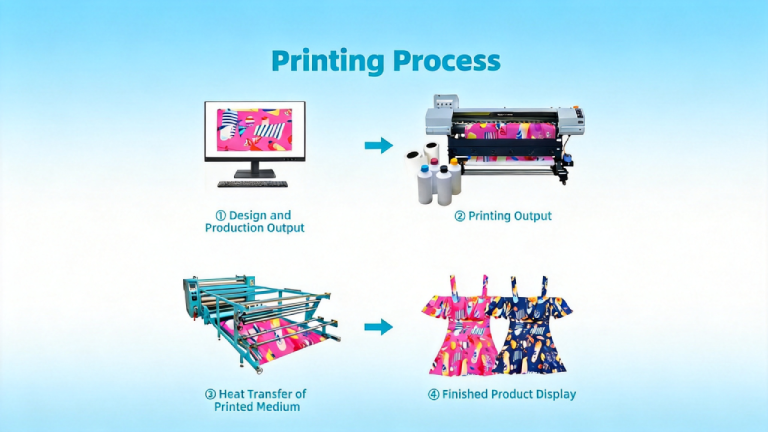
يشرح لك هذا الدليل عملية الطباعة بالتبخير الكامل خطوة بخطوة، حتى تفهم بالضبط ما يحدث بدءًا من الملف وصولاً إلى المنتج النهائي.
ما الذي يجعل التبخير الحراري للأصباغ مختلف؟
تقوم الطباعة التقليدية بنفث الحبر بوضع الحبر فوق سطح الركيزة. أما تقنية التسامي الصبغي فتعمل بطريقة مختلفة جذريًّا: فهي تحول الحبر إلى غاز يترابط ماديًّا مع الركيزة على المستوى الجزيئي.
والنتيجة هي طباعة تشكل جزءًا من القماش نفسه — وليست مطبوعة فوقه. فلا توجد أي نسيج بارز، ولا تقشر، ولا تشققات. وتظل الألوان زاهية لسنوات، حتى بعد الغسيل المتكرر.
الخطوة 1: التحضير للتصميم
تبدأ عملية التسامي على جهاز الكمبيوتر الخاص بك قبل أن يلامس الحبر الورق.
متطلبات إعداد الملف
- 150 نقطة في البوصة كحد أدنى عند الحجم النهائي للإخراج (يفضل 300 نقطة في البوصة للأعمال الفنية الغنية بالتفاصيل)
- التصميم بنظام RGB (وليس CMYK — حيث تستخدم طابعات التسامي ملفات تعريف ICC القائمة على نظام RGB)
- استخدم ملف تعريف ICC الخاص بمزيج الطابعة + الحبر + الركيزة لديك
- TIFF، PDF، PNG (يفضل التنسيقات التي لا تفقد الجودة؛ تجنب استخدام تنسيق JPEG للرسومات ذات الحواف الحادة)
- أضف هامشًا يتراوح بين 0.25 بوصة و0.5 بوصة لطباعات الملابس التي تغطي كامل السطح، وذلك لمنع ظهور حواف بيضاء بعد القص
الطباعة على المرآة
هذه خطوة بالغة الأهمية يغفل عنها العديد من المبتدئين: يجب طباعة تصاميم التسامي بشكل معكوس (مقلوبة أفقيًّا). فعندما تضع ورق النقل وجهه لأسفل على السطح المراد الطباعة عليه وتقوم بتسخينه، تنتقل الصورة المعكوسة بشكل صحيح إلى المنتج.
⚠️ هام: يُعد عدم عكس الصورة أحد أكثر أخطاء المبتدئين شيوعًا وتكلفةً. تأكد دائمًا من إعدادات العكس في برنامج RIP أو برنامج تشغيل الطابعة قبل البدء في الطباعة.
الخطوة 2: الطباعة على ورق النقل
بعد الانتهاء من إعداد ملف التصميم الخاص بك، تتمثل الخطوة التالية في طباعته على ورق نقل بالتبخير باستخدام حبر التبخير.
كيف تعمل حبر التسامي
حبر التسامي هو حبر قائم على الصبغة ويكون في صورة صلبة في درجة حرارة الغرفة. وعلى عكس الأحبار القائمة على البيكسمنت، فإن صبغة التسامي مصممة بحيث تمر بمرحلة انتقال — من الحالة الصلبة مباشرة إلى الحالة الغازية — عند تعرضها لحرارة عالية. وهذا هو تفاعل التسامي بحد ذاته.
في درجة حرارة الغرفة وبعد الطباعة، يظل الحبر على سطح ورق النقل في حالة شبه مستقرة. فهو لم يلتصق بعد بشكل دائم بأي شيء.
إعدادات الطابعة للحصول على أفضل نتائج طباعة
- إعداد "عالي الجودة" أو "أفضل جودة" لتحقيق أقصى كثافة للحبر
- اختر الإعداد الأقرب إلى ‘صورة غير لامعة’ أو ‘ورق العروض التقديمية’
- استخدم ملف تعريف ICC المعاير الخاص بك؛ ودع برنامج RIP أو برنامج التشغيل يتولى إدارة الألوان
- اترك المطبوعات تجف تمامًا قبل الضغط بالحرارة (1–3 دقائق على الأقل)
اختيار ورق النقل
يؤثر نوع الورق الذي تطبع عليه على معدل امتصاص الحبر ووضوح الصورة. فالورق ذو معدل الامتصاص العالي ينقل كمية أكبر من الحبر إلى السطح المطبوع — مما يمنحك مخرجات أكثر حيوية. أما الورق ذو معدل الامتصاص المنخفض فهو مفيد في طباعة التفاصيل الدقيقة والحد من تسرب الحبر على الأقمشة الرقيقة.
الخطوة 3: تحضير الركيزة
لا تعمل تقنية التسامي إلا على أقمشة البوليستر (عادةً ما يكون ذلك بوليستر 65%+ للحصول على ألوان زاهية، أو بوليستر 100% لتحقيق أفضل النتائج) وعلى المنتجات الصلبة المطلية بالبوليمر (الأكواب، أغطية الهواتف، الألواح الألومنيوم، إلخ).
قبل الطباعة:
- لمدة 3–5 ثوانٍ لإزالة الرطوبة والتجاعيد
- تأكد من أن السطح نظيف وخالٍ من الغبار والزيوت والوبر
- بالنسبة للملابس، استخدم أسطوانات إزالة الوبر وحافظ على نظافة سطح العمل
- يجب تخزين المنتجات الصلبة المطلية بالبوليمر في عبوات محكمة الإغلاق حتى وقت استخدامها
نصيحة من الخبراء: تؤدي الرطوبة المحتبسة في القماش أثناء الكي إلى ظهور آثار شبحية وتبهت الألوان. لذا، يجب دائمًا كي الملابس مسبقًا قبل إجراء عملية النقل بالتسامي.
الخطوة 4: نقل الحرارة — تفاعل التسامي
هنا تحدث عملية النقل الكيميائي. تُوضع ورقة النقل المطبوعة بحيث يكون وجهها متجهًا لأسفل على السطح المراد طباعته، وتُثبَّت بشريط لاصق مقاوم للحرارة، ثم تُوضع في مكبس الحرارة.
المتغيرات الثلاثة للتبخير
يخضع كل عملية نقل بالتبخير لثلاثة متغيرات مترابطة:
1. درجة الحرارة
النطاق المعتاد: 380 درجة فهرنهايت – 428 درجة فهرنهايت (193 درجة مئوية – 220 درجة مئوية). عند هذه الدرجة، تتحول صبغة التسامي من الحالة الصلبة إلى الحالة الغازية وتفتح بنية البوليمر في الركيزة.
- نقل ألوان باهت وغير كامل
- الحرارة الشديدة، تغير اللون (خاصةً في درجات الأصفر والأحمر)، تلف النسيج
2. الضغط
يضمن الضغط المتساوٍ والثابت التلامس الكامل بين ورق النقل والسطح المراد طباعته عليه.
- uneven transfer, light spots, blurry edges
- crushed fabric texture, distortion on rigid substrates
Most flatbed presses use medium pressure. Calendering (roll-to-roll) presses use precisely calibrated roller pressure.
3. Dwell Time
The time the press remains closed — typically 45–90 seconds depending on substrate type.
- 45–55 seconds
- 60–75 seconds
- 150–180 seconds in a mug press
- 60–90 seconds
What’s Happening at a Molecular Level
During the press cycle, the combination of heat and pressure causes three simultaneous events:
- The sublimation dye converts from solid to gas (sublimation)
- The polymer structure of the substrate expands and opens, creating microscopic voids
- The gaseous dye molecules penetrate and bond inside the substrate’s polymer structure
When the press opens and the substrate cools, the polymer contracts — permanently trapping the dye inside. The transfer paper is discarded; all the ink has migrated to the substrate.
Step 5: Post-Press Handling
After the press opens, proper handling ensures the best finished result:
- (hot peel) or allow to cool first (cold peel) depending on the paper type
- — it will be very hot immediately after pressing
- — any issues (ghosting, missing areas, color shift) are easiest to diagnose while the press settings are fresh
- to prevent creasing
⚠️ Ghosting Warning: If the transfer paper shifts even slightly while the substrate cools, you can get a ‘ghost’ — a faint double image. Always wait until the substrate is fully cool before moving the transfer paper (cold-peel papers) or peel immediately while hot (hot-peel papers).
Common Sublimation Process Problems & Solutions
Dull or Washed-Out Colors
- insufficient temperature, dwell time, or pressure
- increase temperature by 5°F increments; check press calibration with a digital thermometer
Color Shifting / Hue Changes
- temperature too high; incorrect ICC profile
- reduce temperature; re-calibrate color profile; test with controlled swatches
Ghosting (Double Image)
- transfer paper moved during or after pressing
- use more heat-resistant tape; switch to hot-peel paper; avoid moving substrate until fully cooled
White or Light Spots
- moisture in substrate; uneven pressure; dust/debris on platen
- pre-press longer; clean press platen; check pressure calibration
Color Bleeding / Soft Edges
- ink bleed on transfer paper; too much ink density
- switch to a lower-bleed paper; reduce ink saturation in RIP; use higher DPI
Sublimation vs. Other Printing Processes
Understanding where sublimation excels helps you choose the right process for each job:
- sublimation has no setup costs, handles photographic detail, but requires polyester substrates
- sublimation bonds to substrate at molecular level; DTF uses an adhesive film and works on cotton
- sublimation is seamless with no feel or texture; HTV sits on top of fabric
- sublimation requires polyester; DTG works on cotton, but produces less vibrant colors on poly
Quality Control in the Sublimation Process
Consistent output requires systematic quality control:
- print and press a standard color chart weekly; compare against reference with a spectrophotometer
- use press thermocouples or calibration tools to verify actual vs. displayed temperature
- use pressure-sensitive film to verify even pressure distribution across the platen
- weigh cartridges to track ink consumption and identify head clogging
Environmental & Safety Considerations
Dye sublimation is considered a low-environmental-impact printing process compared to many alternatives:
- unlike screen printing, sublimation uses no water in the transfer process
- sublimation ink does not require chemical fixatives or washout
- some off-gassing occurs during pressing — ensure adequate ventilation in the press area
- finished products are fully recyclable with no ink separation required
Summary: The Dye Sublimation Process at a Glance
The dye sublimation printing process in 5 steps:
- — Create your artwork in RGB, mirrored, with proper bleed and ICC profile
- — Output to sublimation transfer paper using sublimation ink
- — Pre-press substrate; position transfer paper face-down; tape securely
- — Apply heat (385–428°F), pressure, and dwell time (45–90 sec)
- — Peel transfer; inspect; cool; quality check
When each step is executed correctly, dye sublimation delivers unmatched color vibrancy, durability, and detail — making it the preferred process for premium custom print products worldwide.
قد يعجبك أيضًا: